環境搭建
安裝node
官網下載安裝包,傻瓜式安裝:https://nodejs.org/zh-cn/安裝cnpm
npm install -g cnpm --registry=https://registry.npm.taobao.org安裝腳手架
cnpm install -g @vue/cli清空緩存處理
npm cache clean --force項目的創建
創建項目
vue creat 項目名
// 要提前進入目標目錄(項目應該創建在哪個目錄下)
// 選擇自定義方式創建項目,選取Router, Vuex插件
啟動/停止項目
npm run serve / ctrl+c
// 要提前進入項目根目錄
打包項目
npm run build
// 要在項目根目錄下進行打包操作
認識項目
項目目錄
dist: 打包的項目目錄(打包后會生成)
node_modules: 項目依賴
public: 共用資源
src: 項目目標,書寫代碼的地方-- assets:資源-- components:組件-- views:視圖組件-- App.vue:根組件-- main.js: 入口js-- router.js: 路由文件-- store.js: 狀態庫文件
vue.config.js: 項目配置文件(沒有可以自己新建)
配置文件:vue.config.js
module.exports={devServer: {port: 8888}
}
// 修改端口,選做
main.js
new Vue({el: "#app",router: router,store: store,render: function (h) {return h(App)}
})
.vue文件
<template><!-- 模板區域 -->
</template>
<script>// 邏輯代碼區域// 該語法和script綁定出現export default {}
</script>
<style scoped>/* 樣式區域 *//* scoped表示這里的樣式只適用于組件內部, scoped與style綁定出現 */
</style>
項目功能
vue-router
{path: '/',name: 'home',// 路由的重定向redirect: '/home'
}{// 一級路由, 在根組件中被渲染, 替換根組件的<router-view/>標簽path: '/one-view',name: 'one',component: () => import('./views/OneView.vue')
}{// 多級路由, 在根組件中被渲染, 替換根組件的<router-view/>標簽path: '/one-view/one-detail',component: () => import('./views/OneDetail.vue'),// 子路由, 在所屬路由指向的組件中被渲染, 替換該組件(OneDetail)的<router-view/>標簽children: [{path: 'show',component: () => import('./components/OneShow.vue')}]
}
<!-- router-link渲染為a標簽 -->
<router-link to="/">Home</router-link> |
<router-link to="/about">About</router-link> |
<router-link :to="{name: 'one'}">One</router-link> |<!-- 為路由渲染的組件占位 -->
<router-view />
a.router-link-exact-active {color: #42b983;
}
// router的邏輯轉跳
this.$router.push('/one-view')// router采用history方式訪問上一級
this.$router.go(-1)
vuex
// 在任何一個組件中,均可以通過this.$store.state.msg訪問msg的數據
// state永遠只能擁有一種狀態值
state: {msg: "狀態管理器"
},
// 讓state擁有多個狀態值
mutations: {// 在一個一個組件中,均可以通過this.$store.commit('setMsg', new_msg)來修改state中的msgsetMsg(state, new_msg) {state.msg = new_msg}
},
// 讓mutations擁有多個狀態值
actions: {}
vue-cookie
// 安裝cookie的命令
// npm install vue-cookie --save
// 為項目配置全局vue-cookie
import VueCookie from 'vue-cookie'
// 將插件設置給Vue原型,作為全局的屬性,在任何地方都可以通過this.$cookie進行訪問
Vue.prototype.$cookie = VueCookie
// 持久化存儲val的值到cookie中
this.$cookie.set('val', this.val)
// 獲取cookie中val字段值
this.$cookie.get('val')
axios
// 安裝 axios(ajax)的命令
// npm install axios--save
// 為項目配置全局axios
import Axios from 'axios'
Vue.prototype.$ajax = Axios
let _this = this
this.$ajax({method: 'post',url: 'http://127.0.0.1:5000/loginAction',params: {usr: this.usr,ps: this.ps}
}).then(function(res) {// this代表的是回調then這個方法的調用者(axios插件),也就是發生了this的重指向// 要更新頁面的title變量,title屬于vue實例// res為回調的對象,該對象的data屬性就是后臺返回的數據_this.title = res.data
}).catch(function(err) {window.console.log(err)
})
# 用pycharm啟動該文件模擬后臺
from flask import Flask, request, render_template
from flask_cors import CORS
app = Flask(__name__)
CORS(app, supports_credentials=True)@app.route('/')
def index():return "<h1>主頁</h1>"@app.route('/loginAction', methods=['GET', 'POST'])
def test_action():# print(request.args)# print(request.form)# print(request.values)usr = request.args['usr']ps = request.args['ps']if usr != 'abc' or ps != '123':return 'login failed'return 'login success'if __name__ == '__main__':app.run()
import和require的區別
import一定要放在文件頂部,他相當于一個指針引用了文件,并沒有吧文件包含進來,需要調用文件時才引入
require可以吧文件放在任何位置,他是吧文件直接包含進來
設置文件路徑的流程
1)建立組件(.vue的文件)
2)配置路由(index.js文件中配置)
3)<router-link></router-link>
4)<router-view></router-view>
5)import 包名 from "組件路徑"
6)comonents進行注冊
實現異步加載
//異步
vue-resource:實現異步加載數據(已經棄用)
axios:實現異步加載數據
npm install axios --save-dev
npm install vue-axios --save-dev
VUE的生命周期
1、定義vue對象并實例化
2、執行created函數
3、編譯模板,只會編譯template的模板
4、吧HTML元素渲染到頁面當中
5、執行mounted函數,(加載)相當于onload
6、如果有元素的更新,就執行update函數
7、銷毀實例
項目實戰
仿抽屜網站
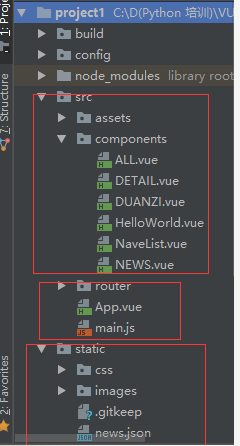
ALL.vue


 1 <template>2   <div class='box'>3     <ul>4       <li v-for='item in arr'>5         <div class='p1'>6           <router-link :to="{path:'/detail',query:{ids:item.id}}">{{item.content}} </router-link>7         </div>8         <div class="p2">9           <img :src="item.imgUrl">
10         </div>
11       </li>
12
13     </ul>
14
15   </div>
16 </template>
17
18 <script>
19   export default {
20     name: 'HelloWorld',
21     data () {
22       return {
23         arr: []
24       }
25     },
26     mounted () {
27       var url = '../../static/news.json'
28       var self=this;
29       this.$axios.get(url)
30         .then(function (response) {
31           console.log(response.data.result.data);
32           self.arr = response.data.result.data;
33         })
34         .catch(function (error) {
35           console.log(error);
36         })
37     }
38   }
39 </script>
40
41 <!-- Add "scoped" attribute to limit CSS to this component only -->
42 <style scoped>
43   h1, h2 {
44     font-weight: normal;
45   }
46
47   ul {
48     list-style-type: none;
49     padding: 0;
50   }
51
52   li {
53     display: inline-block;
54     margin: 0 10px;
55   }
56
57   a {
58     color: #42b983;
59   }
60 .box{
61   width: 980px;
62 }
63 .p1{
64   float:left;
65   width:780px;
66 }
67  img{
68   float:right;
69  }
70 </style> DETAIL.vue
 1 <template>2   <div class="box">3     <h1>我是詳細頁面{{id}}</h1>4     <ul>5       <li>6         <div class="p1">7           {{obj.content}}8         </div>9         <div class="p2">
10           <img :src="obj.imgUrl">
11         </div>
12
13       </li>
14     </ul>
15   </div>
16 </template>
17
18 <script>
19   export default {
20     name: 'Detail',
21     data () {
22       return {
23           obj:{} ,
24           id:this.$route.query.ids
25       }
26     },
27     mounted(){
28       var url = "../../static/news.json"
29       var self =this;
30       this.$axios.get(url,{
31           params:{id:this.id}
32       })
33         .then(function (response) {
34           //console.log(response.data.result.data);
35           self.obj = response.data.result.data[0];
36         })
37         .catch(function (error) {
38           console.log(error);
39         })
40     }
41   }
42 </script>
43
44 <!-- Add "scoped" attribute to limit CSS to this component only -->
45 <style scoped>
46   h1, h2 {
47     font-weight: normal;
48   }
49
50   ul {
51     list-style-type: none;
52     padding: 0;
53   }
54
55   li {
56     display: inline-block;
57     margin: 0 10px;
58   }
59
60   a {
61     color: #42b983;
62   }
63   .box{
64     width: 980px;
65   }
66
67   .p1{
68     float:left;
69     width:700px;
70   }
71   .p2{
72     float:right;
73   }
74 </style> DUANZI.vue
 1 <template>2   <div>3     <h1> 我是段子手</h1>4   </div>5 </template>6 7 <script>8 export default {9   name: 'HelloWorld',
10   data () {
11     return {
12
13     }
14   }
15 }
16 </script>
17
18 <!-- Add "scoped" attribute to limit CSS to this component only -->
19 <style scoped>
20 h1, h2 {
21   font-weight: normal;
22 }
23 ul {
24   list-style-type: none;
25   padding: 0;
26 }
27 li {
28   display: inline-block;
29   margin: 0 10px;
30 }
31 a {
32   color: #42b983;
33 }
34 </style> NaveList.vue
 1 <template>2   <div>3     <router-link to="/">首頁</router-link>4     <router-link to="/news">新聞</router-link>5     <router-link to="/duanzi">段子</router-link>6   </div>7 </template>8 9 <script>
10 export default {
11   name: 'HelloWorld',
12   data () {
13     return {
14
15     }
16   }
17 }
18 </script>
19
20 <!-- Add "scoped" attribute to limit CSS to this component only -->
21 <style scoped>
22 h1, h2 {
23   font-weight: normal;
24 }
25 ul {
26   list-style-type: none;
27   padding: 0;
28 }
29 li {
30   display: inline-block;
31   margin: 0 10px;
32 }
33 a {
34   color: #42b983;
35 }
36 </style> NEWS.vue
 1 <template>2   <div>3     <h1> 我是新聞</h1>4 5   </div>6 </template>7 8 <script>9 export default {
10   name: 'HelloWorld',
11   data () {
12     return {
13
14     }
15   }
16 }
17 </script>
18
19 <!-- Add "scoped" attribute to limit CSS to this component only -->
20 <style scoped>
21 h1, h2 {
22   font-weight: normal;
23 }
24 ul {
25   list-style-type: none;
26   padding: 0;
27 }
28 li {
29   display: inline-block;
30   margin: 0 10px;
31 }
32 a {
33   color: #42b983;
34 }
35 </style> index.js
 1 import Vue from 'vue'2 import Router from 'vue-router'3 import HelloWorld from '@/components/HelloWorld'4 import ALL from '@/components/All'5 import NEWS from '@/components/NEWS'6 import DUANZI from '@/components/duanzi'7 import Detail from '@/components/Detail'8 9 Vue.use(Router)
10
11 export default new Router({
12   routes: [
13     {
14       path: '/hw',
15       name: 'HelloWorld',
16       component: HelloWorld
17     },
18     {
19       path: '/',
20       name: 'ALL',
21       component: ALL
22     },
23     {
24       path: '/news',
25       name: 'NEWS',
26       component: NEWS
27     },
28     {
29       path: '/duanzi',
30       name: 'duanzi',
31       component: DUANZI
32     },
33     {
34       path: '/detail',
35       name: 'Detail',
36       component: Detail
37     },
38
39
40   ]
41 }) App.vue
 1 <template>2   <div id="app">3   <NavList></NavList>4     <router-view></router-view>5   </div>6 </template>7 8 <script>9 import NavList from './components/NavList'
10 export default {
11   name: 'App',
12   components: {NavList}
13 }
14 </script>
15
16 <style>
17 #app {
18   font-family: 'Avenir', Helvetica, Arial, sans-serif;
19   -webkit-font-smoothing: antialiased;
20   -moz-osx-font-smoothing: grayscale;
21   text-align: center;
22   color: #2c3e50;
23   margin-top: 60px;
24 }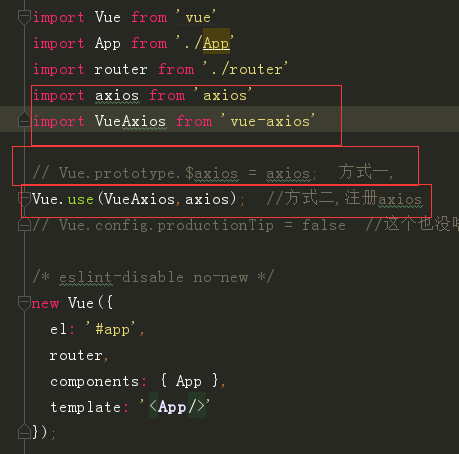
25 </style> main.js
 1 // The Vue build version to load with the `import` command2 // (runtime-only or standalone) has been set in webpack.base.conf with an alias.3 import Vue from 'vue'4 import App from './App'5 import router from './router'6 import axios from 'axios'7 import VueAxios from 'vue-axios'8 9 Vue.prototype.$axios = axios;
10
11 //Vue.use(axios, VueAxios)
12 //Vue.config.productionTip = false
13
14 /* eslint-disable no-new */
15 new Vue({
16   el: '#app',
17   router,
18   components: { App },
19   template: '<App/>'
20 }) ?項目需要注意的問題
問題一:在手動執行webpack?app/a.js?publicndle.js打包時出錯的解決方法需要修改為:?require("style-loader!css-loader!./style.css")
問題2:腳手架生成項目后,運行?npm?run?dev啟動項目后,
? ? ? ? ? ? ?如果想把地址欄中的??#去掉,如:http://localhost:8080/#/news,需要在
? ? ? ? ? ? ?router文件夾下的index.js文件中,加入?mode:?"history"
? ? ? ? ? ? ?如果想把地址欄中的??#去掉,如:http://localhost:8080/#/news,需要在
? ? ? ? ? ? ?router文件夾下的index.js文件中,加入?mode:?"history"
問題三:引入axios的2種方法:
需要在main.js中進行設置:這2種方法都可以,但引用順序不能翻轉。
?
?


- mysql 的安裝)

)
)


)

