SpringBoot整合Redis
- 1、SpringBoot整合redis
- 1.1 pom.xml
- 1.2 application.yml
- 1.3 配置類RedisConfig,實現RedisTemplate序列化
- 1.4 代碼測試
- 2、SpringBoot整合redis幾個疑問?
- 2.1、Redis 連接池講解
- 2.2、RedisTemplate和StringRedisTemplate
- 3、RedisTemplate
1、SpringBoot整合redis
1.1 pom.xml
<dependencies><dependency><groupId>org.springframework.boot</groupId><artifactId>spring-boot-starter-web</artifactId></dependency><dependency><groupId>org.springframework.boot</groupId><artifactId>spring-boot-starter-test</artifactId><scope>test</scope></dependency><dependency><groupId>junit</groupId><artifactId>junit</artifactId><scope>test</scope></dependency><dependency><groupId>org.mybatis.spring.boot</groupId><artifactId>mybatis-spring-boot-starter</artifactId></dependency><dependency><groupId>mysql</groupId><artifactId>mysql-connector-java</artifactId></dependency><dependency><groupId>org.projectlombok</groupId><artifactId>lombok</artifactId></dependency><!--redis相關依賴--><dependency><groupId>org.springframework.boot</groupId><artifactId>spring-boot-starter-data-redis</artifactId></dependency><dependency><groupId>org.apache.commons</groupId><artifactId>commons-pool2</artifactId></dependency></dependencies>
1.2 application.yml
server:port: 8080spring:datasource:driver-class-name: com.mysql.cj.jdbc.Driverusername: rootpassword: rooturl: jdbc:mysql://127.0.0.1:3306/alarm?useUnicode=true&autoReconnect=true&failOverReadOnly=false&characterEncoding=UTF-8&allowMultiQueries=true&useSSL=false&serverTimezone=Asia/Shanghai&zeroDateTimeBehavior=CONVERT_TO_NULLredis:host: 127.0.0.1port: 6379password:database: 0timeout: 1000mslettuce:pool:max-active: 8 # 連接池最大連接數max-idle: 8 # 連接池最大空閑連接數min-idle: 0 # 連接池最小空閑連接數max-wait: -1ms # 連接池最大阻塞等待時間,負值表示沒有限制mybatis:type-aliases-package: cn.yx.zg.pojomapperLocations: classpath:mappers/*.xml
1.3 配置類RedisConfig,實現RedisTemplate序列化
import com.fasterxml.jackson.annotation.JsonAutoDetect;
import com.fasterxml.jackson.annotation.PropertyAccessor;
import com.fasterxml.jackson.databind.ObjectMapper;
import org.springframework.context.annotation.Bean;
import org.springframework.context.annotation.Configuration;
import org.springframework.data.redis.connection.RedisConnectionFactory;
import org.springframework.data.redis.core.RedisTemplate;
import org.springframework.data.redis.serializer.Jackson2JsonRedisSerializer;
import org.springframework.data.redis.serializer.RedisSerializer;
import org.springframework.data.redis.serializer.StringRedisSerializer;
/*** redisConfig** @author zhanggang* @since 2023/11/18 19:15*/
@Configuration
public class RedisConfig {@Beanpublic RedisTemplate<String, Object> redisTemplate(RedisConnectionFactory factory) {RedisTemplate<String, Object> template = new RedisTemplate<>();RedisSerializer<String> redisSerializer = new StringRedisSerializer();Jackson2JsonRedisSerializer jackson2JsonRedisSerializer = new Jackson2JsonRedisSerializer(Object.class);ObjectMapper om = new ObjectMapper ();om.setVisibility(PropertyAccessor.ALL, JsonAutoDetect.Visibility.ANY);om.enableDefaultTyping(ObjectMapper.DefaultTyping.NON_FINAL);jackson2JsonRedisSerializer.setObjectMapper(om);template.setConnectionFactory(factory);//key序列化方式template.setKeySerializer(redisSerializer);//value序列化template.setValueSerializer(jackson2JsonRedisSerializer);//key hashmap序列化template.setHashKeySerializer (redisSerializer);//value hashmap序列化template.setHashValueSerializer(jackson2JsonRedisSerializer);return template;}
}
1.4 代碼測試
經過上面三個步驟的配置,已經把Redis和SpringBoot整合好了,使用下面代碼,既可以操作Redis了。import cn.yx.zg.SpringBootMybatisApplication;
import org.junit.Test;
import org.junit.runner.RunWith;
import org.springframework.beans.factory.annotation.Autowired;
import org.springframework.boot.test.context.SpringBootTest;
import org.springframework.data.redis.core.RedisTemplate;
import org.springframework.test.context.junit4.SpringRunner;/*** @author zhanggang* @since 2023/11/21 10:29*/
@SpringBootTest(classes = SpringBootMybatisApplication.class)
@RunWith(SpringRunner.class)
public class RedisTest {@Autowiredprivate RedisTemplate redisTemplate;@Autowiredprivate StringRedisTemplate stringRedisTemplate;@Testpublic void testRedis01() {redisTemplate.opsForValue().set("name", "zg");}
}
2、SpringBoot整合redis幾個疑問?
2.1、Redis 連接池講解
Redis 的客戶端,常用的有兩種:Jedis 和 Lettuce。Spring Boot 1.5.x 版本,默認的 Redis 客戶端,實現上是直接連接 Redis Server,如果在多線程環境下是非線程安全的,這時候要使用連接池為每個 jedis 實例增加物理連接;
Lettuce:Spring Boot 2.x 版本后默認的 Redis 客戶端,基于 Netty 實現,連接實例可以在多個線程間并發訪問,一個連接實例不夠的情況下也可以按需要增加連接實例。
上面代碼是實現了Lettuce連接池,直接哪來用就行。
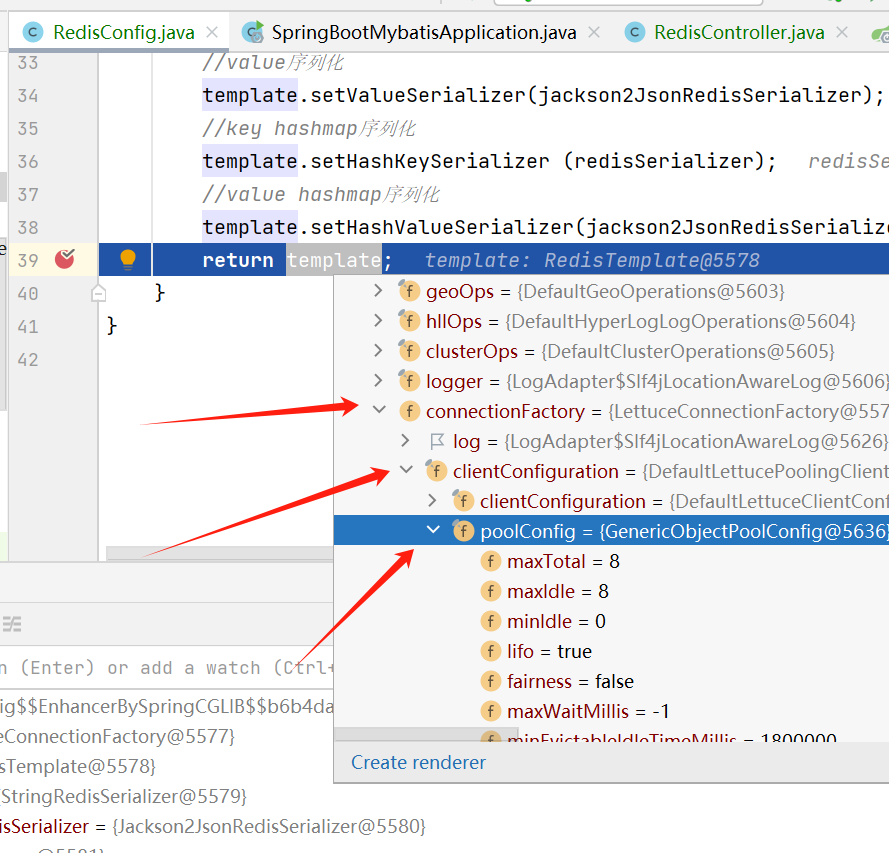
如下圖,通過debug可以看出是使用了Lettuce連接池。
2.2、RedisTemplate和StringRedisTemplate
RedisTemplate實際就是類似java的jdbc,封裝了對redis操作的一些方法。在1.3 新建配置類RedisConfig中,我們給RedisTemplate進行了序列化,為什么要序列化呢?如果不序列化,我們通過RedisTemplate存到redis的數據,都是是二進制存儲的。你只用把我那個配置直接哪來用就可以了。
StringRedisTemplate一般只用來存儲key和value都是String類型,當存入對象時,會報錯 :can not cast into String。
RedisTemplate則是既可以存字符串又可以存對象,一般我們都使用RedisTemplate就夠用了。


系統源碼)


| 設備管理-- 端口 驅動程序 基本I/O控制 磁盤I/O)


- 類型支持 (類型修改,添加 const 或/與 volatile 限定符到給定類型,std::add_cv))


系統部署的重要性)


