? ? 在軟件工程的開發流程中,持續集成是保障代碼質量與開發效率的關鍵環節。本章將圍繞持續集成的各個方面展開詳細講解,結合 Java 代碼示例與可視化圖表,幫助讀者深入理解并實踐相關知識。
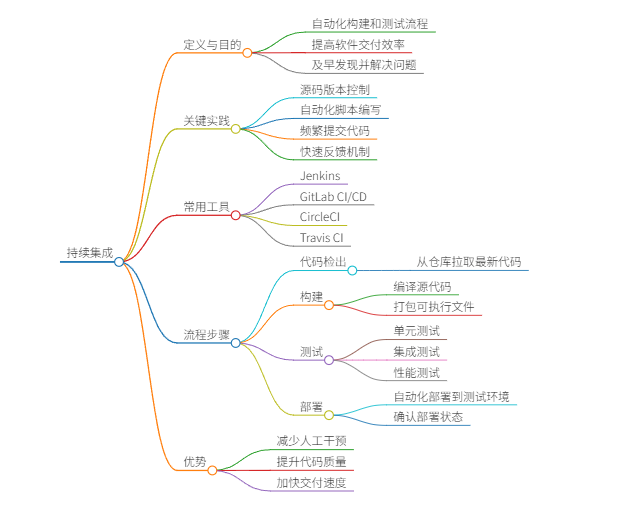
14.1 持續集成概述
14.1.1 持續集成的相關概念
? ?持續集成(Continuous Integration,CI)是一種軟件開發實踐,團隊成員頻繁地將代碼集成到共享倉庫中,每次集成都會通過自動化構建和測試,以快速發現集成錯誤。它強調盡早發現問題、快速反饋,從而提高開發效率和代碼質量。
14.1.2 持續集成的過程與管道
? ?持續集成的過程通常包含代碼提交、構建、測試和反饋幾個步驟,這些步驟構成了持續集成管道。用 繪制的持續集成管道流程圖如下):
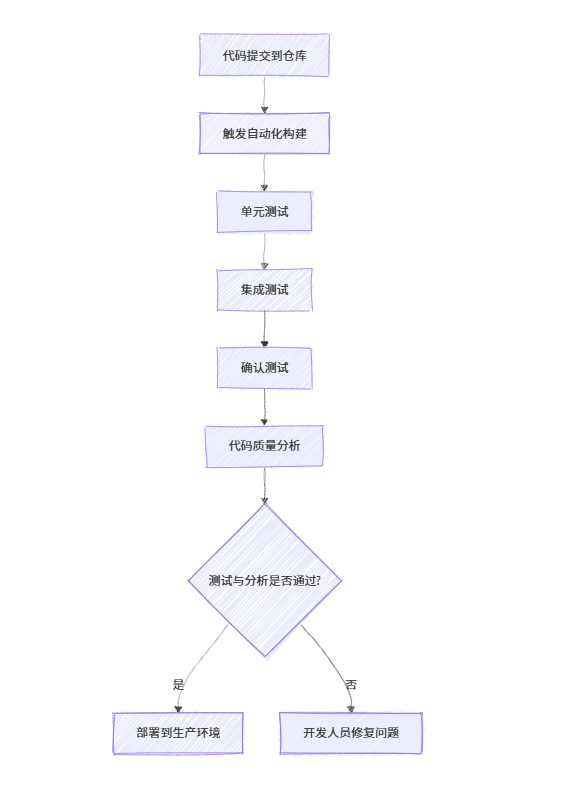
? ? ? ? ? ? ? ? ? ? ? ? ? ? ? ? ? ? ? ? ? ? ? ? ? ? ? ? ? 持續集成管道流程圖
14.1.3 持續集成的價值
- 減少集成問題:頻繁集成使得問題能在早期被發現,避免大規模集成時出現難以排查的問題。
- 提升代碼質量:自動化測試和代碼質量分析,能夠及時發現代碼中的缺陷和不符合規范的地方。
- 加速交付:快速的反饋機制幫助開發人員更快修復問題,縮短軟件交付周期。
14.2 版本控制
14.2.1 集中與分布式版本控制
- 集中式版本控制:如 CVS、SVN,所有版本數據都存儲在中央服務器,客戶端僅保存工作副本,依賴網絡連接。
- 分布式版本控制:以 Git 為代表,每個客戶端都保存完整的版本庫,支持離線操作,分支管理靈活。
14.2.2 版本控制的主線與分支
在 Git 中,常見的分支策略包含主線(master)、開發線(develop)和功能分支(feature):
- master 分支:存放穩定的、可發布的代碼,僅從其他分支合并代碼。
- develop 分支:作為日常開發的主分支,所有功能分支都從這里拉出,并最終合并回 develop 分支。
- feature 分支:用于開發具體功能,開發完成后合并到 develop 分支。
14.2.3 功能開關
? ? 功能開關(Feature Toggle)允許在不修改代碼的情況下,控制功能的可見性。在 Java 中可以通過配置文件實現簡單的功能開關,示例代碼如下:
import java.io.IOException;import java.io.InputStream;import java.util.Properties;public class FeatureToggle {private static final String CONFIG_FILE = "config.properties";private static Properties properties;static {properties = new Properties();try (InputStream inputStream = FeatureToggle.class.getClassLoader().getResourceAsStream(CONFIG_FILE)) {if (inputStream != null) {properties.load(inputStream);} else {throw new IOException("配置文件未找到");}} catch (IOException e) {e.printStackTrace();}}public static boolean isFeatureEnabled(String featureName) {String enabled = properties.getProperty(featureName);return "true".equalsIgnoreCase(enabled);}}在config.properties文件中配置:
new_feature_enabled=true
使用時:
public class Main {public static void main(String[] args) {if (FeatureToggle.isFeatureEnabled("new_feature_enabled")) {System.out.println("新功能已啟用");} else {System.out.println("新功能未啟用");}}}14.3 構建
? ?構建過程是將源代碼轉換為可運行軟件的過程,常用的構建工具包括 Maven 和 Gradle。以 Maven 為例,在pom.xml中配置構建相關信息:
<project xmlns="http://maven.apache.org/POM/4.0.0"xmlns:xsi="http://www.w3.org/2001/XMLSchema-instance"xsi:schemaLocation="http://maven.apache.org/POM/4.0.0 http://maven.apache.org/xsd/maven-4.0.0.xsd"><modelVersion>4.0.0</modelVersion><groupId>com.example</groupId><artifactId>demo-project</artifactId><version>1.0-SNAPSHOT</version><build><plugins><plugin><groupId>org.apache.maven.plugins</groupId><artifactId>maven-compiler-plugin</artifactId><version>3.8.1</version><configuration><source>1.8</source><target>1.8</target></configuration></plugin><plugin><groupId>org.apache.maven.plugins</groupId><artifactId>maven-jar-plugin</artifactId><version>3.2.0</version><configuration><archive><manifest><mainClass>com.example.Main</mainClass></manifest></archive></configuration></plugin></plugins></build><dependencies><!-- 依賴配置 --></dependencies></project>執行mvn clean install命令,即可完成編譯、測試、打包等構建操作。
14.4 測試
14.4.1 單元測試自動化
? ?單元測試用于測試最小的可測試單元,在 Java 中常用 JUnit 框架。以一個簡單的計算器類為例,編寫單元測試:
// 被測試類public class Calculator {public int add(int a, int b) {return a + b;}public int subtract(int a, int b) {return a - b;}}單元測試代碼:import org.junit.jupiter.api.Test;import static org.junit.jupiter.api.Assertions.*;public class CalculatorTest {@Testpublic void testAdd() {Calculator calculator = new Calculator();assertEquals(5, calculator.add(2, 3));}@Testpublic void testSubtract() {Calculator calculator = new Calculator();assertEquals(1, calculator.subtract(3, 2));}}14.4.2 集成測試自動化
? ? 集成測試用于測試多個模塊之間的交互,在 Spring Boot 項目中,可以使用@SpringBootTest注解進行集成測試:
import org.junit.jupiter.api.Test;import org.springframework.beans.factory.annotation.Autowired;import org.springframework.boot.test.context.SpringBootTest;import static org.junit.jupiter.api.Assertions.*;@SpringBootTestpublic class UserServiceIntegrationTest {@Autowiredprivate UserService userService;@Testpublic void testSaveUser() {User user = new User("testUser", "123456");userService.saveUser(user);assertNotNull(userService.getUserById(user.getId()));}}14.4.3 確認測試自動化
? ?確認測試用于驗證軟件是否滿足用戶需求,常使用 Selenium 進行 Web 應用的自動化測試:
import org.junit.jupiter.api.Test;import org.openqa.selenium.WebDriver;import org.openqa.selenium.chrome.ChromeDriver;import static org.junit.jupiter.api.Assertions.*;public class WebAppTest {@Testpublic void testWebAppTitle() {System.setProperty("webdriver.chrome.driver", "path/to/chromedriver");WebDriver driver = new ChromeDriver();driver.get("https://www.example.com");assertEquals("示例網站", driver.getTitle());driver.quit();}}14.5 代碼質量分析
? ?代碼質量分析工具可以幫助檢測代碼中的潛在問題,提升代碼質量。常見工具如 Checkstyle(檢查代碼格式)、PMD(檢測潛在缺陷)、SonarQube(綜合代碼質量管理平臺)。
以 Checkstyle 為例,在pom.xml中配置:
<build><plugins><plugin><groupId>org.apache.maven.plugins</groupId><artifactId>maven-checkstyle-plugin</artifactId><version>3.1.2</version><configuration><configLocation>checkstyle.xml</configLocation></configuration><executions><execution><id>validate</id><phase>validate</phase><goals><goal>check</goal></goals></execution></executions></plugin></plugins></build>在checkstyle.xml中定義代碼格式規則,執行mvn checkstyle:check命令即可檢查代碼格式是否符合規范。
14.6 發布與部署
? ?發布與部署是將軟件交付給用戶的最后一步,常見的部署策略有藍綠部署和金絲雀發布:
- 藍綠部署:同時運行兩個完全相同的生產環境,切換流量實現無縫升級。
- 金絲雀發布:先將新版本發布給一小部分用戶,觀察反饋后再逐步擴大范圍。
使用 Jenkins 進行自動化部署,可在 Jenkinsfile 中編寫部署腳本:
pipeline {agent anystages {stage('檢出代碼') {steps {git 'https://github.com/your-repository.git'}}stage('構建') {steps {sh 'mvn clean install'}}stage('部署') {steps {sh 'ssh user@server "cd /deploy/path && java -jar your-app.jar"'}}}}14.7 小結
? ? 本章全面介紹了持續集成的各個方面,從概念到具體實踐操作。持續集成通過版本控制、自動化構建、測試和代碼質量分析等環節,能夠有效提升軟件開發的效率和質量。在實際項目中,應根據項目需求選擇合適的工具和策略,建立穩定可靠的持續集成流程。同時,持續優化和改進持續集成過程,以適應項目的不斷發展。
以上內容全面覆蓋了持續集成的關鍵知識點。你若覺得某些部分需要更深入講解,或想補充其他內容,歡迎隨時和我說。
)


)