1. 自定義 Advisor
實際上,Advisor 可以看做是 Servlet 當中的“攔截器”,在大模型接收到 prompt 之前進行前置攔截增強(比如敏感詞校驗、記錄日志、鑒權),并在大模型返回響應之后進行后置攔截增強(比如記錄日志)官方已經提供了一系列 Advisor 可供插拔使用,但是接下來我們需要學習如何自定義 Advisor
1.1 自定義 Advisor 步驟
我們接下來就參考官方文檔來學習如何自定義 Advisor 在項目中使用:
📖 參考文檔:https://docs.spring.io/spring-ai/reference/api/advisors.html
1)步驟一:選擇合適的接口實現
- CallAroundAdvisor:用于處理同步的請求與響應(非流式)
- StreamAroundAdvisor:用于處理流式的請求與響應
更加建議兩者同時實現
2)步驟二:實現接口核心方法
- 對于非流式接口 CallAroundAdvisor 來說,需要實現 nextAroundCall 方法
- 對于流式接口 StreamAroundAdvisor 來說,需要實現 nextAroundStream 方法
3)步驟三:設置執行順序
通過重寫 getOrder 方法,返回的值越低,越先被執行
4)步驟四:設置唯一名稱
通過重寫 getName 方法,返回唯一標識符
1.2 實現 Logging Advisor
其實官方提供了一個 SimpleLoggerAdvisor 用于記錄日志,但是出于以下兩方面原因并沒有在項目中采用
- SimpleLoggerAdvisor 源碼中使用 debug 級別輸出日志,而 SpringBoot 默認忽略 debug 以下級別日志
- 自定義的 LoggerAdvisor 更加靈活,便于自定義日志
我們可以參考官方的示例,實現自定義的 Logging Advisor,參考代碼如下:
/*** 自定義日志Advisor* @author ricejson*/
public class MyLoggerAdvisor implements CallAroundAdvisor, StreamAroundAdvisor {private static final Logger logger = LoggerFactory.getLogger(MyLoggerAdvisor.class);@Overridepublic String getName() {return this.getClass().getSimpleName();}@Overridepublic int getOrder() {return 0;}@Overridepublic AdvisedResponse aroundCall(AdvisedRequest advisedRequest, CallAroundAdvisorChain chain) {// 調用前記錄請求日志logger.info("before req:{}", advisedRequest);// 調用執行鏈AdvisedResponse advisedResponse = chain.nextAroundCall(advisedRequest);// 調用后記錄響應日志logger.info("after resp:{}", advisedResponse);return advisedResponse;}@Overridepublic Flux<AdvisedResponse> aroundStream(AdvisedRequest advisedRequest, StreamAroundAdvisorChain chain) {// 調用前記錄請求日志logger.info("before req:{}", advisedRequest);// 調用執行鏈Flux<AdvisedResponse> flux = chain.nextAroundStream(advisedRequest);return new MessageAggregator().aggregateAdvisedResponse(flux, (advisedResponse) -> {// 調用后記錄響應日志logger.info("after resp:{}", advisedResponse);});}
}
需要特別注意的是 MessageAggregator消息聚合器對象將 Flux 類型聚合成單個 AdvisedResponse,是一種流式處理模式,我們在 ResumeApp 當中應用我們編寫的自定義 Advisior 觀察效果
public ResumeApp(ChatModel dashscopeChatModel) {ChatMemory chatMemory = new InMemoryChatMemory();this.chatClient = ChatClient.builder(dashscopeChatModel).defaultSystem("你是一位資深職業顧問與AI技術融合的【簡歷輔導大師】,擁有以下核心能力:\n" +"1. HR視角:熟悉ATS(招聘系統)篩選邏輯、500+行業崗位的簡歷關鍵詞庫\n" +"2. 實戰經驗:基于10萬份真實簡歷優化案例的決策模型\n" +"3. 教練模式:通過蘇格拉底式提問引導用戶自主發現簡歷問題") // 系統預設提示詞.defaultAdvisors(new MessageChatMemoryAdvisor(chatMemory), // 支持多輪對話new MyLoggerAdvisor()) // 自定義日志Advisor.build();
}
最終運行測試代碼,可以發現自定義的日志 Advisor 已經生效了!

1.3 實現 Re2 Advisor
讓我們繼續趁熱打鐵,再來學習官方文檔中的示例,再來實現一個 Re2 的自定義 Advisor 叭!Re2(全稱為Re-Reading)機制,簡單來說就是讓 AI 大模型重新閱讀用戶提示詞,來提升大模型的推理能力,例如:
{input_prompt}
reading the question again: {input_prompt}
💡 注意:雖然 Re2 技術能夠有效提升大模型的推理能力,但是帶來的是雙倍的成本(雙倍token)對于 C 端產品來說需要控制成本
自定義 Re2 Advisor 相關代碼如下:
/*** 自定義 ReReading Advisor* @author ricejson*/
public class MyReReadingAdvisor implements CallAroundAdvisor, StreamAroundAdvisor {@Overridepublic String getName() {return this.getClass().getSimpleName();}@Overridepublic int getOrder() {return -1;}/*** 實現ReReading邏輯* @return 返回ReReading之后的請求*/private AdvisedRequest reReading(AdvisedRequest advisedRequest) {Map<String, Object> userParams = new HashMap<>(advisedRequest.userParams());// 設置替換模板userParams.put("input_prompt", advisedRequest.userText());return AdvisedRequest.from(advisedRequest).userText("""{input_prompt}reading the question again: {input_prompt}""").userParams(userParams).build();}@Overridepublic AdvisedResponse aroundCall(AdvisedRequest advisedRequest, CallAroundAdvisorChain chain) {return chain.nextAroundCall(reReading(advisedRequest));}@Overridepublic Flux<AdvisedResponse> aroundStream(AdvisedRequest advisedRequest, StreamAroundAdvisorChain chain) {return chain.nextAroundStream(reReading(advisedRequest));}
}
我們繼續在 ResumeApp 當中應用我們編寫的自定義的 Advisor 觀察效果
public ResumeApp(ChatModel dashscopeChatModel) {ChatMemory chatMemory = new InMemoryChatMemory();this.chatClient = ChatClient.builder(dashscopeChatModel).defaultSystem("你是一位資深職業顧問與AI技術融合的【簡歷輔導大師】,擁有以下核心能力:\n" +"1. HR視角:熟悉ATS(招聘系統)篩選邏輯、500+行業崗位的簡歷關鍵詞庫\n" +"2. 實戰經驗:基于10萬份真實簡歷優化案例的決策模型\n" +"3. 教練模式:通過蘇格拉底式提問引導用戶自主發現簡歷問題") // 系統預設提示詞.defaultAdvisors(new MessageChatMemoryAdvisor(chatMemory), // 支持多輪對話new MyLoggerAdvisor(), // 自定義日志Advisornew MyReReadingAdvisor()) // 自定義ReReading Advisor.build();
}
最終運行測試代碼,可以發現自定義的 ReReading Advisor 已經生效了!

2. 結構化輸出
2.1 工作流程
Structured Output(結構化輸出)是Spring AI 另一個非常有用的機制,尤其是對于那些依賴可靠輸入的下游服務來說,結構化輸出可以將大模型的輸出結果轉化為特定的數據類型,比如 XML、JSON、POJO 等,結構化輸出的核心組件就是 Structured Output Converter(結構化輸出轉換器),核心數據流圖如下圖所示:
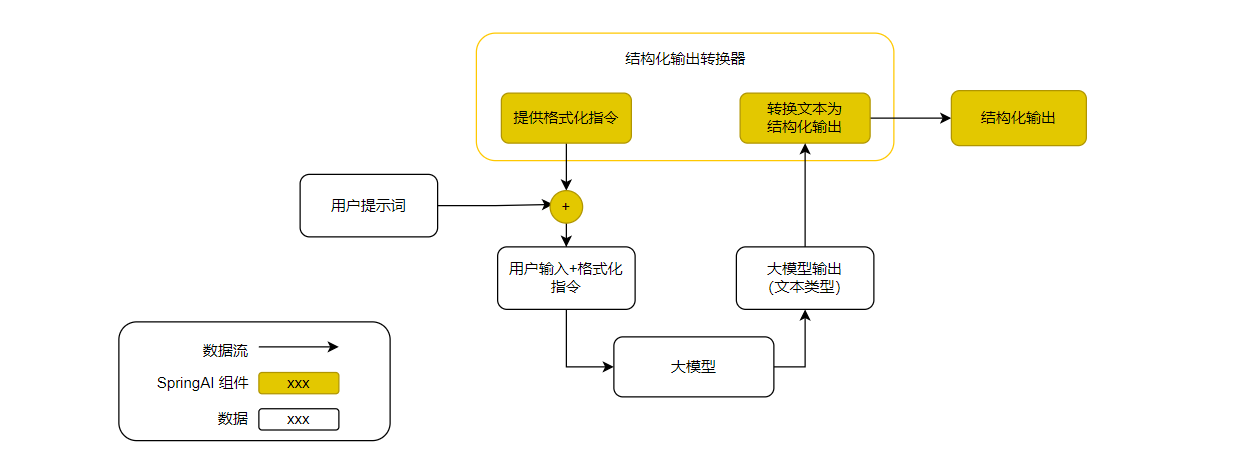
- 在調用大模型之前,轉換器會在用戶提示詞后追加格式化的指令信息,指導大模型輸出期望格式
- 在調用大模型之后,轉換器會解析文本輸出,并將其轉換為匹配的結構化實例,比如XML、JSON、POJO
? 注意:結構化輸出轉換器只是盡最大努力地將輸出結果轉換為結構化輸出,因為一方面某些大模型自身不支持結構化,另一方面大模型可能無法按照提示詞的指令轉換為結構化數據
2.2 API 設計
StructuredOutputConverter 接口繼承了兩個父接口,接口定義格式如下:
public interface StructuredOutputConverter<T> extends Converter<String, T>, FormatProvider {}
- FormatProvider:該接口用于提供指導性的格式化指令追加在用戶提示詞之后,類似格式如下:
Your response should be in JSON format.
The data structure for the JSON should match this Java class: java.util.HashMap
Do not include any explanations, only provide a RFC8259 compliant JSON response following this format without deviation.
- Converter:該接口則專注于將模型輸出的文本內容轉換為特定的目標類型
SpringAI 提供了一系列的轉換器可供使用:
- AbstructMessageOutputConverter:略
- AbstructConversionServiceOutputConverter:略
- MapOutputCoverter:用于將輸出轉換為 map 類型
- BeanOutputConverter:使用 ObjectMapper 將輸出轉換為 Java Bean 類型
- ListOutputConverter:用于將輸出轉換為 List 類型

2.3 使用示例
官方文檔提供了非常多的使用示例,下面簡單進行介紹:
1)使用 BeanOutputConverter 轉換為 Bean
// 定義動作電影類
record ActorsFilms(String actor, List<String> movies) {
}ActorsFilms actorsFilms = ChatClient.create(chatModel).prompt().user(u -> u.text("Generate the filmography of 5 movies for {actor}.").param("actor", "Tom Hanks")).call().entity(ActorsFilms.class);
其實我們還可以通過ParameterizedTypeReference構造函數來指定更加復雜的結構,比如:
// 定義動作電影類
record ActorsFilms(String actor, List<String> movies) {
}List<ActorsFilms> actorsFilms = ChatClient.create(chatModel).prompt().user("Generate the filmography of 5 movies for Tom Hanks and Bill Murray.").call().entity(new ParameterizedTypeReference<List<ActorsFilms>>() {});
2)使用 MapOutputConverter 轉換為 Map 結構
Map<String, Object> result = ChatClient.create(chatModel).prompt().user(u -> u.text("Provide me a List of {subject}").param("subject", "an array of numbers from 1 to 9 under they key name 'numbers'")).call().entity(new ParameterizedTypeReference<Map<String, Object>>() {});
3)使用 ListOutputConverter 轉換為 List 結構
List<String> flavors = ChatClient.create(chatModel).prompt().user(u -> u.text("List five {subject}").param("subject", "ice cream flavors")).call().entity(new ListOutputConverter(new DefaultConversionService()));
3. 對話記憶持久化
3.1 基礎概念
前面我們已經使用InMemoryChatMemory基于內存的方式來保存對話上下文信息,但是如果這時候服務器重啟了,對話記憶就會消失,這時候我們就會想到通過文件、數據庫、redis 中進行持久化存儲,應該怎么實現呢?
SpringAI 提供了以下兩種思路:
- 使用現有提供的依賴,比如官方提供了一些第三方數據庫的整合支持
- InMemoryChatMemory:基于內存存儲
- CassandraChatMemory:基于Cassandra 進行存儲
- Neo4jChatMemory:基于 Neo4j 進行存儲
- JdbcChatMeory:基于 JDBC 關系數據庫進行存儲
- 自定義提供 ChatMemory 的實現
這里我推薦直接造輪子,使用自定義的 ChatMemory ,Spring AI 的對話記憶功能實現的非常精巧,將記憶存儲與記憶算法解耦合,即我們只需要提供自定義的 ChatMemory 來改變存儲位置而無需關心記憶算法如何實現的,另外雖然官方文檔沒有提供自定義 ChatMemory 的使用示例,但是我們可以參考InMemoryChatMemory的源碼
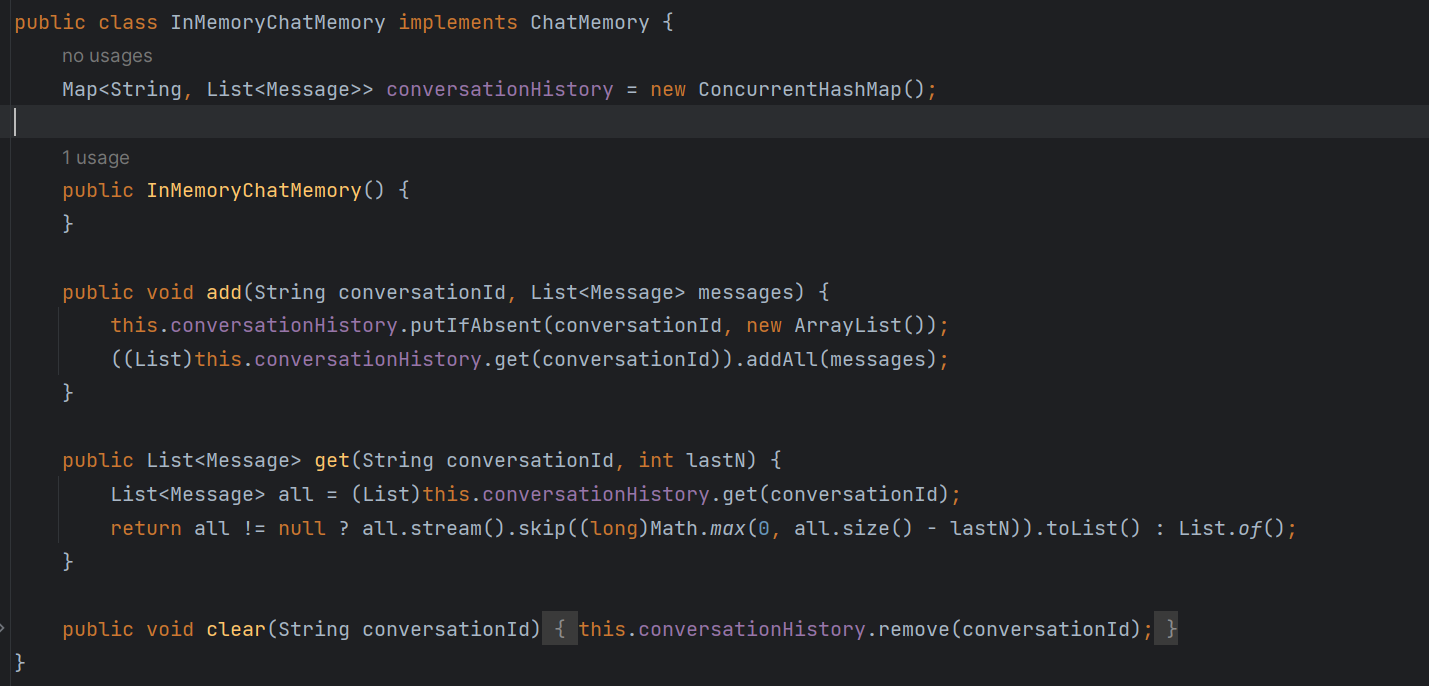
其實不難發現,自定義 ChatMemory 只需要實現 ChatMeory 接口并實現相應的增刪查方法邏輯即可!下面我們就來提供一種文件存儲的方式提供自定義的 ChatMemory
3.2 自定義文件存儲
我們本能的會想到使用 JSON 序列化來保存到文件,但是實現起來非常麻煩,原因有如下幾點:
- Message 接口有眾多實現類,比如 UserMessage、SystemMessage
- 不同實現類字段都不統一
- 子類都沒有無參構造方法,也沒有實現 Serializable 接口
因此我們考慮使用高性能的序列化庫 Kryo 來完成序列化的任務,具體步驟如下:
1)引入 Kryo 依賴:
<!-- Kryo 序列化依賴 -->
<dependency><groupId>com.esotericsoftware</groupId><artifactId>kryo</artifactId><version>5.6.2</version>
</dependency>
2)實現自定義文件存儲記憶類:
/*** 自定義文件記憶存儲* @author ricejson*/
public class MyFileChatMemory implements ChatMemory {private static final Kryo kryo = new Kryo();private final File BASE_FILE;static {kryo.setRegistrationRequired(false);// 設置實例化策略kryo.setInstantiatorStrategy(new StdInstantiatorStrategy());}public MyFileChatMemory(String dir) {this.BASE_FILE = new File(dir);// 如果根路徑不存在就創建if (!BASE_FILE.exists()) {BASE_FILE.mkdirs();}}@Overridepublic void add(String conversationId, Message message) {// 找到對應文件File file = getFile(conversationId);// 獲取文件中原先的消息列表List<Message> messageList = getMessageList(file);// 追加新文件后寫入messageList.add(message);saveMessageList(file, messageList);}@Overridepublic void add(String conversationId, List<Message> messages) {// 獲取目標文件File file = getFile(conversationId);// 獲取原先的消息列表List<Message> messageList = getMessageList(file);// 追加新的消息messageList.addAll(messages);// 寫入saveMessageList(file, messageList);}@Overridepublic List<Message> get(String conversationId, int lastN) {// 根據conversationId 查找對應文件File file = getFile(conversationId);List<Message> messageList = getMessageList(file);return messageList.stream().skip(Math.max(0, messageList.size() - lastN)).toList();}@Overridepublic void clear(String conversationId) {// 獲取文件File file = getFile(conversationId);// 清除文件if (file.exists()) {file.delete();}}private void saveMessageList(File file, List<Message> messageList) {try(Output output = new Output(new FileOutputStream(file))) {kryo.writeObject(output, messageList);} catch (FileNotFoundException e) {e.printStackTrace();}}private static List<Message> getMessageList(File file) {List<Message> messageList = new ArrayList<>();if (file.exists()) {// 讀取文件try (Input input = new Input(new FileInputStream(file))) {messageList = kryo.readObject(input, ArrayList.class);} catch (FileNotFoundException e) {e.printStackTrace();}}return messageList;}@NotNullprivate File getFile(String conversationId) {File file = new File(this.BASE_FILE, conversationId + ".kryo");return file;}
}
3)修改 ResumeApp 類構造方法:
public ResumeApp(ChatModel dashscopeChatModel) {// 修改成文件存儲記憶ChatMemory chatMemory = new MyFileChatMemory(System.getProperty("user.dir") + "/tmp/");this.chatClient = ChatClient.builder(dashscopeChatModel).defaultSystem("你是一位資深職業顧問與AI技術融合的【簡歷輔導大師】,擁有以下核心能力:\n" +"1. HR視角:熟悉ATS(招聘系統)篩選邏輯、500+行業崗位的簡歷關鍵詞庫\n" +"2. 實戰經驗:基于10萬份真實簡歷優化案例的決策模型\n" +"3. 教練模式:通過蘇格拉底式提問引導用戶自主發現簡歷問題") // 系統預設提示詞.defaultAdvisors(new MessageChatMemoryAdvisor(chatMemory), // 支持多輪對話new MyLoggerAdvisor(), // 自定義日志Advisornew MyReReadingAdvisor()) // 自定義ReReading Advisor.build();
}
4)測試:

4. 提示詞模板
4.1 基礎概念
接下來要講的是 PromptTemplate(提示詞模板),這是 Spring AI 當中用于管理和構建提示詞的組件,允許用戶定義帶占位符的提示詞,然后在程序動態運行過程中替換占位符,示例代碼如下:
// 帶占位符的提示詞模板
String template = "你好,{name},今天是{day},天氣:{weather}";
PromptTemplate promptTemplate = new PromptTemplate(template);
// 準備變量映射
Map<String, Object> variables = new HashMap<>();
variables.put("name", "米飯");
variables.put("day", "星期一");
variables.put("weather", "晴朗");
// 生成最終提示文本
String prompt = promptTemplate.render(variables);
💡 提示:模板思想在編程世界中有大量運用,比如模板引擎、日志占位符、SQL預編譯語句
PromptTemplate 在以下場景中非常有用:
- A/B測試:能夠輕松對比測試結果
- 多語言支持:可重用內容,動態替換替換語言部分
- 用戶交互場景:根據上下文語境定制提示詞
- 提示詞版本管理:便于提示詞版本控制
4.2 實現原理
這里簡單介紹,Spring AI 當中的 Prompt Template 底層基于 OSS String Template 模板引擎技術 ,下圖是其類以及接口的相關依賴圖
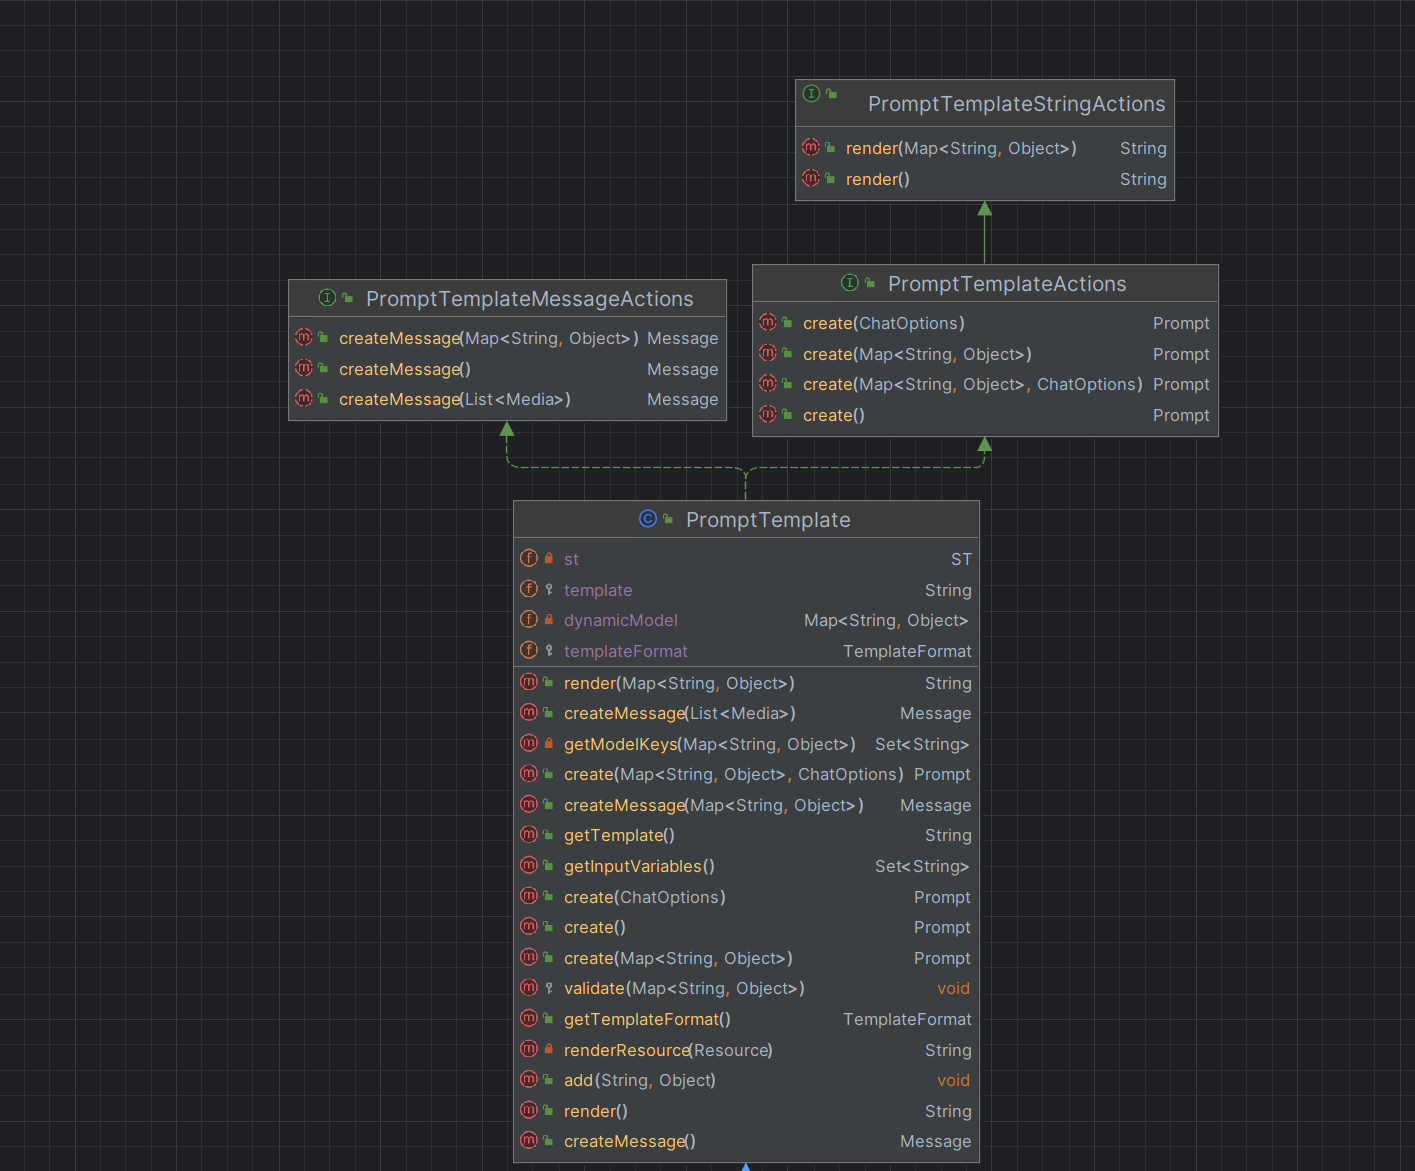
SpringAI 還提供了一些專用的模板類,比如:
- SystemPromptTemplate:用于系統消息
- AssistantPromptTemplate:用于助手消息
- FunctionPromptTemplate:目前暫時沒用
這些類可以快速構建專用的提示詞,再來介紹 PromptTemplate 另外一個特性,就是支持從文件當中讀取模板信息,示例代碼如下:
/*** 簡歷輔導應用* @author ricejson*/
@Component
public class ResumeApp {private ChatClient chatClient;@Autowiredpublic ResumeApp(ChatModel dashscopeChatModel, @Value("classpath:/prompts/system.st") Resource systemPrompt) throws IOException {// 修改成文件存儲記憶ChatMemory chatMemory = new MyFileChatMemory(System.getProperty("user.dir") + "/tmp/");this.chatClient = ChatClient.builder(dashscopeChatModel).defaultSystem(systemPrompt) // 系統預設提示詞.defaultAdvisors(new MessageChatMemoryAdvisor(chatMemory), // 支持多輪對話new MyLoggerAdvisor(), // 自定義日志Advisornew MyReReadingAdvisor()) // 自定義ReReading Advisor.build();}
}
在我們的改造下,將原有的硬編碼的系統提示詞替換為了從文件資源中加載!


流)
(完整實現流程))


