C++學習-入門到精通【14】標準庫算法
目錄
- C++學習-入門到精通【14】標準庫算法
- 一、對迭代器的最低要求
- 迭代器無效
- 二、算法
- 1.fill、fill_n、generate和generate_n
- 2.equal、mismatch和lexicographical_compare
- 3.remove、remove_if、remove_copy和remove_copy_if
- 4.replace、replace_if、replace_copy和replace_copy_if
- 5.數學算法
- 6.基本查找和排序算法
- 7.swap、iter_swap和swap_ranges
- 8.copy_backward、merge、unique和reverse
- 9.inplace_merge、unique_copy和reverse_copy
- 10.集合操作
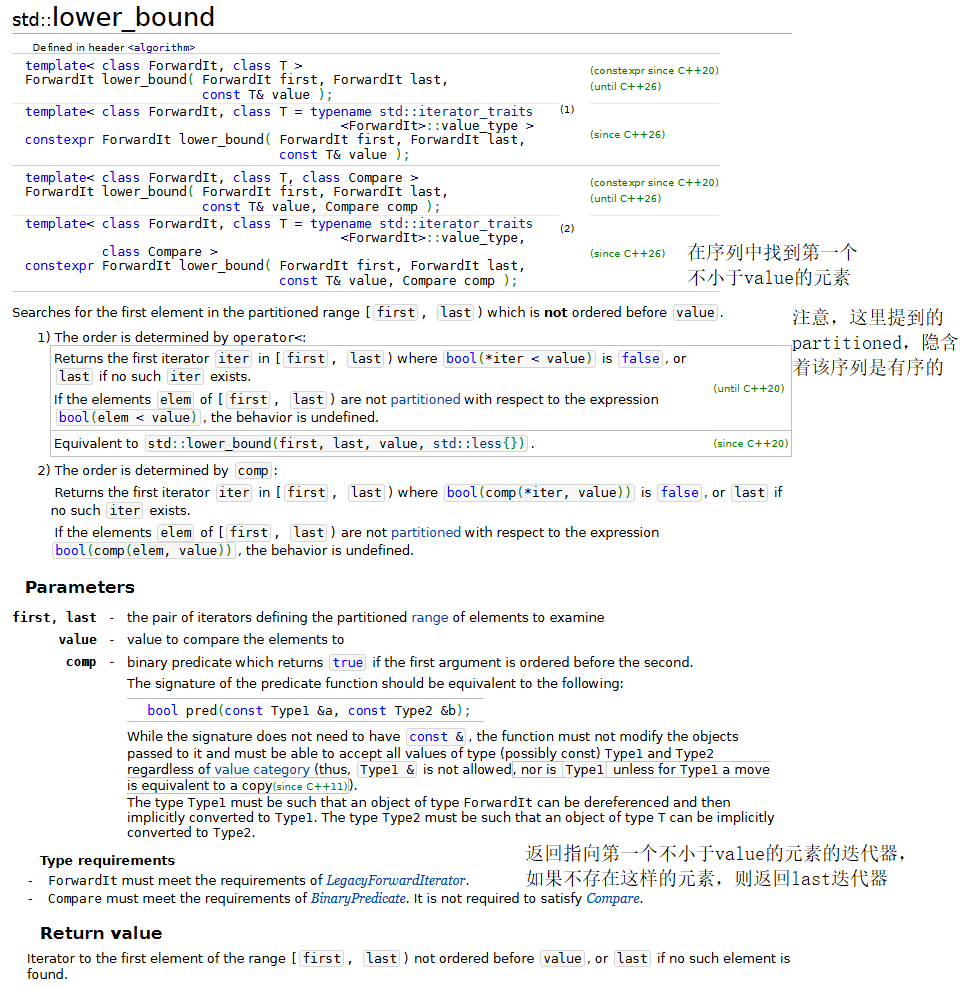
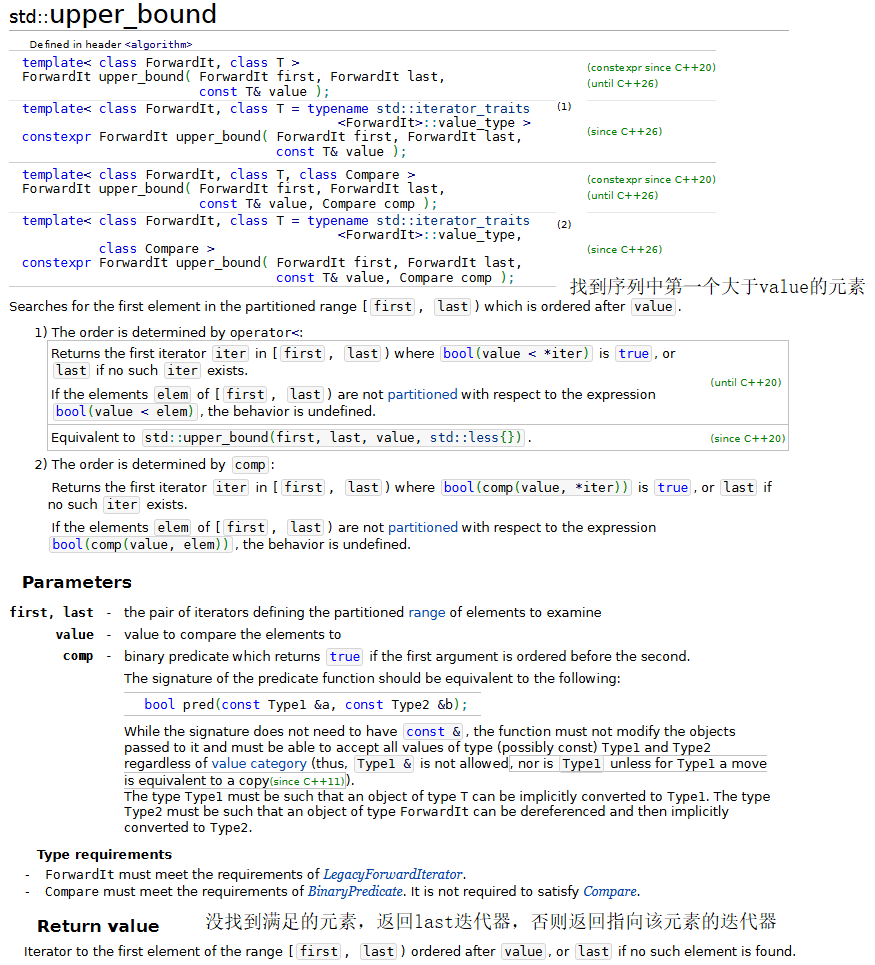
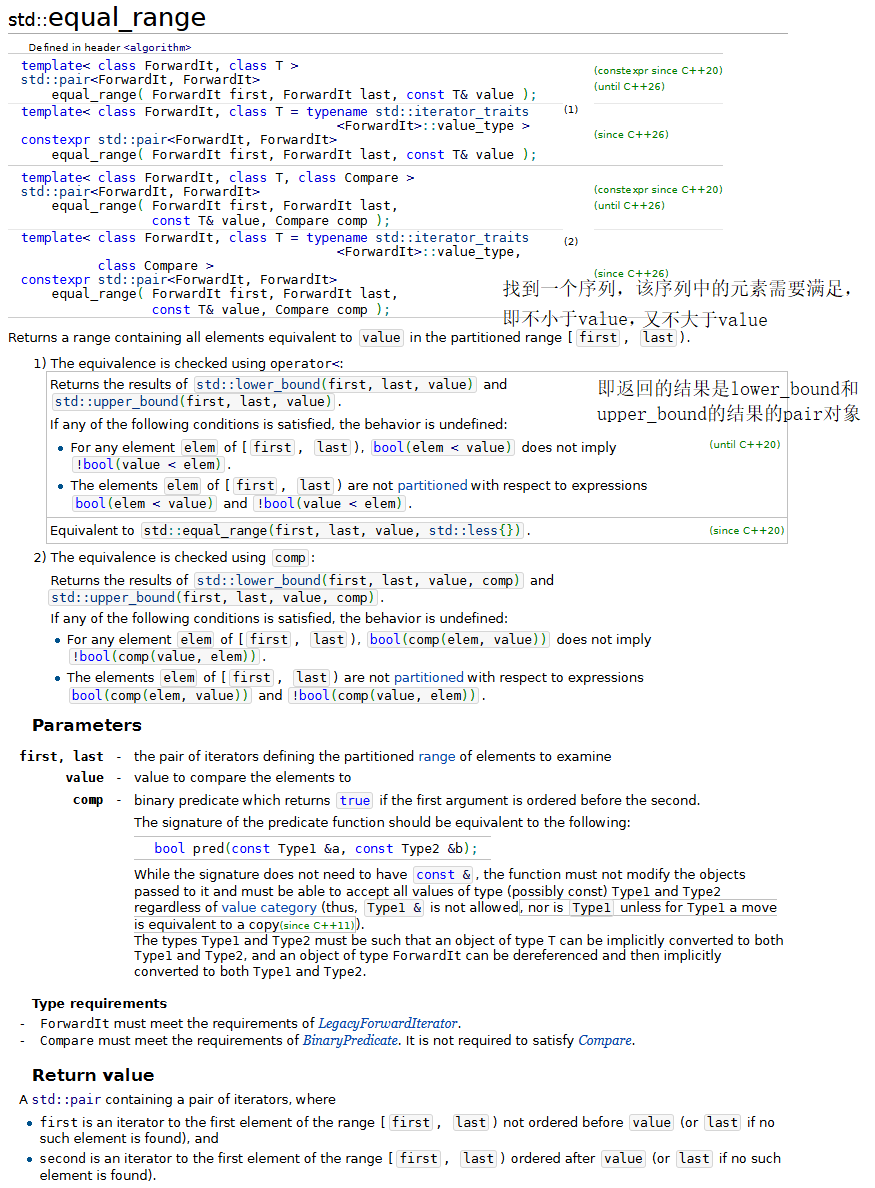
- 11.lower_bound、upper_bound和equal_range
- 12.堆排序
- 13.min、max、minmax和minmax_element
- 三、函數對象
- 函數對象較函數指針的優越之處
- 標準模板庫中預先定義的函數對象
- 使用標準庫的accumulate算法
- 四、lambda表達式
- 五、標準庫算法總結
一、對迭代器的最低要求
通常標準庫會將算法和容器分離,這樣做是為了使添加新算法更容易。每個容器的一個重要部分就是它支持的迭代器類型,這決定了該容器能夠使用什么樣的算法。所以每個以迭代器為參數的算法的標準庫算法,都要求迭代器提供最低限度的功能。例如,如果一個算法需要前向迭代器,那么它就可以使用在支持任何支持前向迭代器、雙向迭代器和隨機訪問迭代器的容器中。
標準庫算法并不依賴它們操作的容器的實現細節,只要該容器的迭代器滿足算法的需求,那么這個算法就能作用在這個容器上。
在性能允許的情況下使用“最弱的迭代器”,這將有助于產生可用性最大化的組件。例如,一個算法只需要前向迭代器,那么它就可以與支持前向迭代器、雙向迭代器或隨機訪問迭代器的任何容器一起使用,但是如果一個算法需要隨機訪問迭代器,那么它只能與支持隨機訪問迭代器的容器一起使用。
迭代器無效
迭代器只是簡單地指向容器的元素,因此當對容器進行某些修改時,迭代器就有可能會失效。例如,如果對一個vector對象調用clear函數,那么會間接調用erase函數,將所有元素全部刪除。如果在調用clear函數之前,程序中有任何指向該vector對象中元素的迭代器,那么現在這些迭代器就會失效。下面我們總結了在插入和刪除操作期間迭代器何時會失效:
插入操作:
- vector —— 如果 vector 對象被重新分配,那么
所有指向這個 vector 對象的迭代器都將變得無效。如果沒有重新分配,那么從插入點到這個對象末尾的迭代器都將變為無效(所有元素都會后移); - deque ——
所有迭代器都變為無效;deque通常實現為多個固定大小的數組(被稱為塊或緩沖區)的集合,這些塊由一個中央控制結構(通常是一個數組,被稱為映射器)管理,映射器存儲指向這些塊的指針。所以一個指向deque對象元素的迭代器中通常包含多個組件:指向當前元素的指針、指向當前內存塊起始位置的指針、指向當前內存塊結束位置的指針和指向映射數組中管理當前內存塊的指針的指針。當進行插入操作時觸發了映射數組的擴容和重新分配,那么映射數組就移動到了一個新的地址,之前所有迭代器中存儲的指向映射數組或其內部指針的指針都變得無效了,即使迭代器之前指向的元素的地址沒有發生變化,迭代器也無法再正確地定位它所在的塊,所以迭代器會失效。由于用戶是無法預知哪一次操作會導致上面情況的發生,所以C++標準規定,當對一個deque對象進行了一次插入之后,之前的所有指向該對象的迭代器都會失效。 - list 或 forward_list ——
所有迭代器都依然有效。它們本身實現就是鏈表,不管如何插入元素,迭代器都還是會指向原來指向的元素。 - 有序的關聯容器 ——
所有迭代器都依然有效。這是因為有序的關聯容器基本上都是使用紅黑樹來實現,而樹結構在插入新節點之后,只需要修改節點中的父子指針的指向即可(進行旋轉),節點本身的物理地址是沒有發生變化的,所以迭代器不會失效。 - 無序的關聯容器 ——
所有迭代器都會失效。無序的關聯容器使用哈希表來實現,它的內存分布是由一個桶數組(一個連續的內存塊)來存儲表頭指針或是動態數組(存儲一個數組其實就是存儲該數組首元素的地址)和用于解決沖突的鏈表或動態數組組成。當進行插入操作后,可能會導致桶數組重新分配,此時桶數組的地址會發生變化,迭代器內會存儲桶數組的地址用來尋址,所以迭代器會失效。所以保守起見,C++標準庫中規定,只要對一個無序關聯容器插入新元素,那么所有的迭代器都會失效;
刪除操作:當對容器進行刪除操作時,指向被刪除元素的迭代器會失效。
- vector —— 從被刪除元素到這個 vector 對象末尾的迭代器都會變為無效;
- deque —— 如果處在這個 deque 對象中部的元素被刪除,那么所有的迭代器都會變為無效;
迭代器本質上是對底層內存地址的抽象封裝。它存儲的是一個指向特定內存位置的指針(或者類似指針的東西,當進行插入或刪除操作后,原來的元素可能會在內存發生移動,這里再使用原來的迭代器就無法找到對應的元素。這就相當于是你的朋友搬家之后,你仍使用他原來的住址去找他,顯然是不合適的)。
二、算法
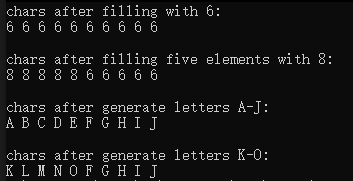
1.fill、fill_n、generate和generate_n
下面的程序演示了標準庫中的fill、fill_n、generate和generate_n算法。
fill 和 fill_n 算法把容器中某個范圍內的元素設置為一個指定值。

generate 和 generate_n 算法使用一個生成函數為容器中一定范圍內的元素創建新的值。
test.cpp
#include <iostream>
#include <algorithm>
#include <array>
#include <iterator>
using namespace std;// 元素生成函數
char nextLetter();int main()
{array<char, 10> chars;ostream_iterator<char> output(cout, " ");fill(chars.begin(), chars.end(), '6'); // 為chars中begin()和end()之間的元素全部分配6cout << "chars after filling with 6:\n";copy(chars.cbegin(), chars.cend(), output);fill_n(chars.begin(), 5, '8'); // 為chars的前5個元素重新分配值為8cout << "\n\nchars after filling five elements with 8:\n";copy(chars.cbegin(), chars.cend(), output);generate(chars.begin(), chars.end(), nextLetter);cout << "\n\nchars after generate letters A-J:\n";copy(chars.cbegin(), chars.cend(), output);// 這里是使用了函數指針generate_n(chars.begin(), 5, nextLetter);cout << "\n\nchars after generate letters K-O:\n";copy(chars.cbegin(), chars.cend(), output);
}char nextLetter()
{static char letter = 'A';return letter++;
}
運行結果:
2.equal、mismatch和lexicographical_compare
示例代碼:
#include <iostream>
#include <array>
#include <algorithm>
#include <iterator>
using namespace std;int main()
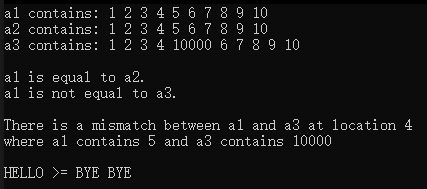
{const size_t SIZE = 10;array <int, SIZE> a1 { 1, 2, 3, 4, 5, 6, 7, 8, 9, 10 };array <int, SIZE> a2(a1); // 使用拷貝構造函數創建一個array對象array <int, SIZE> a3 { 1, 2, 3, 4, 10000, 6, 7, 8, 9, 10 };ostream_iterator<int> output(cout, " ");cout << "a1 contains: ";copy(a1.cbegin(), a1.cend(), output);cout << "\na2 contains: ";copy(a2.cbegin(), a2.cend(), output);cout << "\na3 contains: ";copy(a3.cbegin(), a3.cend(), output);// 比較a1和a2是否相等bool result = equal(a1.cbegin(), a1.cend(), a2.cbegin(), a2.cend());cout << "\n\na1 " << (result ? "is " : "is not ") << "equal to a2.\n";// 比較a1和a3是否相等result = equal(a1.cbegin(), a1.cend(), a3.cbegin(), a3.cend());cout << "a1 " << (result ? "is ": "is not ") << "equal to a3.\n";auto location = mismatch(a1.cbegin(), a1.cend(), a3.cbegin(), a3.cend());cout << "\nThere is a mismatch between a1 and a3 at location "<< (location.first - a1.cbegin()) << "\nwhere a1 contains "<< *location.first << " and a3 contains " << *location.second << "\n\n";char c1[SIZE] = "HELLO";char c2[SIZE] = "BYE BYE";result = lexicographical_compare(cbegin(c1), cend(c1), cbegin(c2), cend(c2));cout << c1 << (result ? " < " : " >= ") << c2 << endl;
}
運行結果:
3.remove、remove_if、remove_copy和remove_copy_if
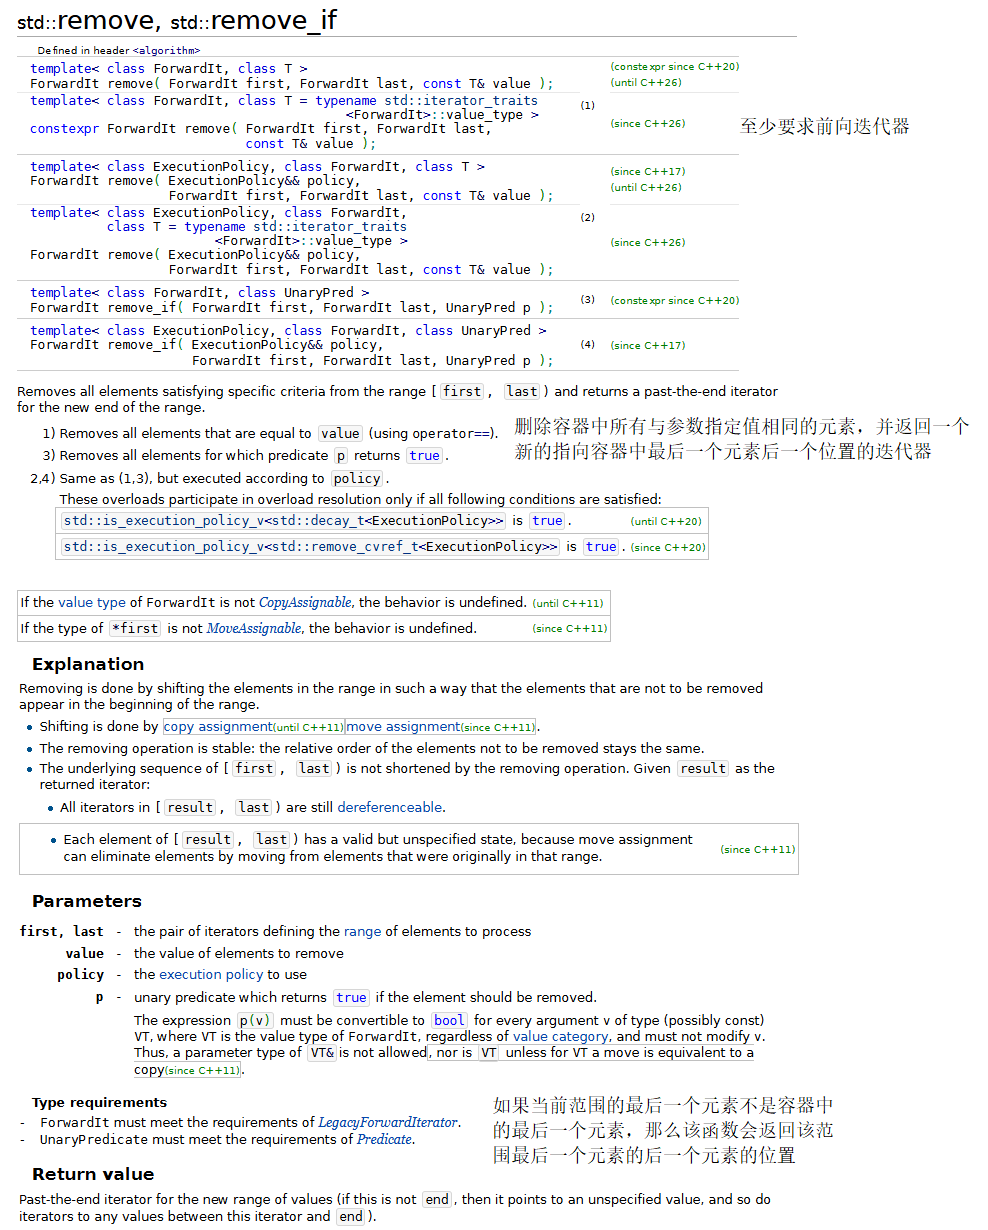
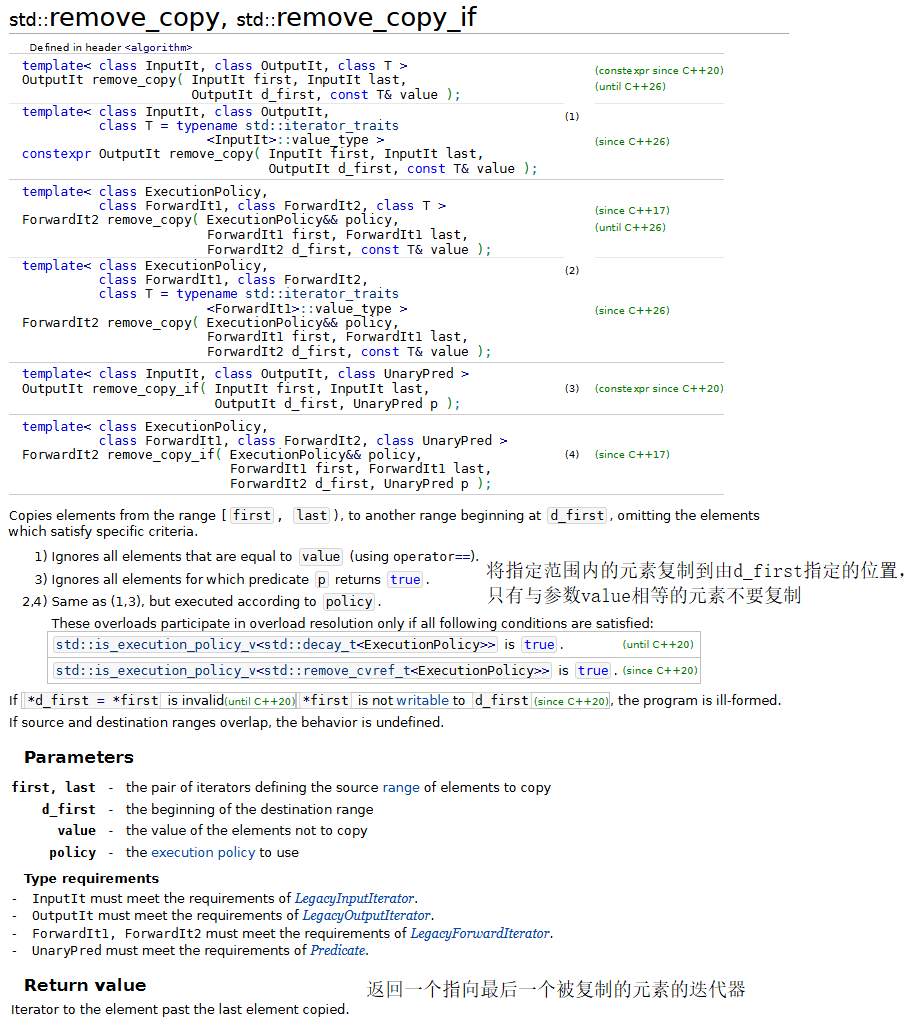
注意上面的算法不會改變容器的容量,也并不會真的將刪除元素,只是用與參數指定值相同的元素使用它后一個元素替換。
示例代碼:
#include <iostream>
#include <algorithm>
#include <array>
#include <iterator>
using namespace std;bool greater9(int);int main()
{const size_t SIZE = 10;array<int, SIZE> init = { 10, 2, 10, 4, 16, 6, 14, 8, 12, 10 };ostream_iterator<int> output(cout, " ");// 測試removecout << "Testing algorithm \"remove\"\n";array<int, SIZE> a1(init);cout << "a1 before remove all 10:\n";copy(a1.cbegin(), a1.cend(), output);auto newLastElement = remove(a1.begin(), a1.end(), 10);cout << "\na1 after remove all 10(newLastElement):\n";copy(a1.begin(), newLastElement, output);cout << "\na1 between a1.cbegin and a1.cend:\n";copy(a1.cbegin(), a1.cend(), output);// 測試remove_copycout << "\n\nTesting algorithm \"remove_copy\"\n";array<int, SIZE> a2(init);array<int, SIZE> a3 { };cout << "a2 before removing all 10 and copying:\n";copy(a2.cbegin(), a2.cend(), output);// 將a2中不是10的元素復制到a3中newLastElement = remove_copy(a2.cbegin(), a2.cend(), a3.begin(), 10);cout << "\na3 after removing all 10 from a2(newLastElement):\n";copy(a3.begin(), newLastElement, output);cout << "\na3 after removing all 10 from a2:\n";copy(a3.cbegin(), a3.cend(), output);// 測試remove_ifcout << "\n\nTesting algorithm \"remove_if\"\n";array<int, SIZE> a4(init);cout << "a4 before removing all elements greater than 9:\n";copy(a4.cbegin(), a4.cend(), output);// 使用remove_if函數,該函數可以指定條件,“刪除”滿足條件的元素newLastElement = remove_if(a4.begin(), a4.end(), greater9);cout << "\na4 after removing all elements greater than 9(newLastElement):\n";copy(a4.begin(), newLastElement, output);cout << "\na4 after removing all elements greater than 9:\n";copy(a4.cbegin(), a4.cend(), output);// 測試remove_copy_ifcout << "\n\nTesting algorithm \"remove_copy_if\"\n";array<int, SIZE> a5(init);array<int, SIZE> a6{};cout << "a5 before removing all elements greater than 9 and copying:\n";copy(a5.cbegin(), a5.cend(), output);newLastElement = remove_copy_if(a5.begin(), a5.end(), a6.begin(), greater9);cout << "\na6 after removing all elements greater than 9(newLastElement):\n";copy(a6.begin(), newLastElement, output);cout << "\na6 after removing all elements greater than 9:\n";copy(a6.cbegin(), a6.cend(), output);cout << endl;
}bool greater9(int x)
{return x > 9;
}
運行結果:
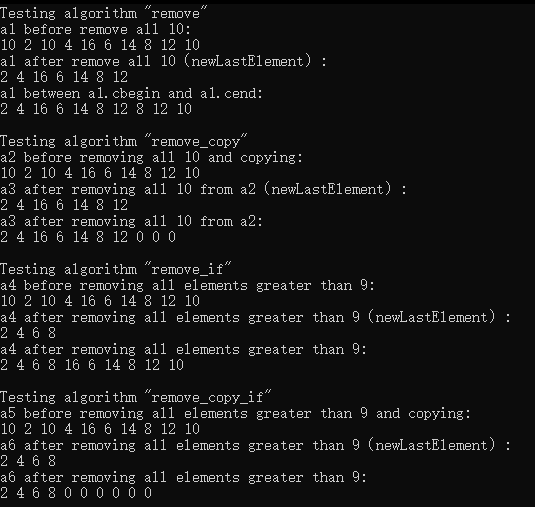
從結果我們可以看出上面的這4個版本的算法其實并不會真的將元素刪除,僅僅是將容器中與指定元素不同的元素往前移動,并返回一個指向這些與指定元素不同的最后一個元素的迭代器,在這個迭代器之后的元素是什么并不確定。
與容器中實現的成員函數remove比較,算法remove并不會真正的刪除元素,而成員函數remove會真正的刪除元素。
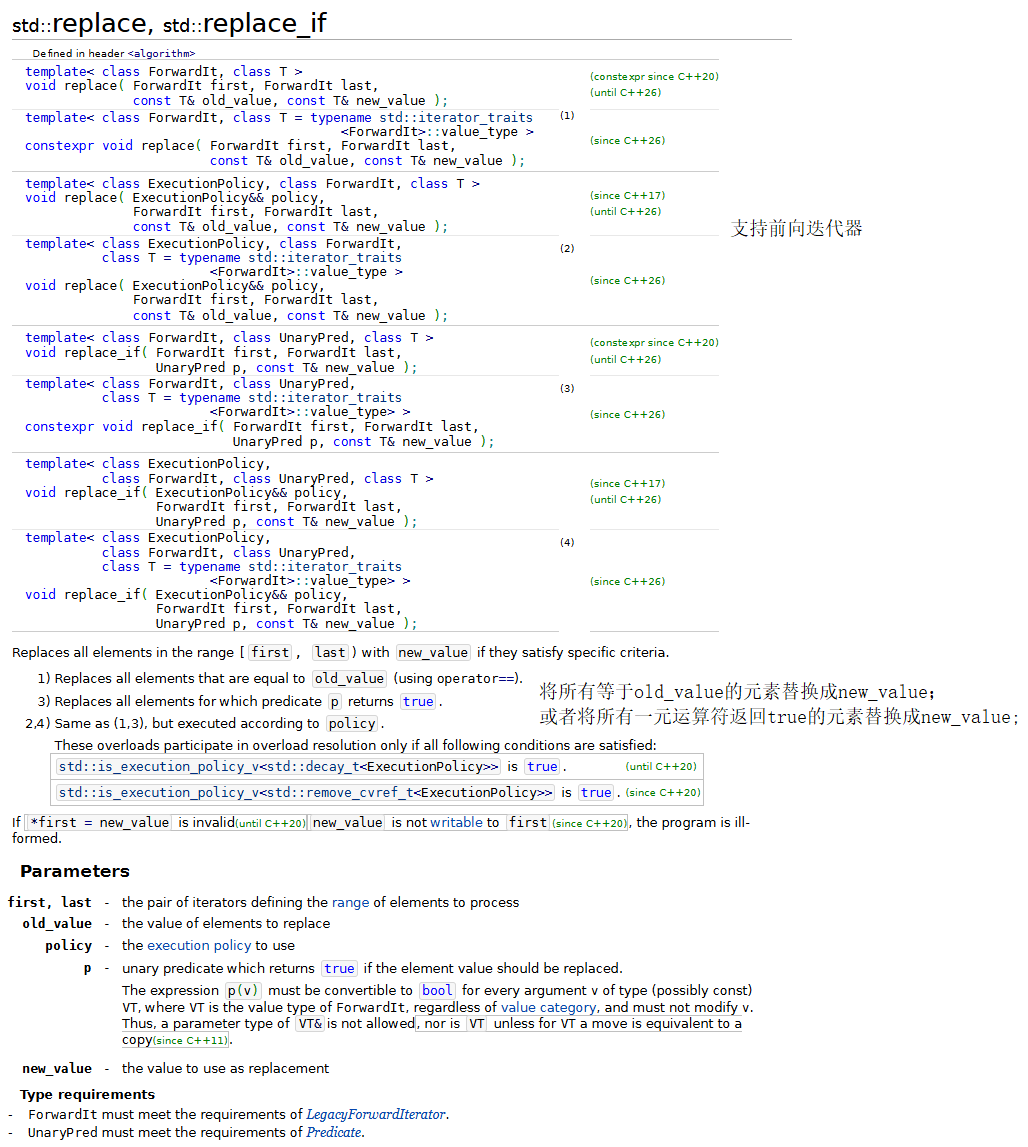
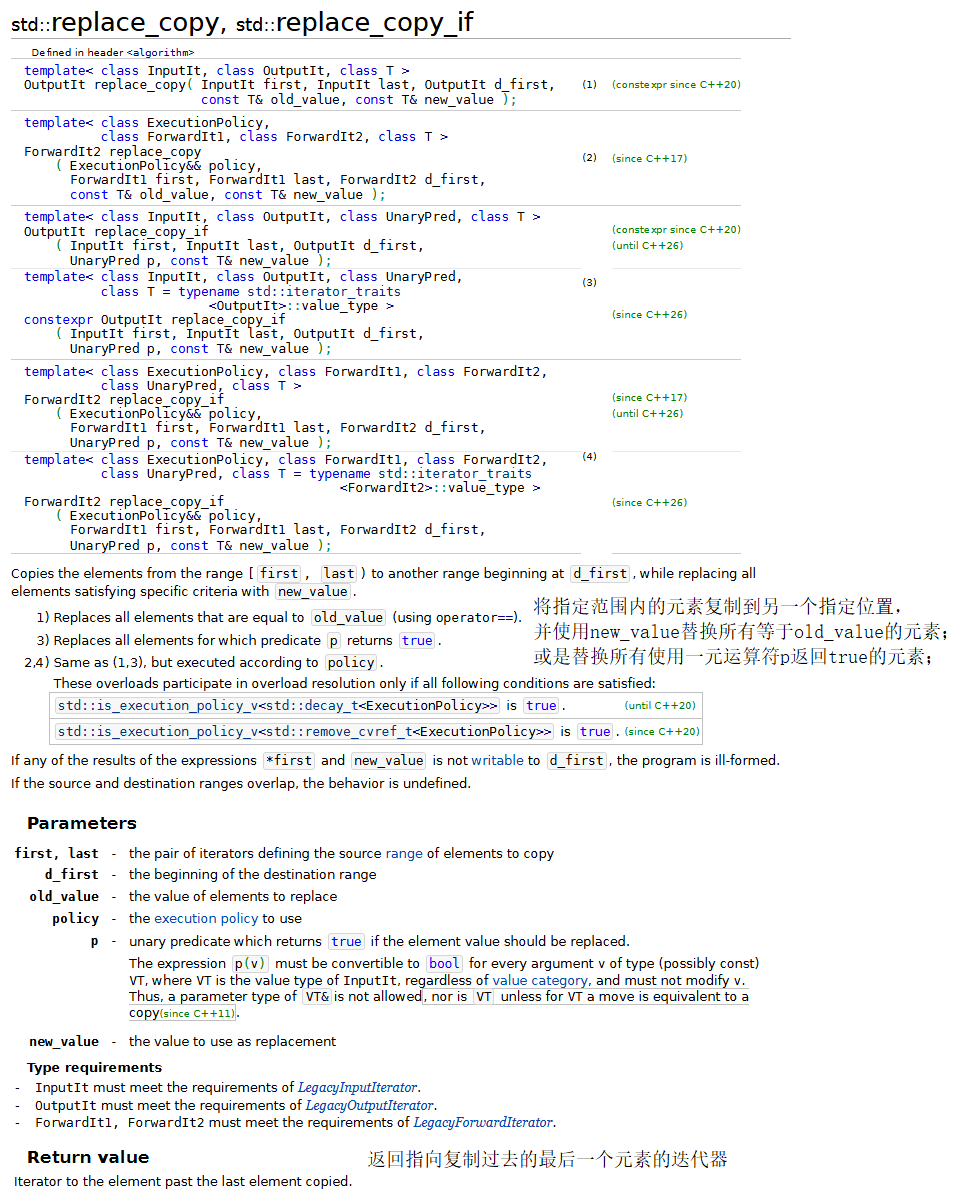
4.replace、replace_if、replace_copy和replace_copy_if
示例代碼:
#include <iostream>
#include <array>
#include <iterator>
#include <algorithm>
using namespace std;bool greater9(int);int main()
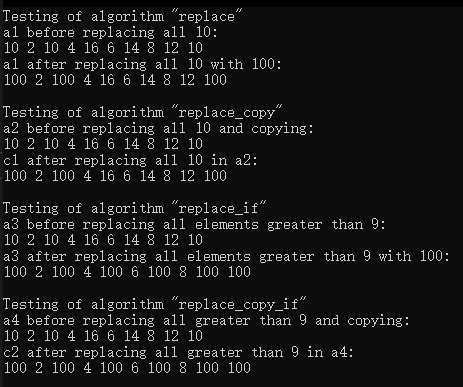
{const size_t SIZE = 10;array<int, SIZE> init = { 10, 2, 10, 4, 16, 6, 14, 8, 12, 10 };ostream_iterator<int> output(cout, " ");// 測試replacecout << "Testing of algorithm \"replace\"";array<int, SIZE> a1(init);cout << "\na1 before replacing all 10:\n";copy(a1.cbegin(), a1.cend(), output);cout << "\na1 after replacing all 10 with 100:\n";replace(a1.begin(), a1.end(), 10, 100);copy(a1.cbegin(), a1.cend(), output);// 測試replace_copycout << "\n\nTesting of algorithm \"replace_copy\"";array<int, SIZE> a2(init);array<int, SIZE> c1{};cout << "\na2 before replacing all 10 and copying:\n";copy(a2.cbegin(), a2.cend(), output);cout << "\nc1 after replacing all 10 in a2:\n";replace_copy(a2.begin(), a2.end(), c1.begin(), 10, 100);copy(c1.cbegin(), c1.cend(), output);// 測試replace_ifcout << "\n\nTesting of algorithm \"replace_if\"";array<int, SIZE> a3(init);cout << "\na3 before replacing all elements greater than 9:\n";copy(a3.cbegin(), a3.cend(), output);cout << "\na3 after replacing all elements greater than 9 with 100:\n";replace_if(a3.begin(), a3.end(), greater9, 100);copy(a3.cbegin(), a3.cend(), output);// 測試replace_copy_ifcout << "\n\nTesting of algorithm \"replace_copy_if\"";array<int, SIZE> a4(init);array<int, SIZE> c2{};cout << "\na4 before replacing all greater than 9 and copying:\n";copy(a4.cbegin(), a4.cend(), output);cout << "\nc2 after replacing all greater than 9 in a4:\n";replace_copy_if(a4.begin(), a4.end(), c2.begin(), greater9, 100);copy(c2.cbegin(), c2.cend(), output);cout << endl;
}bool greater9(int x)
{return x > 9;
}
運行結果:
5.數學算法
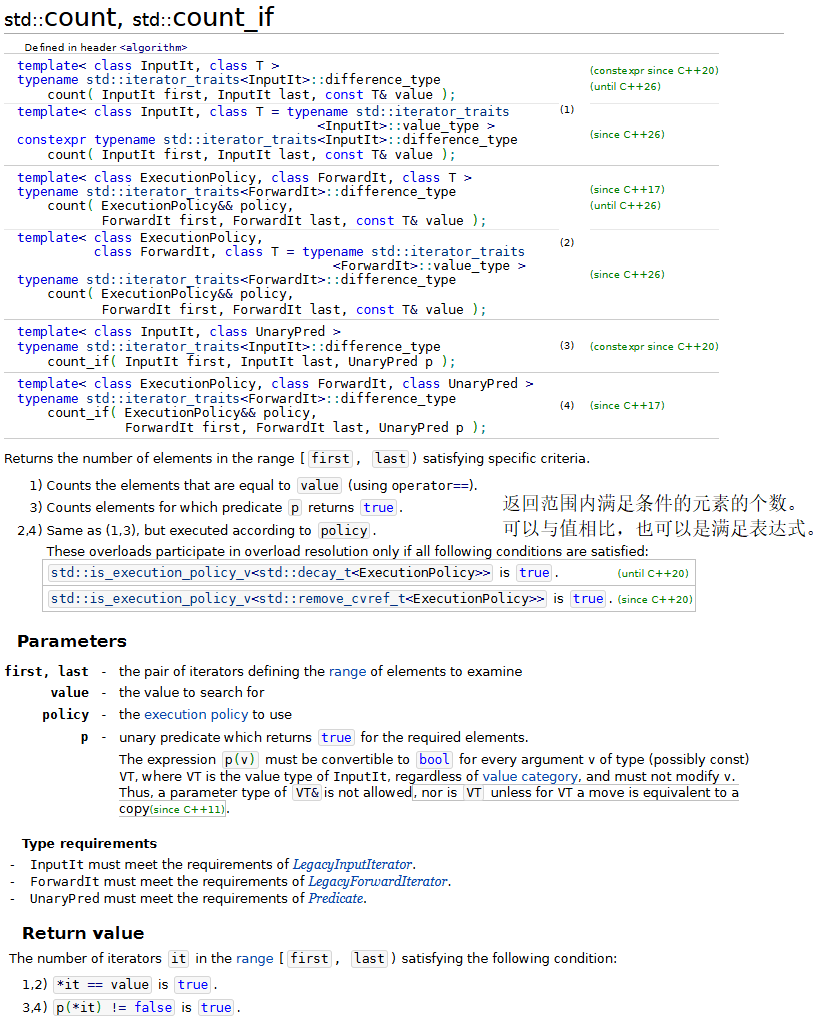
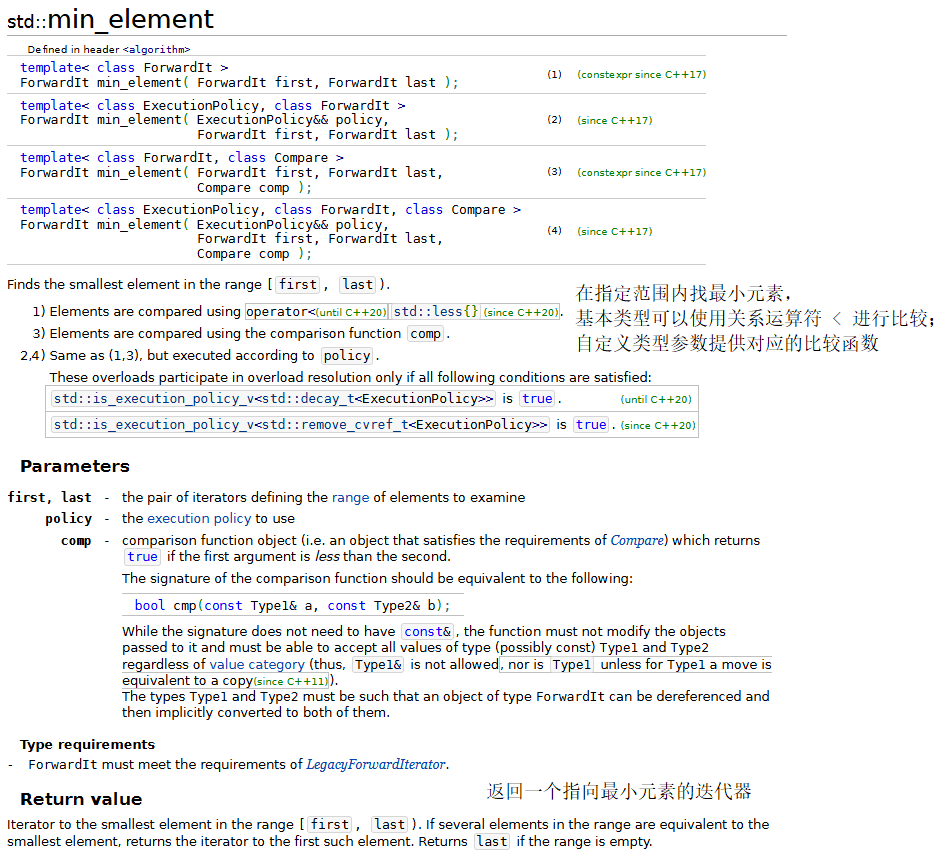
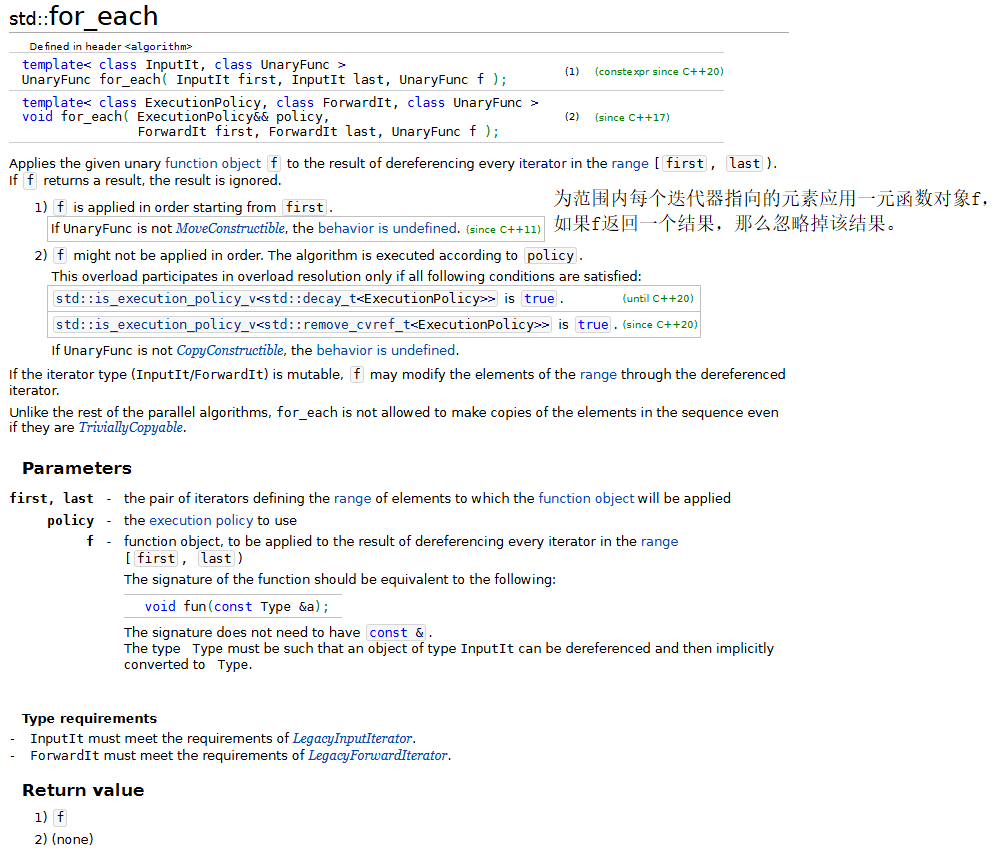
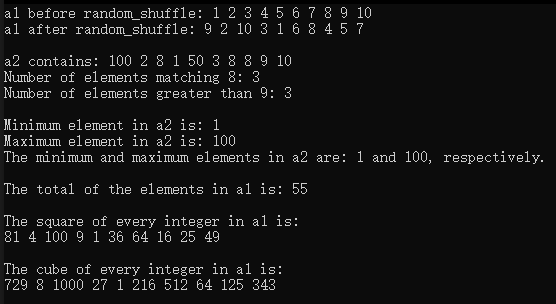
下面的程序演示了幾個常用的數學算法,包括:random_shuffle、count、count_if、min_element、max_element、minmax_element、accumulate、for_each和transform。

示例代碼:
#include <iostream>
#include <algorithm>
#include <numeric> // accumulate算法定義在該頭文件中
#include <array>
#include <iterator>
using namespace std;bool greater9(int);
void outputSquare(int);
int calculateCube(int);int main()
{const size_t SIZE = 10;array<int, SIZE> a1 = { 1,2,3,4,5,6,7,8,9,10 };ostream_iterator<int> output(cout, " ");// random_shufflecout << "a1 before random_shuffle: ";copy(a1.cbegin(), a1.cend(), output);// 使用默認的rand函數random_shuffle(a1.begin(), a1.end());cout << "\na1 after random_shuffle: ";copy(a1.cbegin(), a1.cend(), output);// count和count_ifarray<int, SIZE> a2 = { 100,2,8,1,50,3,8,8,9,10 };cout << "\n\na2 contains: ";copy(a2.cbegin(), a2.cend(), output);// 計算a2中8的個數auto result = count(a2.cbegin(), a2.cend(), 8);cout << "\nNumber of elements matching 8: " << result;// 計算a2中大于9的元素的個數result = count_if(a2.cbegin(), a2.cend(), greater9);cout << "\nNumber of elements greater than 9: " << result;// min_element、max_element和 minmax_elementcout << "\n\nMinimum element in a2 is: "<< *(min_element(a2.cbegin(), a2.cend()));cout << "\nMaximum element in a2 is: "<< *(max_element(a2.cbegin(), a2.cend()));auto minAndMax = minmax_element(a2.cbegin(), a2.cend());cout << "\nThe minimum and maximum elements in a2 are: "<< *minAndMax.first << " and " << *minAndMax.second << ", respectively.";// accumulatecout << "\n\nThe total of the elements in a1 is: "<< accumulate(a1.cbegin(), a1.cend(), 0);// for_eachcout << "\n\nThe square of every integer in a1 is:\n";for_each(a1.cbegin(), a1.cend(), outputSquare);array<int,SIZE> cubes;// transformtransform(a1.cbegin(), a1.cend(), cubes.begin(), calculateCube);cout << "\n\nThe cube of every integer in a1 is:\n";copy(cubes.cbegin(), cubes.cend(), output);cout << endl;
}bool greater9(int x)
{return x > 9;
}void outputSquare(int value)
{cout << value * value << ' ';
}int calculateCube(int value)
{return value * value * value;
}
運行結果:
6.基本查找和排序算法
下面將演示標準庫中的幾種基本的查找和排序算法,包括:find、find_if、find_if_not、sort、binary_search、all_of、和any_of。


示例代碼:
#include <iostream>
#include <algorithm>
#include <array>
#include <iterator>
using namespace std;bool greater10(int);
bool less10(int);int main()
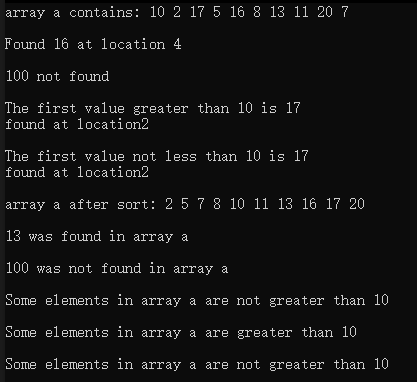
{const size_t SIZE = 10;array<int, SIZE> a { 10, 2, 17, 5, 16, 8, 13, 11, 20, 7 };ostream_iterator<int> output(cout, " ");cout << "array a contains: ";copy(a.cbegin(), a.cend(), output);// find、find_if、find_if_notauto location = find(a.cbegin(), a.cend(), 16);if (location != a.cend()) // 范圍內存在元素16{// 顯示第一個值為16的元素在容器中位置cout << "\n\nFound 16 at location " << (location - a.cbegin()); }elsecout << "\n\n16 not found";location = find(a.cbegin(), a.cend(), 100);if (location != a.cend()) // 范圍內存在元素100{// 顯示第一個值為100的元素在容器中位置cout << "\n\nFound 100 at location " << (location - a.cbegin());}elsecout << "\n\n100 not found";// 查找容器內第一個大于10的元素location = find_if(a.cbegin(), a.cend(), greater10);if (location != a.cend()) {// 顯示第一個值大于10的元素在容器中位置cout << "\n\nThe first value greater than 10 is " << *location<< "\nfound at location" << (location - a.cbegin());}elsecout << "\n\nNo values greater than 10 were found.";location = find_if_not(a.cbegin(), a.cend(), less10);if (location != a.cend()){// 顯示第一個值大于10的元素在容器中位置cout << "\n\nThe first value not less than 10 is " << *location<< "\nfound at location" << (location - a.cbegin());}elsecout << "\n\nNo values not less than 10 were found.";// sortsort(a.begin(), a.end());cout << "\n\narray a after sort: ";copy(a.cbegin(), a.cend(), output);// binary_search// 判斷容器中是否存在元素13if(binary_search(a.cbegin(), a.cend(), 13))cout << "\n\n13 was found in array a";elsecout << "\n\n13 was not found in array a";// 判斷容器中是否存在元素13if (binary_search(a.cbegin(), a.cend(), 100))cout << "\n\n100 was found in array a";elsecout << "\n\n100 was not found in array a";// all_of、any_of和none_ofif(all_of(a.cbegin(), a.cend(), greater10))cout << "\n\nAll the elements in array a are greater than 10";elsecout << "\n\nSome elements in array a are not greater than 10";if (any_of(a.cbegin(), a.cend(), greater10))cout << "\n\nSome elements in array a are greater than 10";elsecout << "\n\nNone elements in array a are not greater than 10";if (none_of(a.cbegin(), a.cend(), greater10))cout << "\n\nNone elements in array a are greater than 10";elsecout << "\n\nSome elements in array a are not greater than 10";cout << endl;
}bool greater10(int value)
{return value > 10;
}// value 不超過 10 時返回 true
bool less10(int value)
{return value <= 10;
}
運行結果:
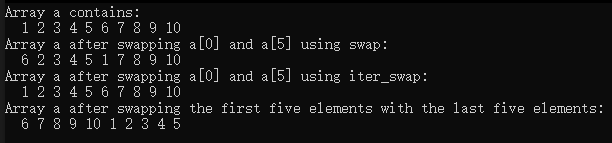
7.swap、iter_swap和swap_ranges

注意,在使用swap_ranges時,交換的兩個區域不能重疊。
示例代碼:
#include <iostream>
#include <iterator>
#include <array>
#include <algorithm>
using namespace std;int main()
{const size_t SIZE = 10;array<int, SIZE> a = { 1,2,3,4,5,6,7,8,9,10 };ostream_iterator<int> output(cout, " ");cout << "Array a contains:\n  ";copy(a.cbegin(), a.cend(), output);swap(a[0], a[5]);cout << "\nArray a after swapping a[0] and a[5] using swap:\n  ";copy(a.cbegin(), a.cend(), output);iter_swap(a.begin(), a.begin() + 5);cout << "\nArray a after swapping a[0] and a[5] using iter_swap:\n  ";copy(a.cbegin(), a.cend(), output);swap_ranges(a.begin(), a.begin() + 5, a.begin() + 5);cout << "\nArray a after swapping the first five elements with the last five elements:\n  ";copy(a.cbegin(), a.cend(), output);cout << endl;
}
運行結果:
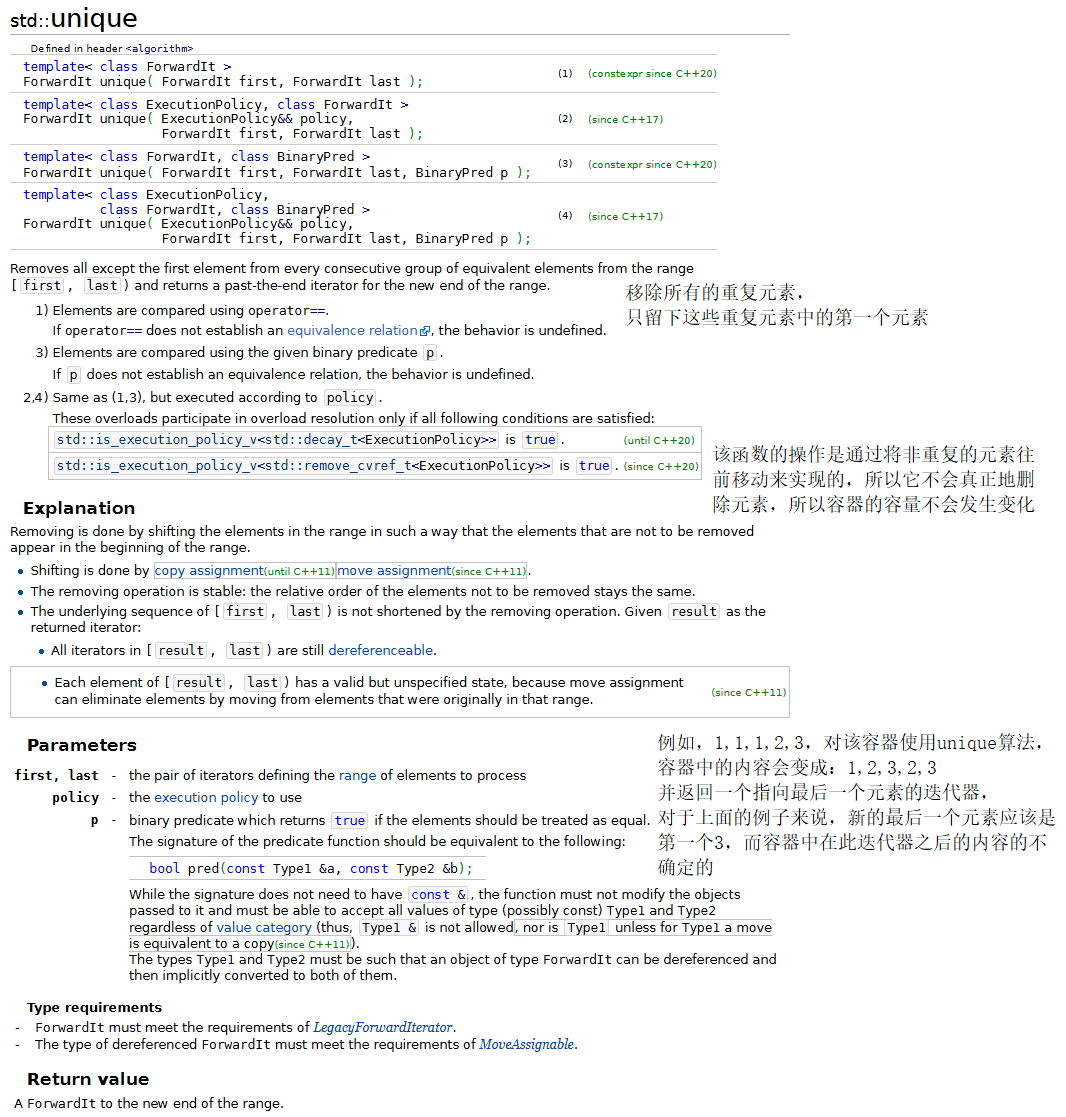
8.copy_backward、merge、unique和reverse
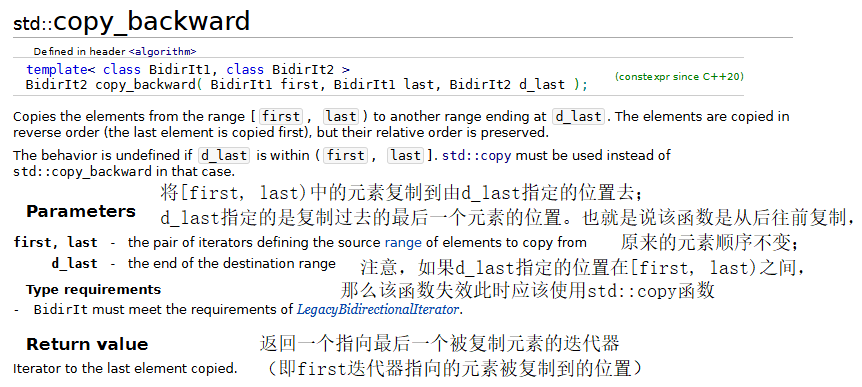
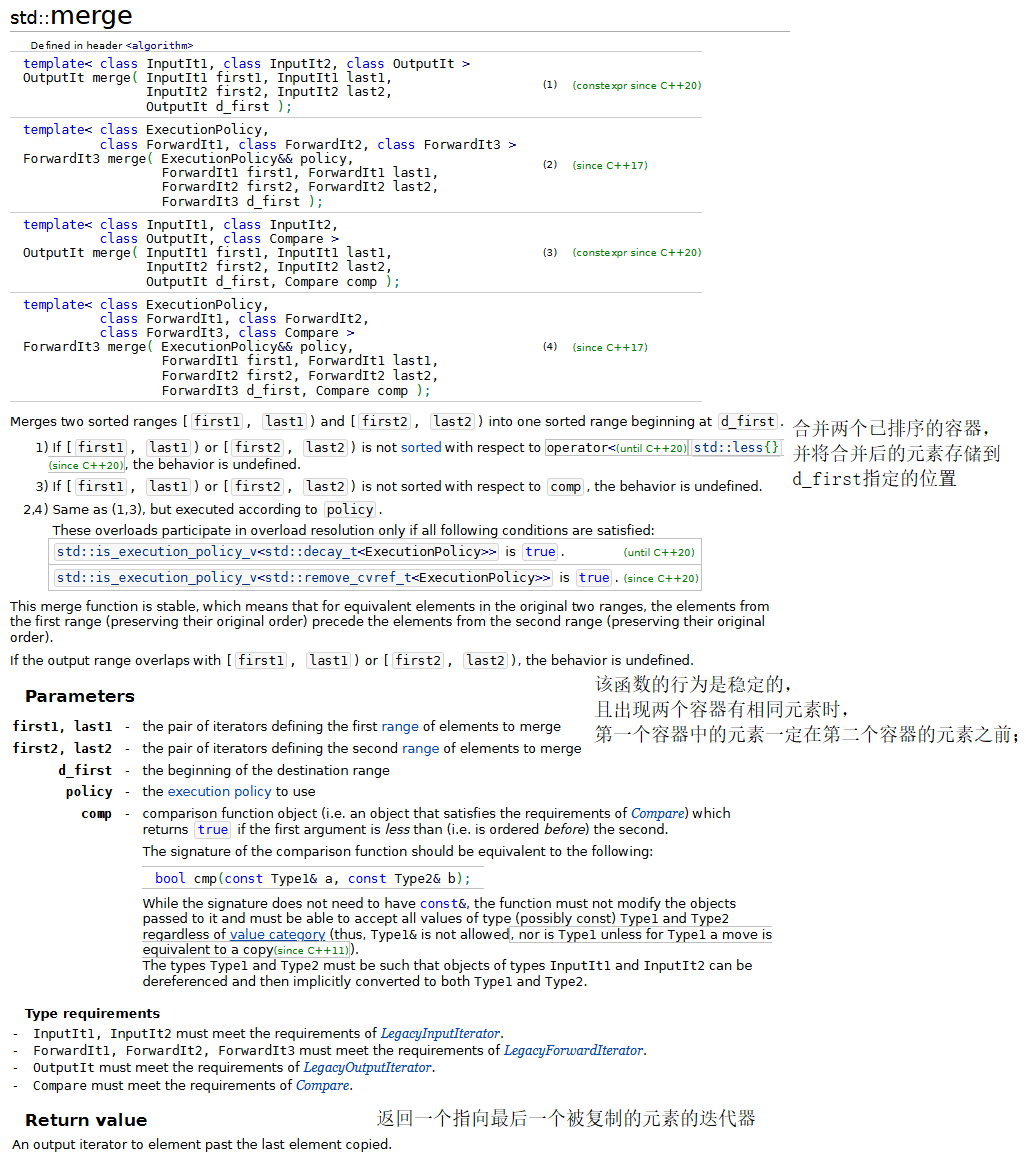

示例代碼:
#include <iostream>
#include <algorithm>
#include <iterator>
#include <array>
using namespace std;int main()
{const size_t SIZE = 5;array<int, SIZE> a1 { 1,3,5,7,9 };array<int, SIZE> a2 { 2,4,5,7,9 };ostream_iterator<int> output(cout, " ");cout << "array a1 contains: ";copy(a1.cbegin(), a1.cend(), output);cout << "\narray a2 contains: ";copy(a2.cbegin(), a2.cend(), output);array<int, SIZE> results {};copy_backward(a1.cbegin(), a1.cend(), results.end());cout << "\n\nAfter copy_backward, results contains: ";copy(results.cbegin(), results.cend(), output);array<int, SIZE + SIZE> results2;merge(a1.cbegin(), a1.cend(), a2.cbegin(), a2.cend(), results2.begin());cout << "\n\nAfter merge of a1 and a2, results2 contains: ";copy(results2.cbegin(), results2.cend(), output);auto endLocation = unique(results2.begin(), results2.end());cout << "\n\nAfter unique results2 contains (endLocation): ";copy(results2.begin(), endLocation, output);cout << "\nAfter unique results2 contains: ";copy(results2.cbegin(),results2.cend(), output);reverse(a1.begin(), a1.end());cout << "\n\nArray a1 after reverse: ";copy(a1.cbegin(), a1.cend(), output);cout << endl;
}
運行結果:

對于上面程序merge算法的使用,我們提前創建了一個array對象用于接收合并后的數據。如果我們事先并不知道被合并的兩個容器的總的元素個數是多少,我們應該怎么辦呢?使用頭文件<iterator>中定義的back_inserter、front_inserter或inserter函數。這些函數會在參數指定的容器中插入元素,它們會返回一個指向將要被插入的位置的迭代器,使用該迭代器進行插入操作。
9.inplace_merge、unique_copy和reverse_copy
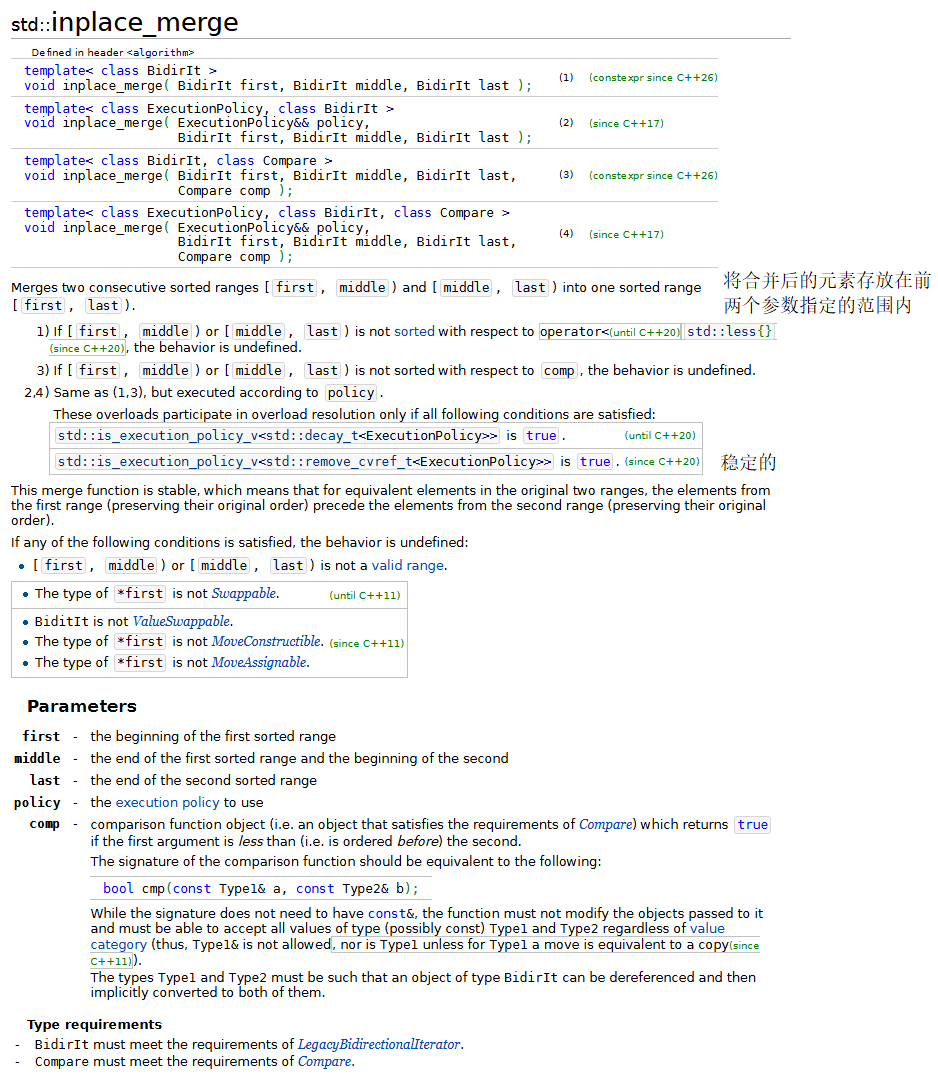
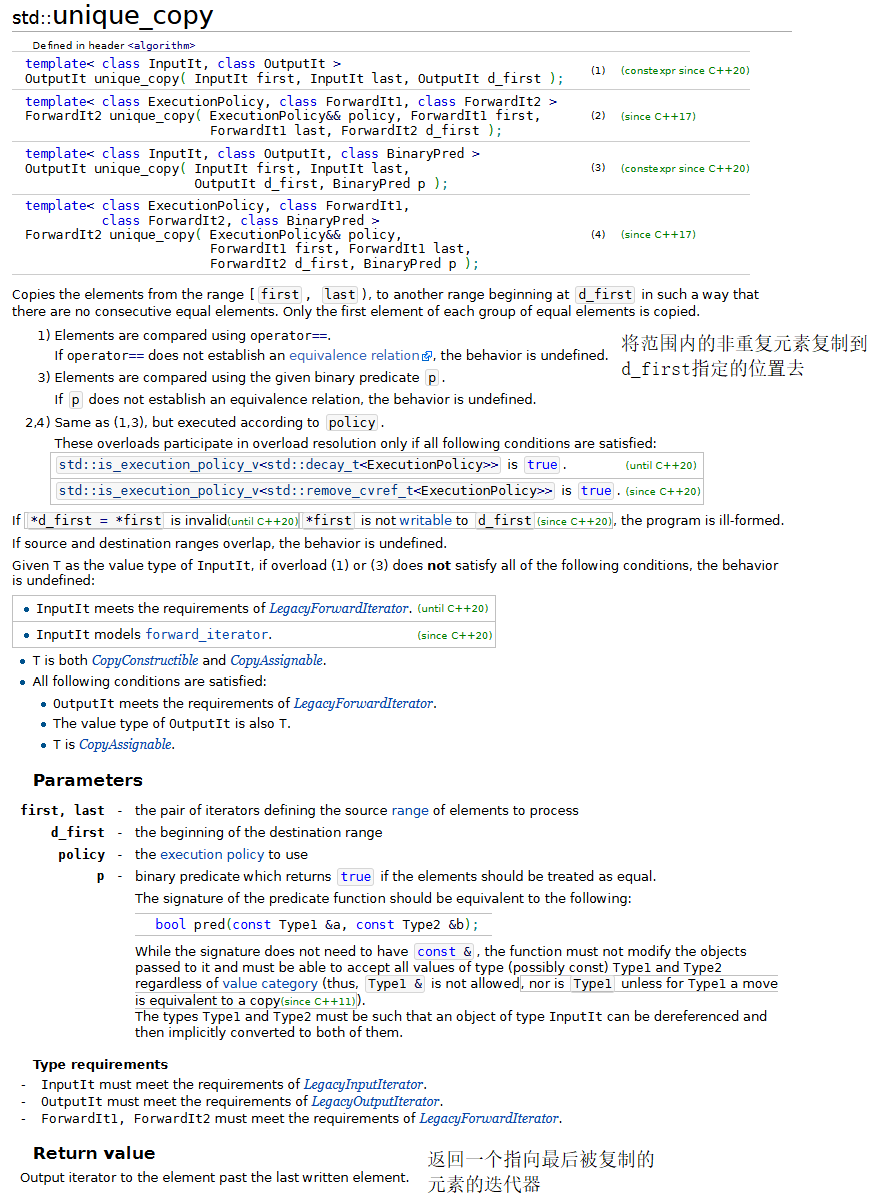
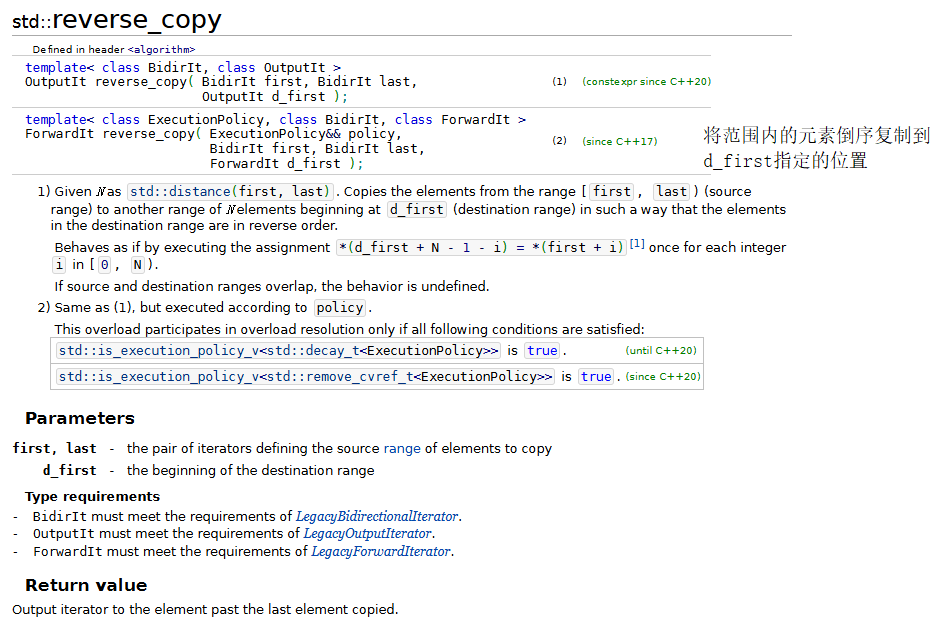
注意在使用inplace_merge之后,序列會自動排序
示例代碼:
#include <iostream>
#include <iterator>
#include <algorithm>
#include <array>
#include <vector>
using namespace std;int main()
{const size_t SIZE = 10;array <int, SIZE> a1 = { 1, 3, 5, 7, 9, 1, 3, 5, 7, 9 };ostream_iterator<int> output(cout, " ");cout << "array a1 contains: ";copy(a1.cbegin(), a1.cend(), output);inplace_merge(a1.begin(), a1.begin() + 5, a1.end());cout << "\nAfter inplace_merge, a1 contains: ";copy(a1.cbegin(), a1.cend(), output);vector<int> results1;// 使用 back_inserter 往vector對象中插入新元素unique_copy(a1.cbegin(),a1.cend(), back_inserter(results1));cout << "\nAfter unique_copy, results1 contains: ";copy(results1.cbegin(), results1.cend(), output);vector<int> results2;// 使用 back_inserter 往vector對象中插入新元素reverse_copy(a1.cbegin(), a1.cend(), back_inserter(results2));cout << "\nAfter reverse_copy, results2 contains: ";copy(results2.cbegin(), results2.cend(), output);cout << endl;
}
運行結果:

在上面的程序中我們就使用之前提到的back_inserter函數來在vector對象的末端添加新元素。而back_inserter實際上使用vector的push_back函數來在這個vector對象的末端插入新元素,并不是修改已有元素的值。
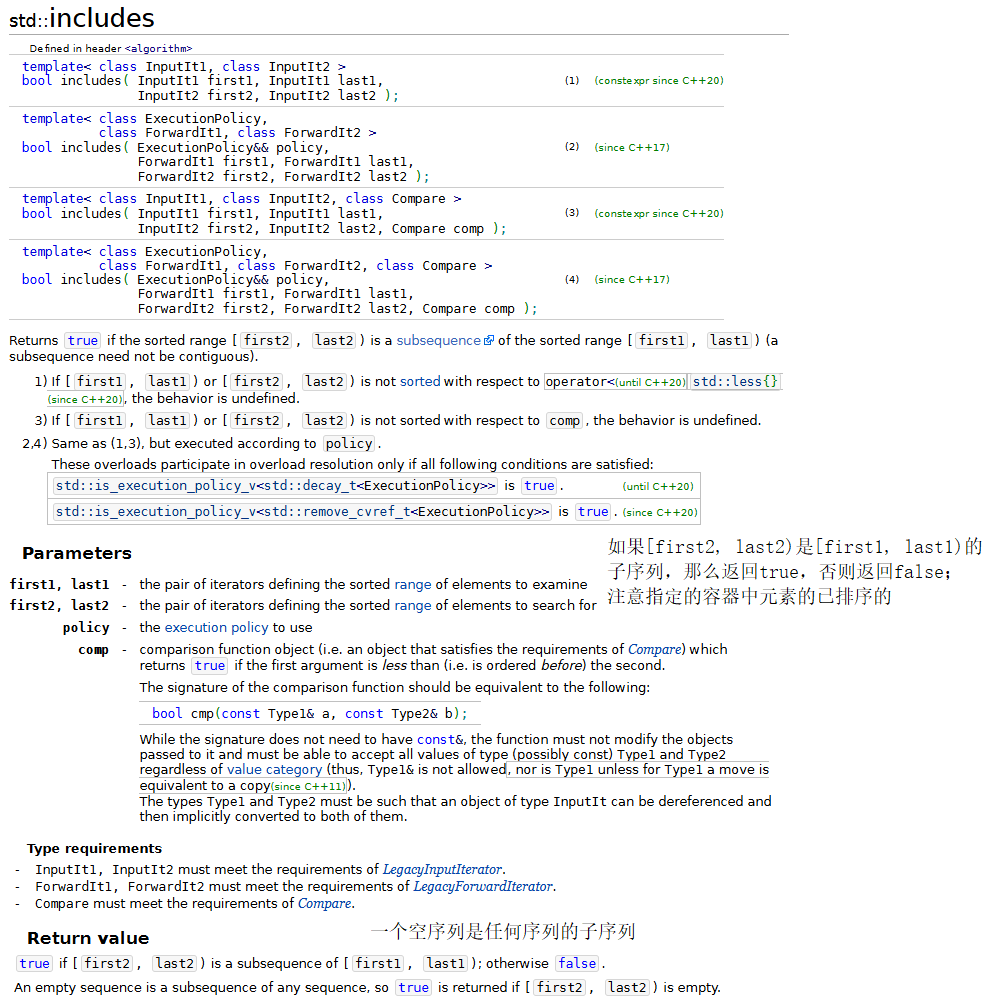
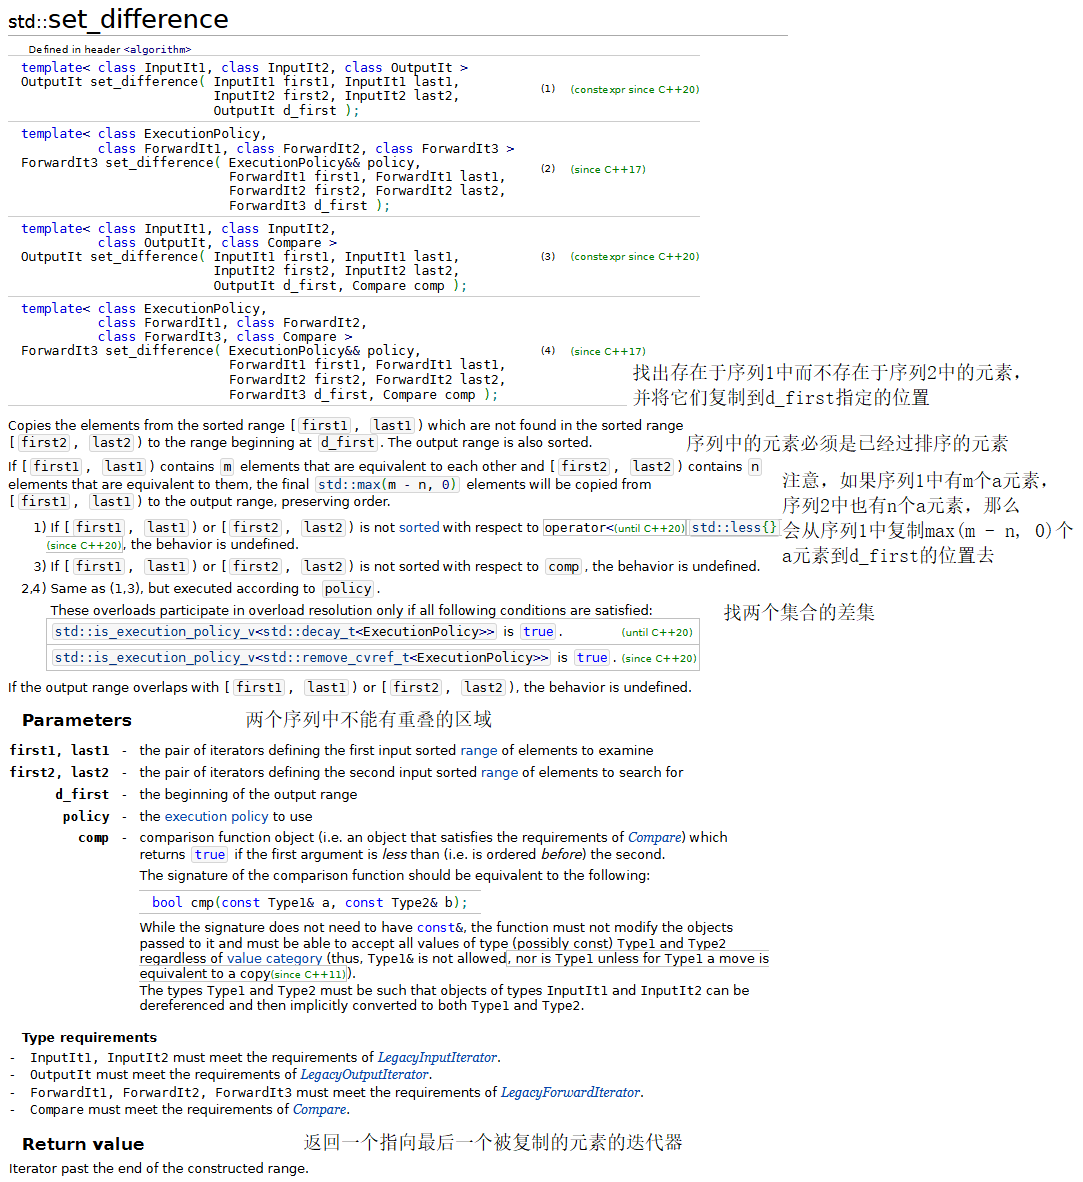
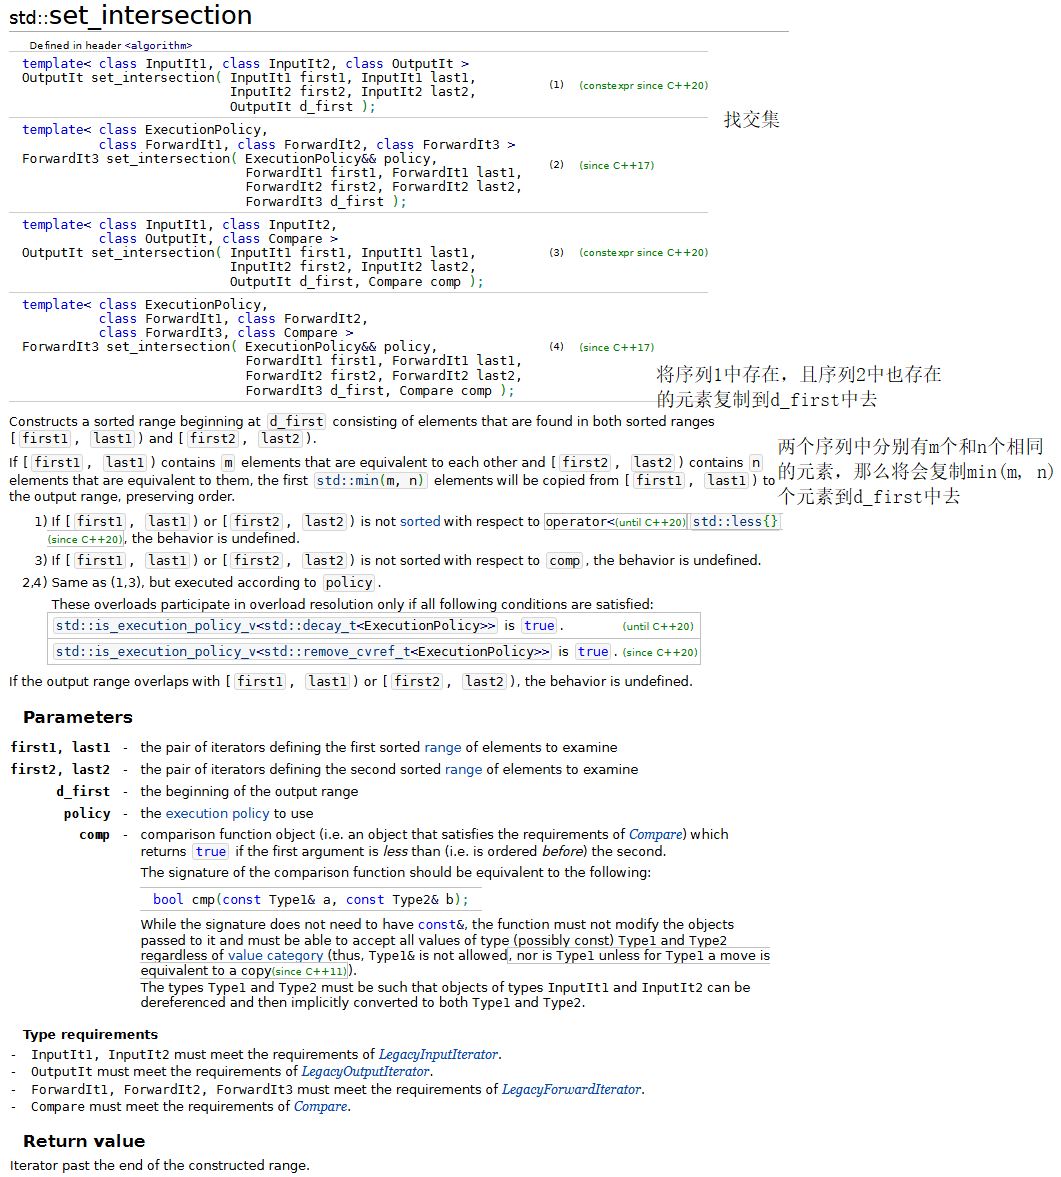
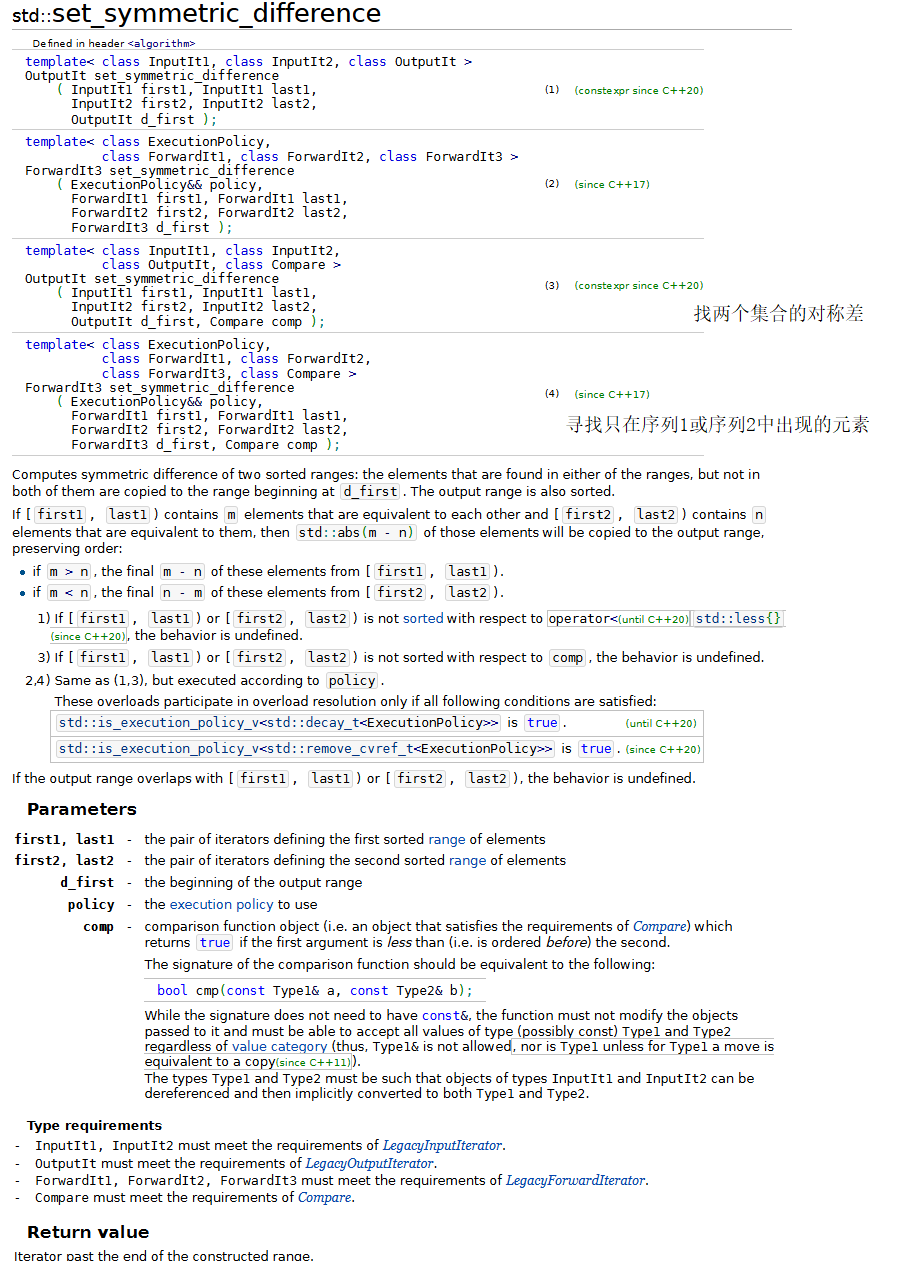
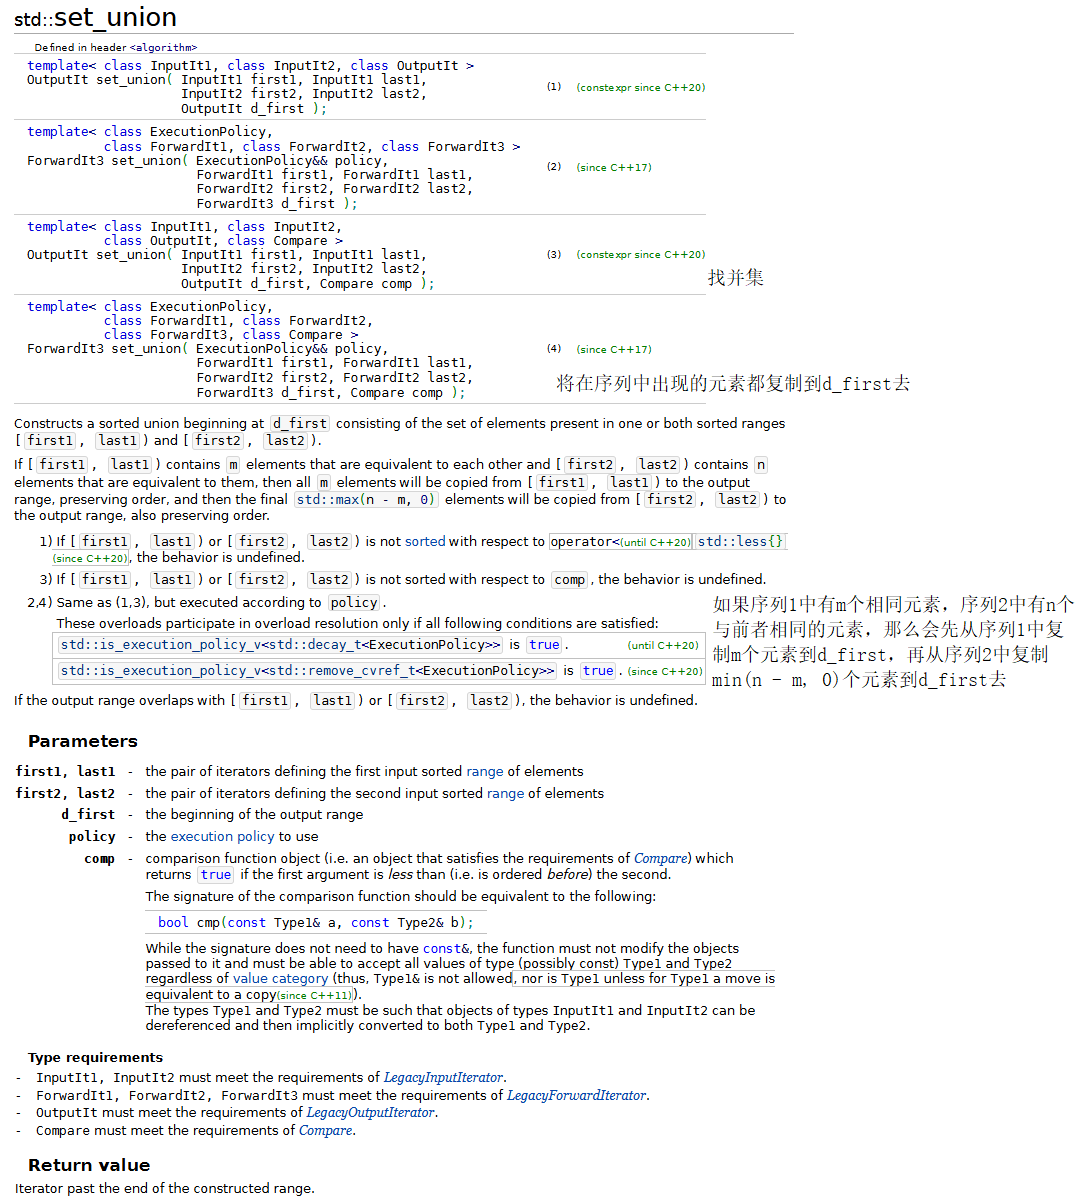
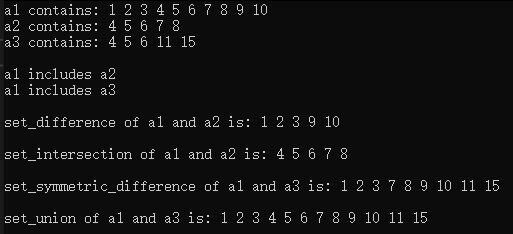
10.集合操作
標準庫中還有一些用來操作有序值集合的算法,包括:includes、set_difference、set_intersection、set_symmetric_difference和set_union。
示例代碼:
#include <iostream>
#include <iterator>
#include <algorithm>
#include <array>
using namespace std;int main()
{const size_t SIZE1 = 10;const size_t SIZE2 = 5;const size_t SIZE3 = 20;array<int, SIZE1> a1 = {1,2,3,4,5,6,7,8,9,10};array<int, SIZE2> a2 = {4,5,6,7,8};array<int, SIZE2> a3 = {4,5,6,11,15};ostream_iterator<int> output(cout, " ");cout << "a1 contains: ";copy(a1.cbegin(), a1.cend(), output);cout << "\na2 contains: ";copy(a2.cbegin(), a2.cend(), output);cout << "\na3 contains: ";copy(a3.cbegin(), a3.cend(), output);// 判斷a2是否是a1的子序列if (includes(a1.cbegin(), a1.cend(), a2.cbegin(), a2.cbegin())){cout << "\n\na1 includes a2";}else{cout << "\n\na1 does not includes a2";}// 判斷a3是否是a1的子序列if (includes(a1.cbegin(), a1.cend(), a3.cbegin(), a3.cbegin())){cout << "\na1 includes a3";}else{cout << "\na1 does not includes a3";}// 測試set_differencearray<int, SIZE1> difference{};auto result1 = set_difference(a1.cbegin(), a1.cend(), a2.cbegin(), a2.cend(), difference.begin());cout << "\n\nset_difference of a1 and a2 is: ";copy(difference.begin(), result1, output);// 測試set_intersectionarray<int, SIZE1> intersection{};auto result2 = set_intersection(a1.cbegin(), a1.cend(),a2.cbegin(), a2.cend(), intersection.begin());cout << "\n\nset_intersection of a1 and a2 is: ";copy(intersection.begin(), result2, output);// 測試set_symmetric_differencearray<int, SIZE1 + SIZE2> symmetric_difference{};auto result3 = set_symmetric_difference(a1.cbegin(), a1.cend(),a3.cbegin(), a3.cend(), symmetric_difference.begin());cout << "\n\nset_symmetric_difference of a1 and a3 is: ";copy(symmetric_difference.begin(), result3, output);// 測試set_unionarray<int, SIZE3> unionSet{};auto result4 = set_union(a1.cbegin(), a1.cend(),a3.cbegin(), a3.cend(), unionSet.begin());cout << "\n\nset_union of a1 and a3 is: ";copy(unionSet.begin(), result4, output);cout << endl;
}
運行結果:
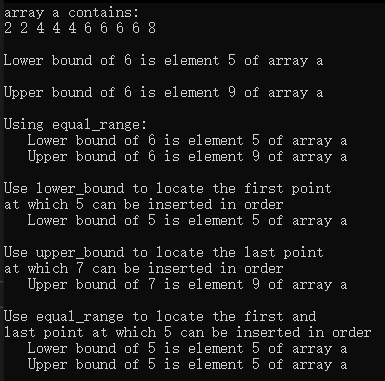
11.lower_bound、upper_bound和equal_range
示例代碼:
#include <iostream>
#include <iterator>
#include <array>
#include <algorithm>
using namespace std;int main()
{const size_t SIZE = 10;array<int, SIZE> a = { 2,2,4,4,4,6,6,6,6,8 };ostream_iterator<int> output(cout, " ");cout << "array a contains:\n";copy(a.cbegin(), a.cend(), output);// 找到a中第一個不小于6的元素auto lower = lower_bound(a.cbegin(), a.cend(), 6);cout << "\n\nLower bound of 6 is element "<< (lower - a.cbegin()) << " of array a";// 找到a中第一個大于6的元素auto upper = upper_bound(a.cbegin(), a.cend(), 6);cout << "\n\nUpper bound of 6 is element "<< (upper - a.cbegin()) << " of array a";auto eq = equal_range(a.cbegin(), a.cend(), 6);cout << "\n\nUsing equal_range:\n   Lower bound of 6 is element "<< (eq.first - a.cbegin()) << " of array a\n   "<< "Upper bound of 6 is element " << (eq.second - a.begin()) << " of array a";// lower_bound的使用場景cout << "\n\nUse lower_bound to locate the first point\n"<< "at which 5 can be inserted in order";lower = lower_bound(a.cbegin(), a.cend(), 5);cout << "\n   Lower bound of 5 is element "<< (lower - a.cbegin()) << " of array a";// upper_bound的使用場景cout << "\n\nUse upper_bound to locate the last point\n"<< "at which 7 can be inserted in order";upper = upper_bound(a.cbegin(), a.cend(), 7);cout << "\n   Upper bound of 7 is element "<< (upper - a.cbegin()) << " of array a";// equal_range的使用場景cout << "\n\nUse equal_range to locate the first and\n"<< "last point at which 5 can be inserted in order";eq = equal_range(a.cbegin(), a.cend(), 5);cout << "\n   Lower bound of 5 is element "<< (eq.first - a.cbegin()) << " of array a"<< "\n   Upper bound of 5 is element " << (eq.second - a.cbegin()) << " of array a"<< endl;
}
運行結果:
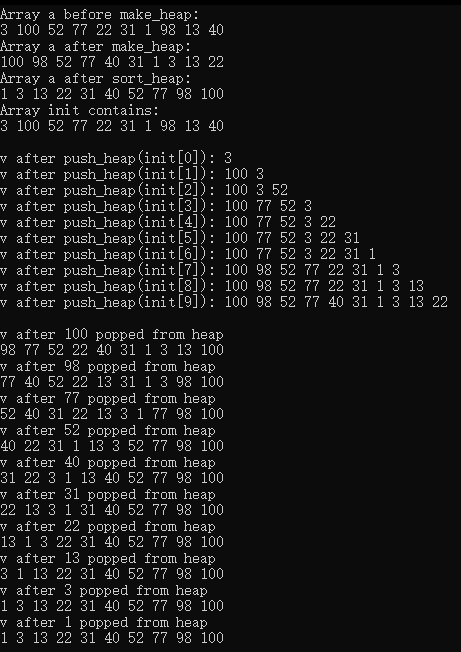
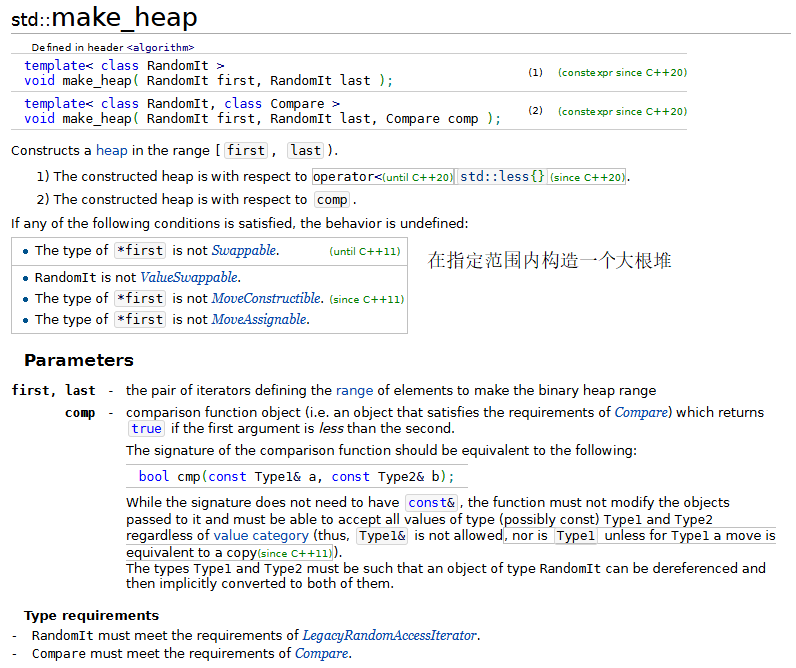
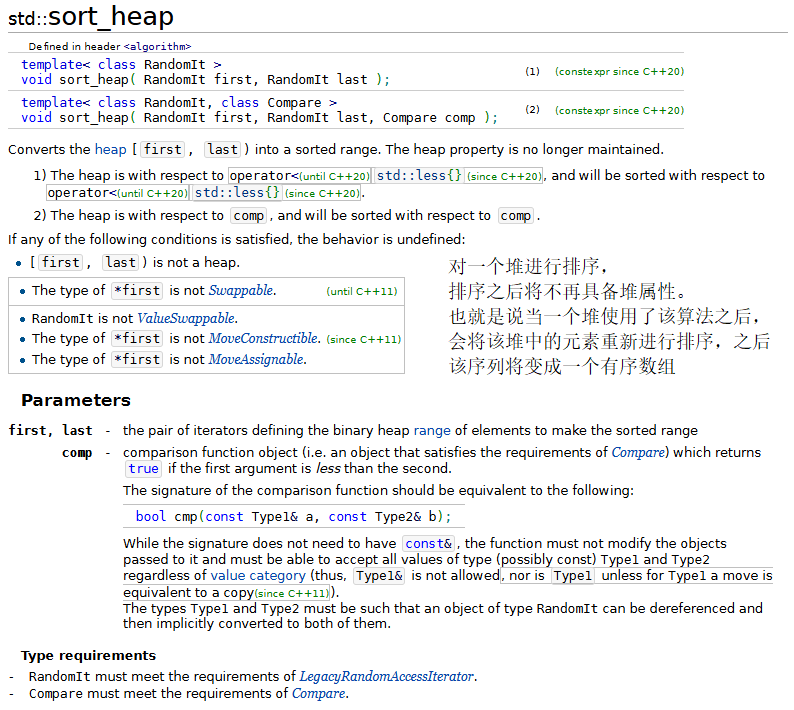
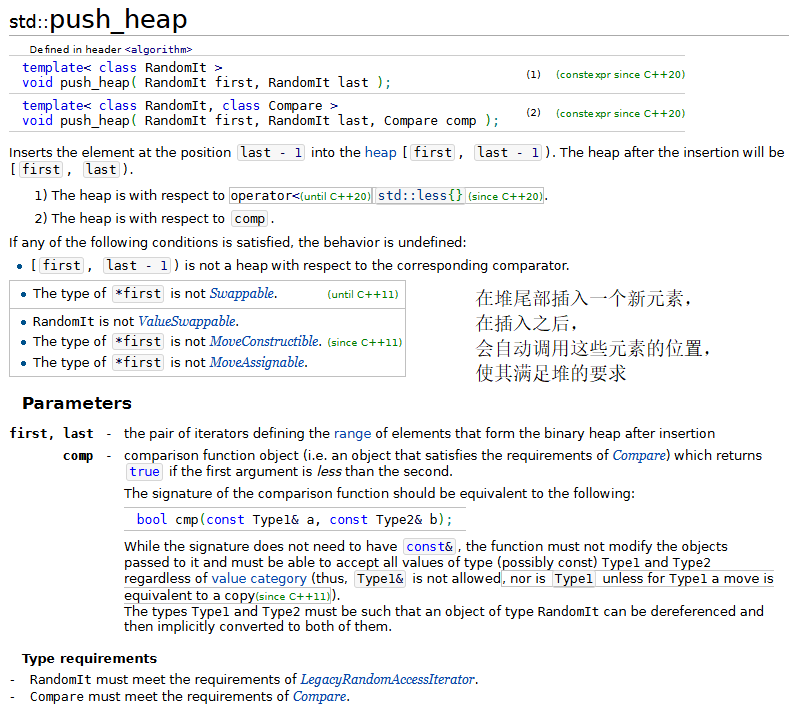
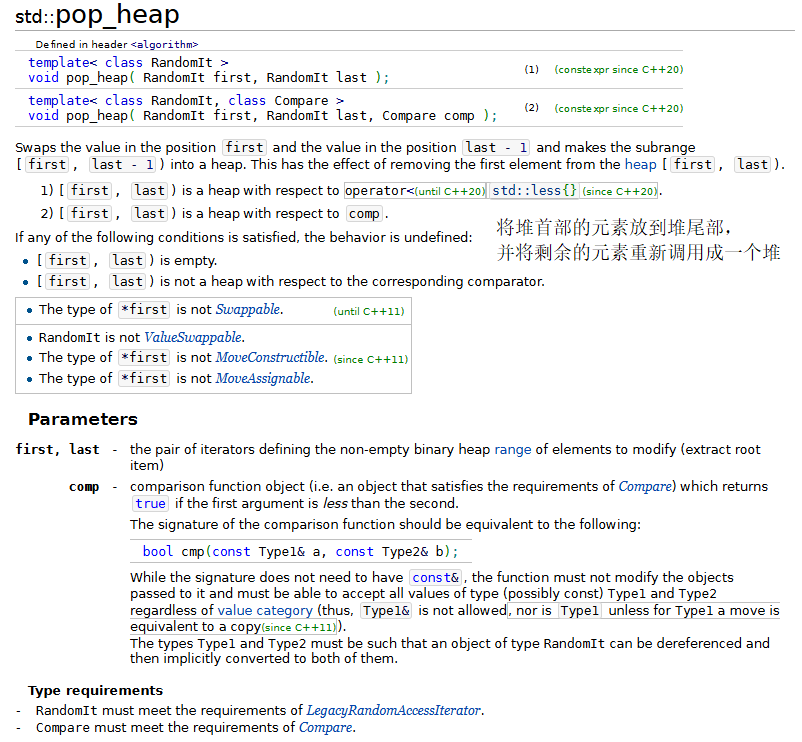
12.堆排序
堆排序是一種排序算法,排序時一個數組中的元素被組織成一個特殊的數據結構——堆。關于堆排序的原理,請在“數據結構”課程中學習。
#include <iostream>
#include <iterator>
#include <algorithm>
#include <array>
#include <vector>
using namespace std;int main()
{const size_t SIZE = 10;array<int, SIZE> init { 3, 100, 52, 77, 22, 31, 1, 98, 13, 40 };array<int, SIZE> a(init);ostream_iterator<int> output(cout, " ");cout << "Array a before make_heap:\n";copy(a.cbegin(), a.cend(), output);// 以array對象a中的元素建立一個堆make_heap(a.begin(), a.end());cout << "\nArray a after make_heap:\n";copy(a.cbegin(), a.cend(), output);// 對堆中的元素進行堆排序sort_heap(a.begin(), a.end());cout << "\nArray a after sort_heap:\n";copy(a.cbegin(), a.cend(), output);cout << "\nArray init contains:\n";copy(init.cbegin(), init.cend(), output);	cout << endl;vector<int> v;// 將init中的元素放入v中for (size_t i = 0; i < SIZE; ++i){v.push_back(init[i]);push_heap(v.begin(), v.end());cout << "\nv after push_heap(init[" << i << "]): ";copy(v.cbegin(), v.cend(), output);}cout << endl;for (size_t i = 0; i < v.size(); ++i){cout << "\nv after " << v[0] << " popped from heap\n";pop_heap(v.begin(), v.end() - i);copy(v.cbegin(), v.cend(), output);}cout << endl;
}
運行結果:

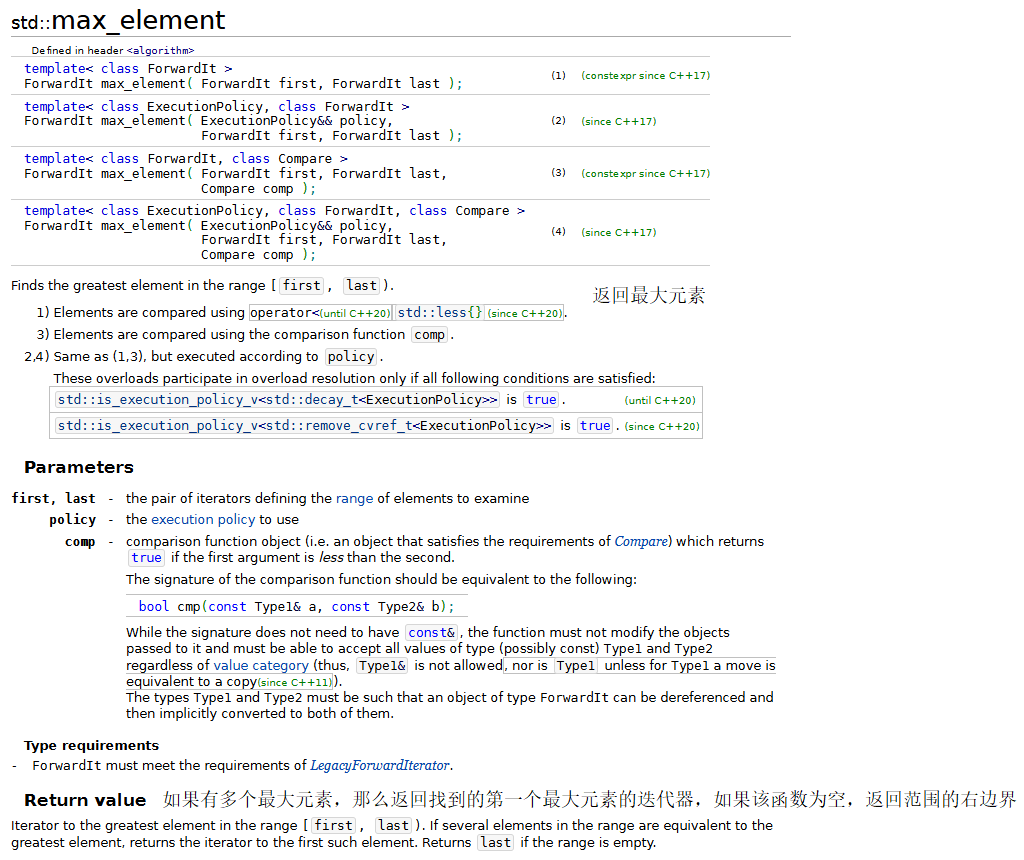
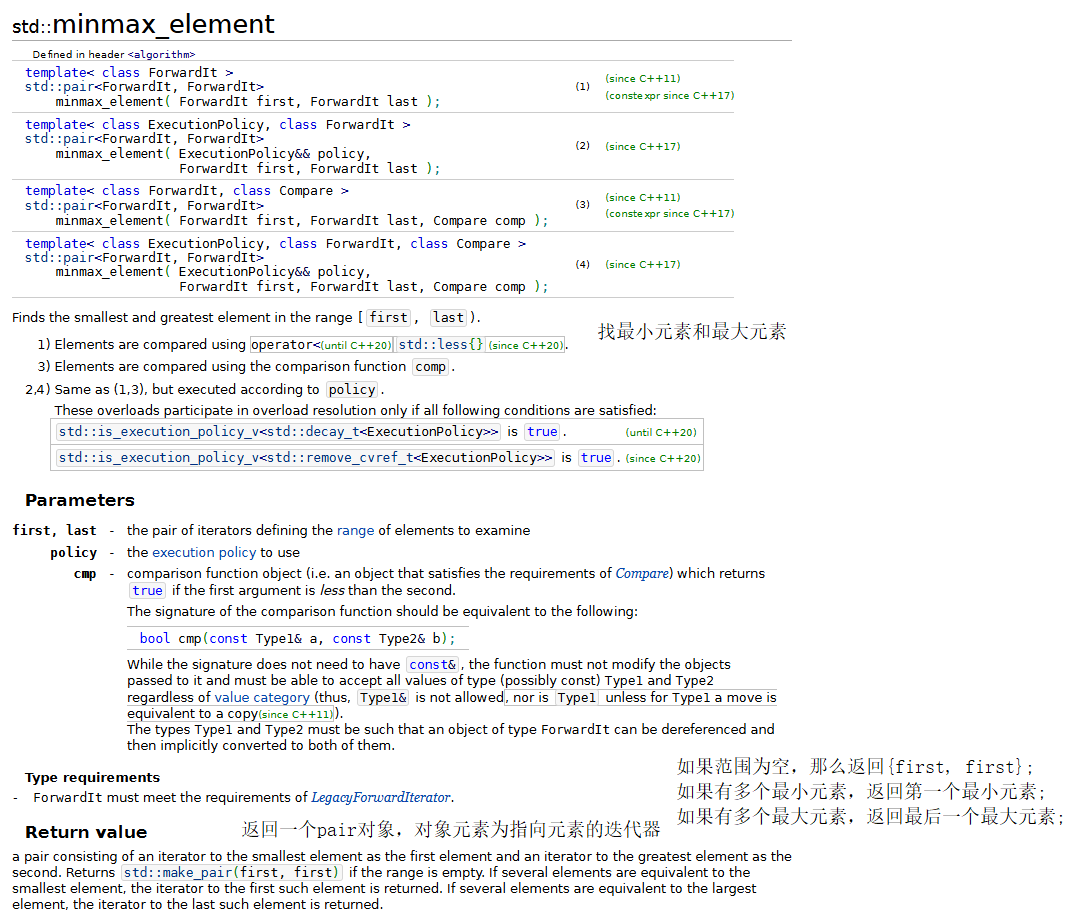
13.min、max、minmax和minmax_element
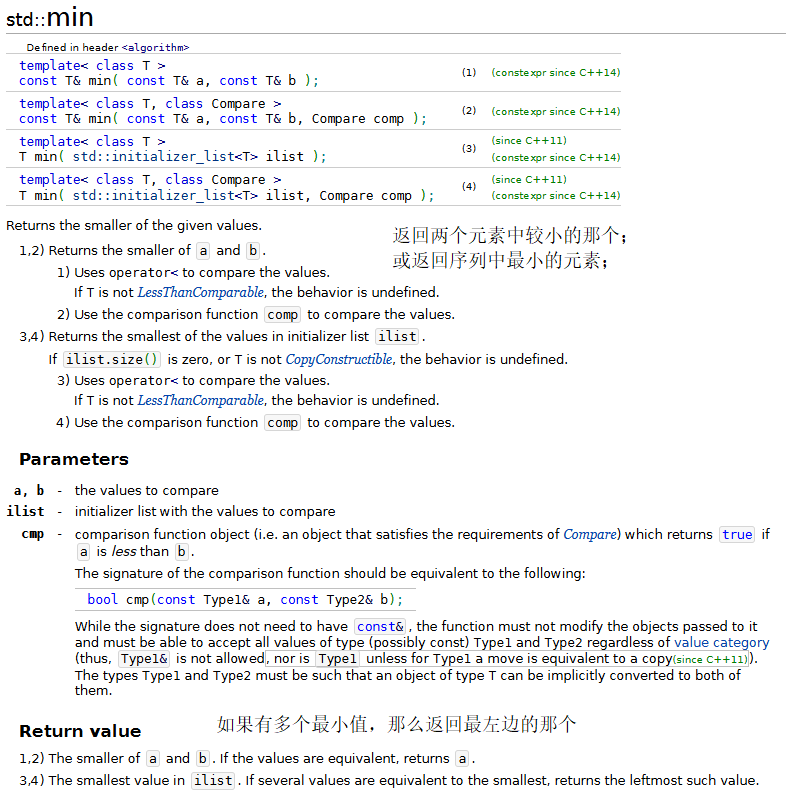
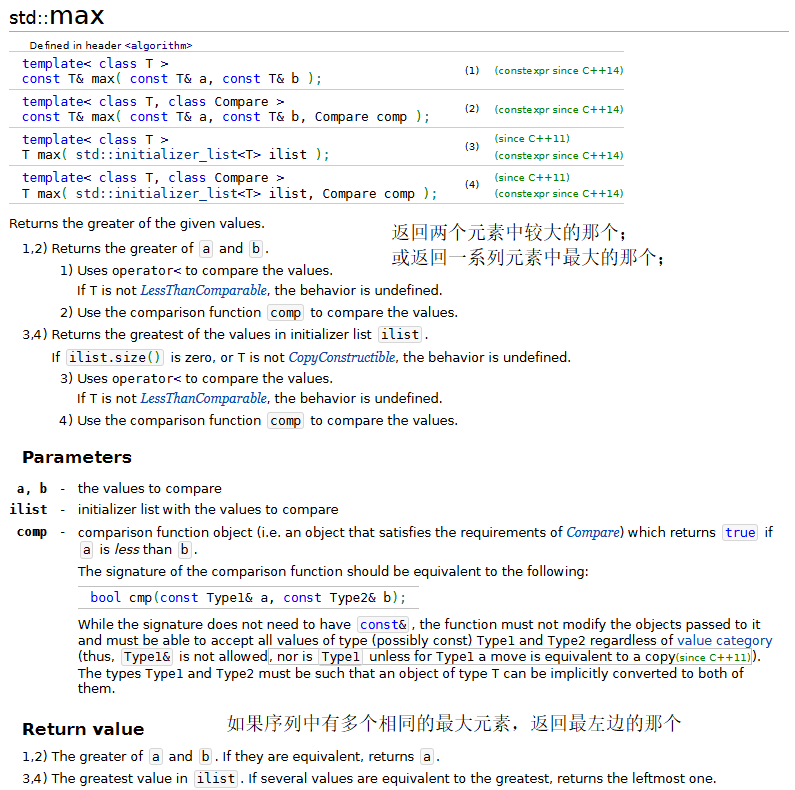
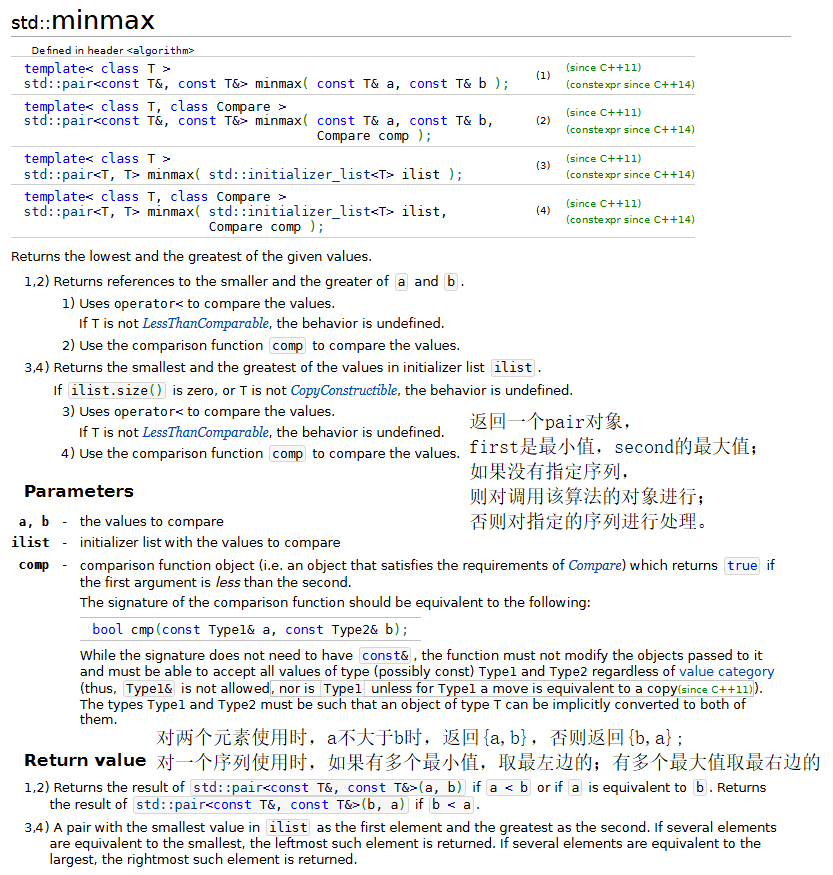
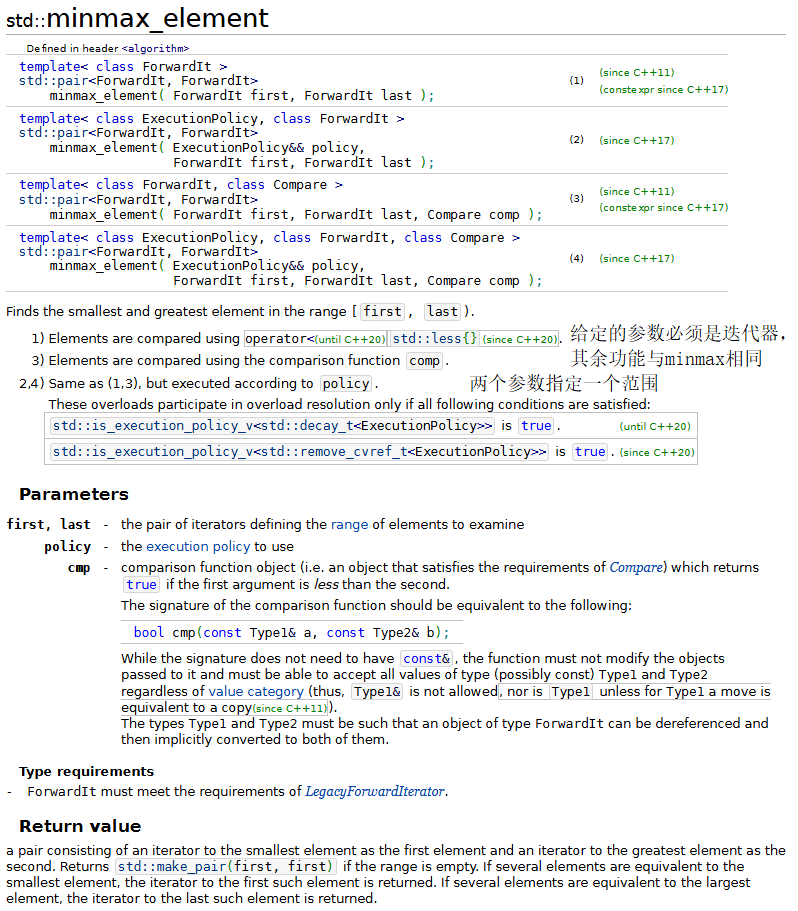
示例代碼:
#include <iostream>
#include <array>
#include <algorithm>
using namespace std;int main()
{cout << "The minimum of 12 and 7 is: " << min(12, 7);cout << "\nThe maximum of 12 and 7 is: " << max(12, 7);cout << "\nThe minimum of 'G' and 'Z' is: " << min('G', 'Z');cout << "\nThe maximum of 'G' and 'Z' is: " << max('G', 'Z');auto result1 = minmax(12, 7);cout << "\n\nThe minimum of 12 and 7 is: " << result1.first<< "\nThe maximum of 12 and 7 is: " << result1.second;array <int, 10> items { 3, 100, 52, 77, 22, 31, 1, 98, 13, 40 };ostream_iterator<int> output(cout, " ");cout << "\n\nArray itmes contains: ";copy(items.cbegin(), items.cend(), output);auto result2 = minmax_element(items.cbegin(), items.cend());cout << "\nThe minimum element in items is: " << *result2.first<< "\nThe maximum element in items is: " << *result2.second<< endl;
}
運行結果:
三、函數對象
很多算法允許以一個函數指針來作為參數以完成它的任務。例如,上面的minmax_element算法就有一個重載的版本,需要用戶提供一個函數來完成元素的比較任務。
任何可以接收函數指針的算法都可以接收一個類的對象,只要這個類提供我們之前學習過的重載函數運算符operator(),且該重載的運算符符合算法的需要。例如在上面的minmax_element算法中,重載的函數運算符必須接收兩個參數,并返回一個bool值。這樣的類的對象就被稱為函數對象,它們在語法和語義上可以像函數或函數指針一樣使用。
函數對象較函數指針的優越之處
與函數指針相比,函數對象有若干優點。
編譯器可以內聯函數對象重載的operator()來提高性能(使用函數指針,每次調用都需要進行函數調用,會產生額外開銷)。
而且,由于是類的對象,函數對象可以具有該重載函數運算符用來執行任務的數據成員(函數指針可以使用全局變量或靜態變量來做到,但是會存在安全隱患)。
標準模板庫中預先定義的函數對象
我們在之前的算法中也曾使用過函數對象less<T>來指定容器元素排序的次序。
| 標準庫函數 | 對象類型 |
|---|---|
| divides<T> | 算術 |
| equal_to<T> | 關系 |
| greater<T> | 關系 |
| greater_equal<T> | 關系 |
| less<T> | 關系 |
| less_equal<T> | 關系 |
| logical_and<T> | 邏輯 |
| logical_not<T> | 邏輯 |
| logical_or<T> | 邏輯 |
| minus<t> | 算術 |
| modulus<T> | 算術 |
| negate<T> | 算術 |
| not_equal_to<T> | 關系 |
| plus<T> | 算術 |
| multiplies<T> | 算術 |
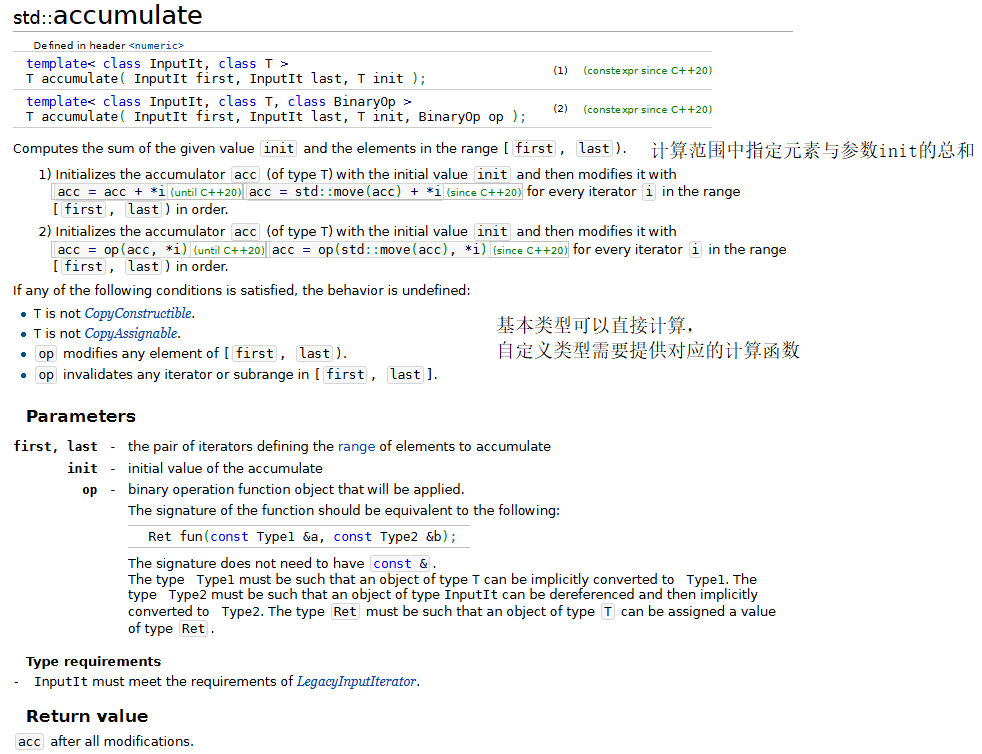
使用標準庫的accumulate算法
該算法我們在前面數學算法中也已經介紹過了,下面我們將創建一個程序,再次使用該算法,一次使用函數指針,一次使用函數對象。
#include <iostream>
#include <array>
#include <algorithm>
#include <numeric>
#include <functional>
#include <iterator>
using namespace std;int sumSquares(int total, int value)
{return total + value * value;
}template <class T>
class SumSquaresClass
{
public:T operator()(const T& total, const T& value){return total + value * value;}
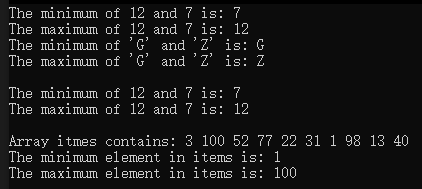
};int main()
{const size_t SIZE = 10;array <int, SIZE> integers { 1,2,3,4,5,6,7,8,9,10 };ostream_iterator<int> output(cout, " ");cout << "array integers contains:\n ";copy(integers.cbegin(), integers.cend(), output);// 使用函數指針作為參數,計算序列中元素的平方和int result = accumulate(integers.cbegin(), integers.cend(), 0, sumSquares);cout << "\n\nSum of squares of elements in integers using "<< "binary\nfunction sumSquares: " << result;// 使用函數對象result = accumulate(integers.cbegin(), integers.cend(), 0, SumSquaresClass<int>());cout << "\n\nSum of squares of elements in integers using "<< "binary\nfunction sumSquares: " << result << endl;
}
運行結果:
上面代碼中的SumSquaresClass<int>()其實就是,使用特化的類SumSquaresClass<int>調用該類的默認構造函數來實例化了一個函數對象,并將該函數對象作為accumulate算法的參數,之后該算法會使用該對象來調用它的成員函數operator(),從而實現函數調用的功能。
四、lambda表達式
在上面的內容中,我們能夠發現有許多的算法可以接收函數指針或函數對象這樣的參數。在將函數指針或函數對象傳遞給算法作參數之前,相應的函數或類必須已經聲明。
C++11的lambda表達式(或lambda函數)這一新特性,使程序員可以在將函數對象傳遞給一個函數的地方定義匿名的函數對象。lambda表達式被局部地定義在函數內,可以(以按值或按引用的方式)獲得它所在函數的局部變量,然后在lambda表達式的體中操作這些變量。
下面展示了一個簡單的lambda表達式的使用示例,它把一個int類型array對象的每個元素值加倍:
#include <iostream>
#include <array>
#include <algorithm>
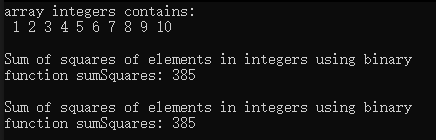
using namespace std;int main()
{const size_t SIZE = 4;array<int, SIZE> values { 1,2,3,4 };// 為指定序列中的每個元素進行同樣的處理for_each(values.cbegin(), values.cend(),// 一個 lambda 表達式[](int i){ cout << i * 2 << endl; });int sum = 0;for_each(values.cbegin(), values.cend(),// 一個 lambda 表達式[&sum](int i) { sum += i; });cout << "Sum is " << sum << endl;
}
運行結果:
lambda表達式lambda導引器([]),然后是形參表和函數體。如果函數體是形如return 表達式;的單條語句,那么返回值類型可以自動地被推斷出來;否則,默認的返回值類型為void,或者可以顯式地使用尾隨返回值類型指明。例如,[](int i) -> int { return i * i; }。編譯器會將這個lambd表達式轉換成一個函數對象。
對于上面的示例代碼中第一個的lambda表達式接收一個int類型的參數i,for_each算法將array對象的每個元素傳遞給這個lambda表達式,由該lambda表達式輸出array中元素值的2倍。
第二個lambda表達式接收一個int類型的參數,且它的lambda導引器[&sum]表明該lambda表達式以按引用的方式獲得了當前程序中的局部變量sum,因此這個lambda表達式可以修改該局部變量的量。如果沒有&符號,則是按值的方式獲得局部變量,也就無法修改當前程序中的sum變量的值。
lambda表達式還可以賦值給變量,然后這個變量可以用來調用lambda表達式或者將它傳遞給其他函數。例如,auto myLambda = [](int i) { cout << i * 2 << endl; };
之后就可以像一個函數名一樣使用此變量名來調用該lambda表達式,如下所示:
myLambda(10); // 輸出20
五、標準庫算法總結
C++標準中將算法分為了幾類,包括改變序列的算法、不改變序列的算法、排序及相關算法、廣義的數值運算等。
該部分內容較多,請自行前往cppreference查閱。
對于標準模板庫中提供的算法,它們提供了實現一種功能的通用方法,所以算法只是將功能抽象出來,使得不同的容器只要能夠滿足最低的迭代器要求,那么就可以使用相同的算法來實現相同的功能,即使它們容器內部中要實現該功能的函數其實不一樣。
對于STL中的容器、算法和迭代器這三個主要組件,容器規定數據的存儲結構以及對這些數據的一些操作方法,算法定制了通用功能的實現,而算法通過迭代器來訪問容器中的數據,使得定制的功能能夠在對應容器中被執行。


)


先進技術)

