介紹
Spring AI 是 Spring 項目中一個面向 AI 應用的模塊,旨在通過集成開源框架、提供標準化的工具和便捷的開發體驗,加速 AI 應用程序的構建和部署。
依賴
<!-- 基于 WebFlux 的響應式 SSE 傳輸 -->
<dependency><groupId>org.springframework.ai</groupId><artifactId>spring-ai-mcp-client-webflux-spring-boot-starter</artifactId>
</dependency>
<!-- mcp -->
<dependency><groupId>org.springframework.ai</groupId><artifactId>spring-ai-mcp-client-spring-boot-starter</artifactId>
</dependency>
<!-- spring-ai -->
<dependency><groupId>org.springframework.ai</groupId><artifactId>spring-ai-openai-spring-boot-starter</artifactId>
</dependency>
<!-- spring-web -->
<dependency><groupId>org.springframework.boot</groupId><artifactId>spring-boot-starter-web</artifactId>
</dependency>
配置文件
配置大模型的 API Key 和模型類型:
spring:ai:openai:base-url: ${AI_BASE_URL}api-key: ${AI_API_KEY} # 通過環境變量文件 .env 獲取chat:options:model: ${AI_MODEL}temperature: 0.8
我這里使用的是 DeepSeek 的 API,可以去官網查看:https://platform.deepseek.com/
# AI URL
AI_BASE_URL=https://api.deepseek.com
# AI 密鑰
AI_API_KEY=sk-xxxxxxxxxxxxxxxxxxxxxxx
# AI 模型
AI_MODEL=deepseek-chat
配置類
概念
首先,簡單介紹一些概念
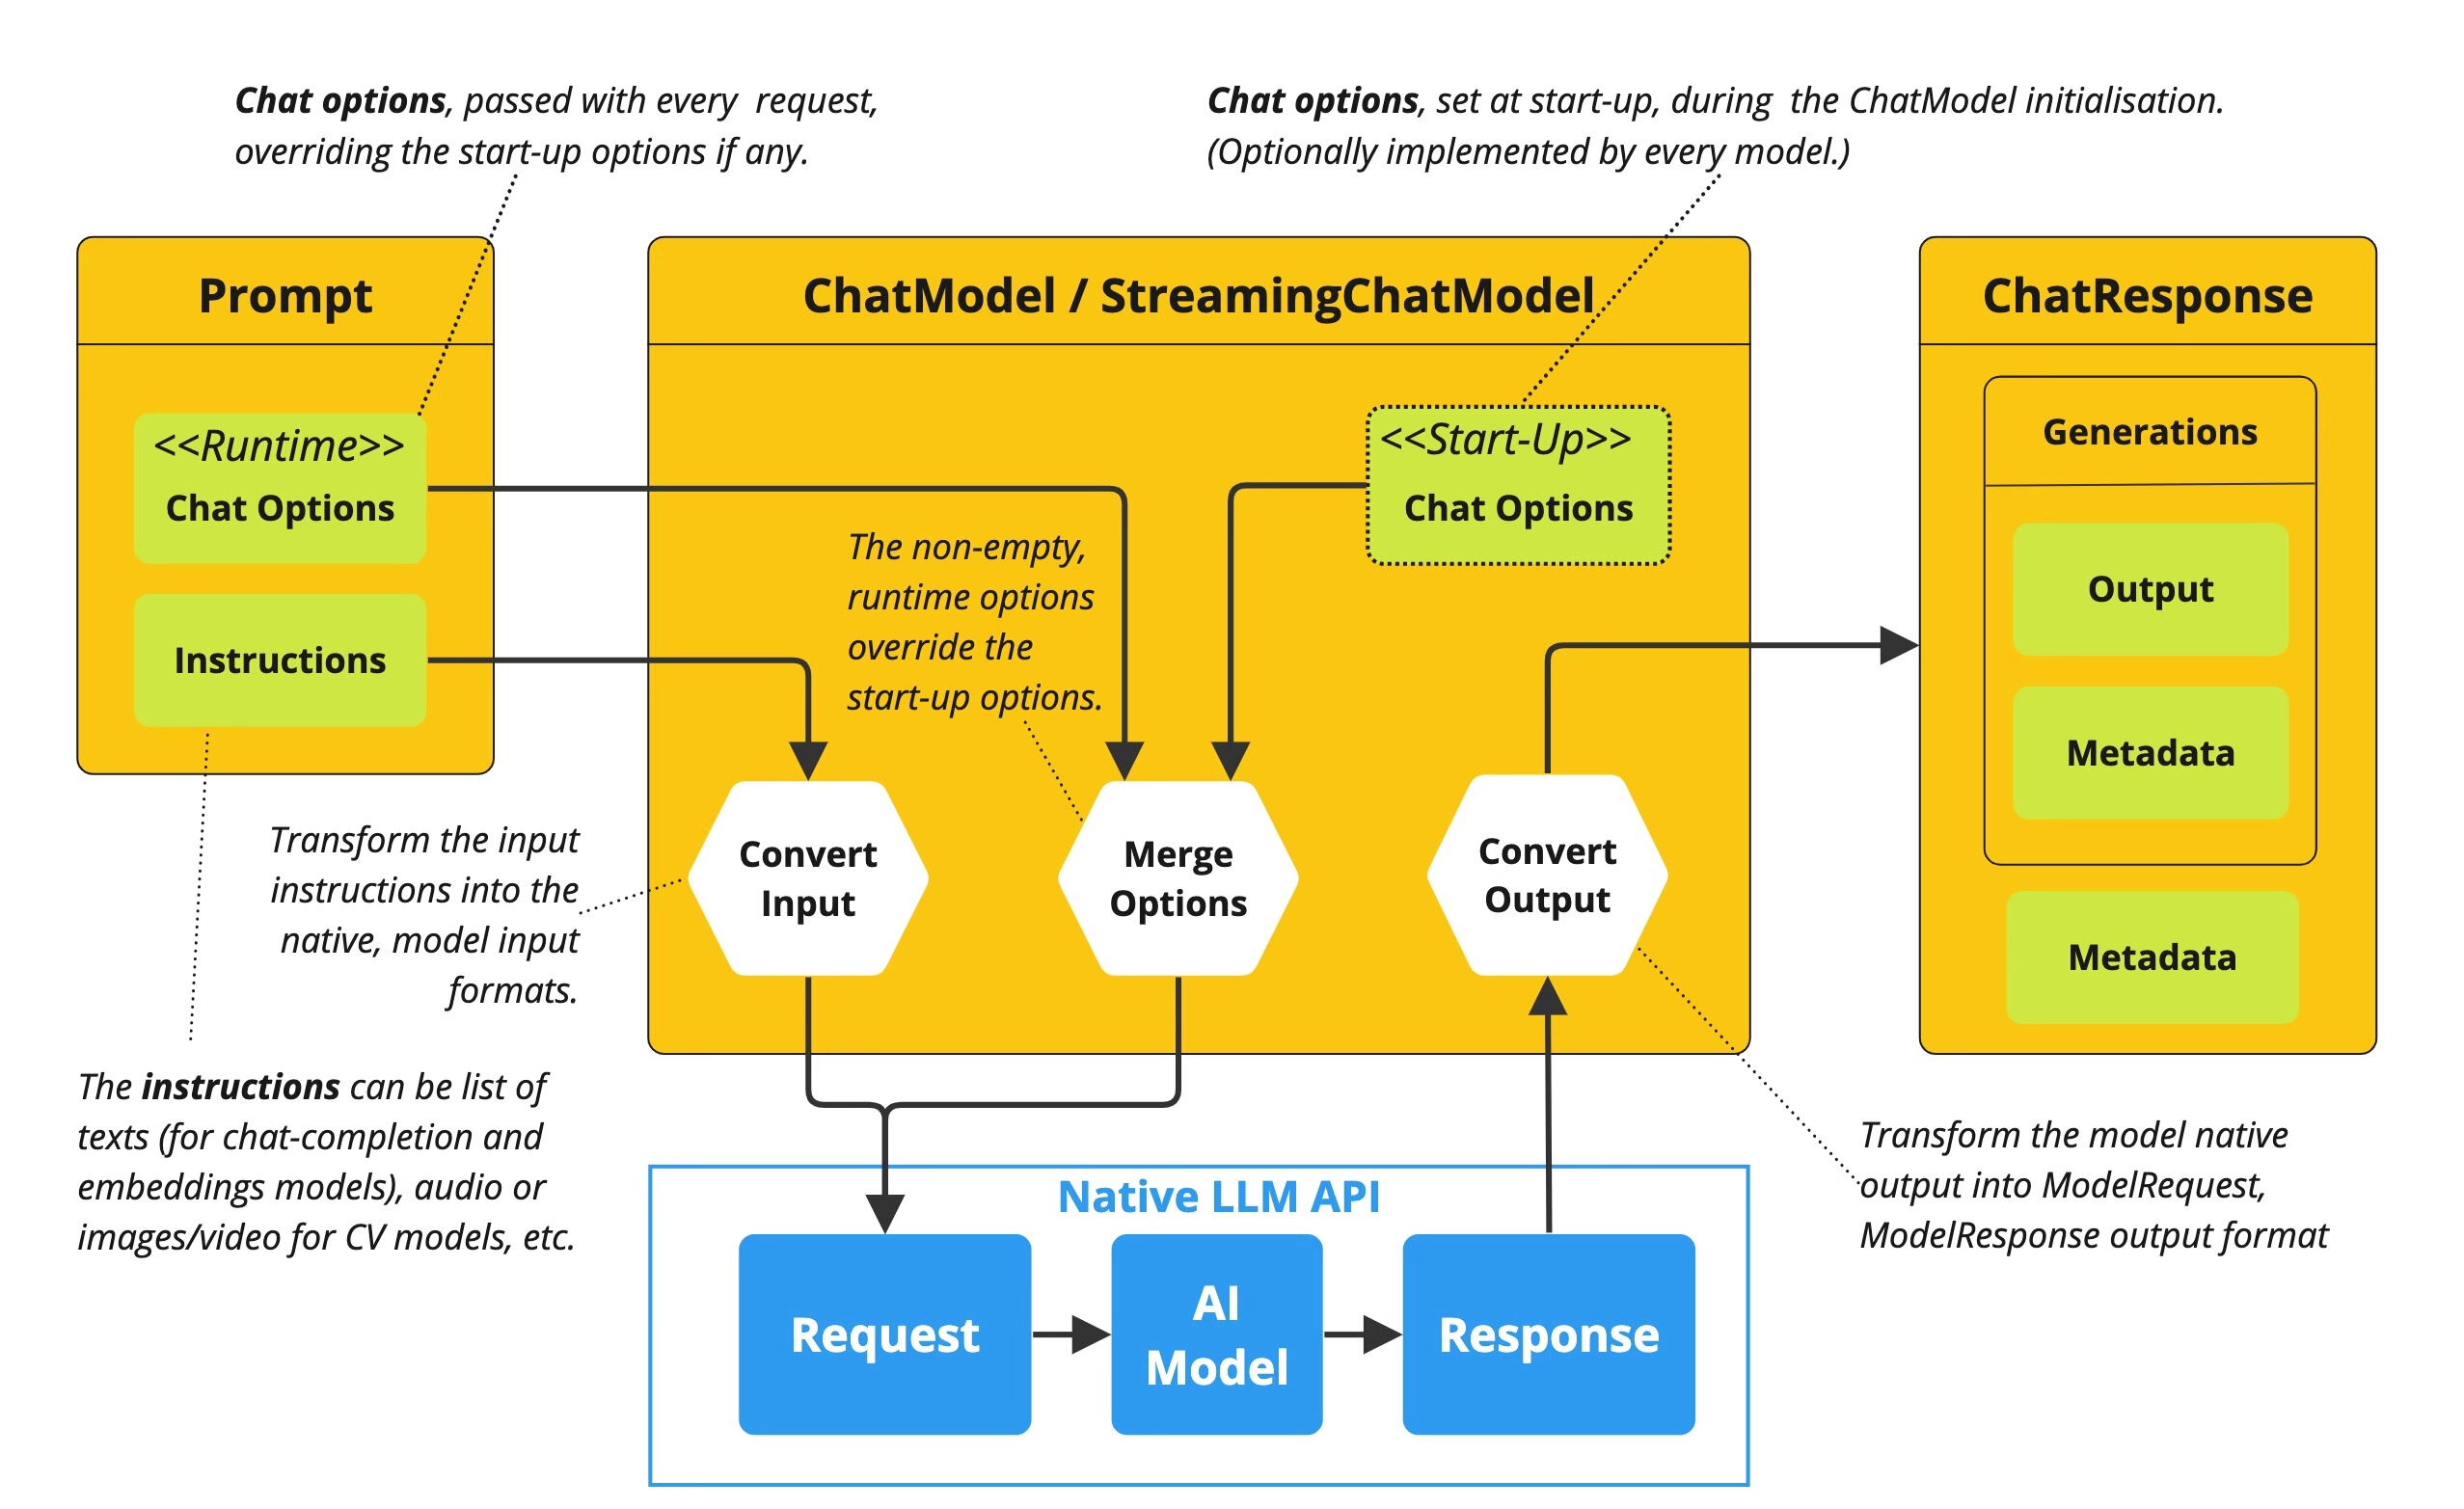
- ChatClient
ChatClient 提供了與 AI 模型通信的 Fluent API,它支持同步和反應式(Reactive)編程模型。
ChatClient 類似于應用程序開發中的服務層,它為應用程序直接提供 AI 服務,開發者可以使用 ChatClient Fluent API 快速完成一整套 AI 交互流程的組裝
- ChatModel
ChatModel 即對話模型,它接收一系列消息(Message)作為輸入,與模型 LLM 服務進行交互,并接收返回的聊天消息(ChatMessage)作為輸出。目前,它有 3 種類型:
-
ChatModel:文本聊天交互模型,支持純文本格式作為輸入,并將模型的輸出以格式化文本形式返回
-
ImageModel:接收用戶文本輸入,并將模型生成的圖片作為輸出返回(文生圖)
-
AudioModel:接收用戶文本輸入,并將模型合成的語音作為輸出返回
ChatModel 的工作原理是接收 Prompt 或部分對話作為輸入,將輸入發送給后端大模型,模型根據其訓練數據和對自然語言的理解生成對話響應,應用程序可以將響應呈現給用戶或用于進一步處理。
問題
一個項目中可能會存在多個大模型的調用實例,例如 ZhiPuAiChatModel(智譜)、OllamaChatModel(Ollama本地模型)、OpenAiChatModel(OpenAi),這些實例都實現了ChatModel 接口,當然,我們可以直接使用這些模型實例來實現需求,但我們通常通過 ChatModel 來構建 ChatClient,因為這更通用。
可以通過在 yml 配置文件中設置 spring.ai.chat.client.enabled=false 來禁用 ChatClient bean 的自動配置,然后為每個聊天模型 build 出一個 ChatClient。
spring:ai:chat:client:enabled: false
配置類
package cn.onism.mcp.config;import jakarta.annotation.Resource;
import org.springframework.ai.chat.client.ChatClient;
import org.springframework.ai.chat.client.advisor.MessageChatMemoryAdvisor;
import org.springframework.ai.chat.memory.InMemoryChatMemory;
import org.springframework.ai.ollama.OllamaChatModel;
import org.springframework.ai.openai.OpenAiChatModel;
import org.springframework.ai.tool.ToolCallbackProvider;
import org.springframework.ai.zhipuai.ZhiPuAiChatModel;
import org.springframework.context.annotation.Bean;
import org.springframework.context.annotation.Configuration;/*** ChatClient 配置** @author wxw* @date 2025-03-25*/
@Configuration
public class ChatClientConfig {@Resourceprivate OpenAiChatModel openAiChatModel;@Resourceprivate ZhiPuAiChatModel zhiPuAiChatModel;@Resourceprivate OllamaChatModel ollamaChatModel;@Resourceprivate ToolCallbackProvider toolCallbackProvider;@Bean("openAiChatClient")public ChatClient openAiChatClient() {return ChatClient.builder(openAiChatModel)// 默認加載所有的工具,避免重復 new.defaultTools(toolCallbackProvider.getToolCallbacks()).defaultAdvisors(new MessageChatMemoryAdvisor(new InMemoryChatMemory())).build();}@Bean("zhiPuAiChatClient")public ChatClient zhiPuAiChatClient() {return ChatClient.builder(zhiPuAiChatModel)// 默認加載所有的工具,避免重復 new.defaultTools(toolCallbackProvider.getToolCallbacks()).defaultAdvisors(new MessageChatMemoryAdvisor(new InMemoryChatMemory())).build();}@Bean("ollamaChatClient")public ChatClient ollamaChatClient() {return ChatClient.builder(ollamaChatModel)// 默認加載所有的工具,避免重復 new.defaultTools(toolCallbackProvider.getToolCallbacks()).defaultAdvisors(new MessageChatMemoryAdvisor(new InMemoryChatMemory())).build();}
}
使用 ChatClient 的時候,@Resource 注解會按 Bean 的名稱注入
@Resource
private ChatClient openAiChatClient;@Resource
private ChatClient ollamaChatClient;@Resource
private ChatClient zhiPuAiChatClient;
基礎對話
普通響應
使用 call 方法來調用大模型
private ChatClient openAiChatModel;@GetMapping("/chat")
public String chat(){Prompt prompt = new Prompt("你好,請介紹下你自己");String response = openAiChatModel.prompt(prompt).call().content();return response;
}
流式響應
call 方法修改為 stream,最終返回一個 Flux 對象
@GetMapping(value = "/chat/stream", produces = "text/html;charset=UTF-8")
public Flux<String> stream() {Prompt prompt = new Prompt("你好,請介紹下你自己");String response = openAiChatModel.prompt(prompt).stream().content();return response;
}
tips:我們可以通過緩存減少重復請求,提高性能。可以使用 Spring Cache 的 @Cacheable 注解實現:
@Cacheable("getChatResponse")
public String getChatResponse(String message){String response = openAiChatModel.prompt().user(message).call().content();return response;
}
tips: 適用于批量處理場景。可以使用 Spring 的 @Async 注解實現:
@Async
public CompletableFuture<String> getAsyncChatResponse(String message) {return CompletableFuture.supplyAsync(() -> openAiChatModel.prompt().user(message).call().content());
}
3 種組織提示詞的方式
Prompt
通過 Prompt 來封裝提示詞實體,適用于簡單場景
Prompt prompt = new Prompt("介紹下你自己");
PromptTemplate
使用提示詞模板 PromptTemplate 來復用提示詞,即將提示詞的大體框架構建好,用戶僅輸入關鍵信息完善提示詞
其中,{ } 作為占位符,promptTemplate.render 方法來填充
@GetMapping("/chat/formatPrompt")
public String formatPrompt(@RequestParam(value = "money") String money,@RequestParam(value = "number") String number,@RequestParam(value = "brand") String brand
) {PromptTemplate promptTemplate = new PromptTemplate("""根據我目前的經濟情況{money},只推薦{number}部{brand}品牌的手機。""");Prompt prompt = new Prompt(promptTemplate.render(Map.of("money",money,"number", number, "brand", brand)));return openAiChatModel.prompt(prompt).call().content();
}
Message
使用 Message ,提前約定好大模型的功能或角色
消息類型:
系統消息(SystemMessage):設定對話的背景、規則或指令,引導 AI 的行為
用戶消息(UserMessage):表示用戶的輸入,即用戶向 AI 提出的問題或請求
助手消息(AssistantMessage):表示 AI 的回復,即模型生成的回答
工具響應消息(ToolResponseMessage):當 AI 調用外部工具(如 API)后,返回 工具的執行結果,供 AI 進一步處理
@GetMapping("/chat/messagePrompt")
public String messagePrompt(@RequestParam(value = "book", defaultValue = "《白夜行》") String book) {// 用戶輸入UserMessage userMessage = new UserMessage(book);log.info("userMessage: {}", userMessage);// 對系統的指令SystemMessage systemMessage = new SystemMessage("你是一個專業的評書人,給出你的評價吧!");log.info("systemMessage: {}", systemMessage);// 組合成完整的提示詞,注意,只能是系統指令在前,用戶消息在后,否則會報錯Prompt prompt = new Prompt(List.of(systemMessage, userMessage));return openAiChatModel.prompt(prompt).call().content();
}
保存 prompt
prompt 不宜嵌入到代碼中,可以將作為一個 .txt 文件 其保存到 src/main/resources/prompt 目錄下,使用讀取文件的工具類就可以讀取到 prompt
package cn.onism.mcp.utils;import org.springframework.core.io.ClassPathResource;
import org.springframework.stereotype.Component;import java.io.BufferedReader;
import java.io.IOException;
import java.io.InputStream;
import java.io.InputStreamReader;
import java.nio.charset.StandardCharsets;/*** @description: 讀取文件內容的工具類* @date: 2025/5/8*/
@Component
public class FileContentReader {public String readFileContent(String filePath) {StringBuilder content = new StringBuilder();try {// 創建 ClassPathResource 對象以獲取類路徑下的資源ClassPathResource resource = new ClassPathResource(filePath);// 打開文件輸入流InputStream inputStream = resource.getInputStream();// 創建 BufferedReader 用于讀取文件內容BufferedReader reader = new BufferedReader(new InputStreamReader(inputStream, StandardCharsets.UTF_8));String line;// 逐行讀取文件內容while ((line = reader.readLine()) != null) {content.append(line).append("\n");}// 關閉輸入流reader.close();} catch (IOException e) {// 若讀取文件時出現異常,打印異常信息e.printStackTrace();}return content.toString();}
}
PromptTemplate promptTemplate = new PromptTemplate(fileContentReader.readFileContent("prompt/formatPrompt.txt")
);
解析模型輸出(結構化)
模型輸出的格式是不固定的,無法直接解析或映射到 Java 對象,因此,Spring AI 通過在提示詞中添加格式化指令要求大模型按特定格式返回內容,在拿到大模型輸出數據后通過轉換器做結構化輸出。

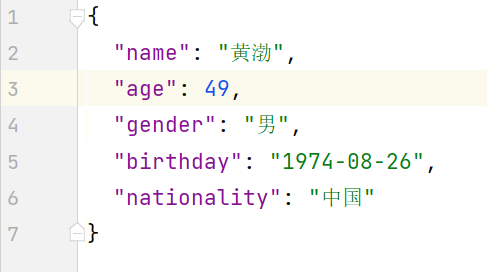
實體類 Json 格式
首先我們定義一個實體類 ActorInfo
@Data
@Description("演員信息")
public class ActorInfo {@JsonPropertyDescription("演員姓名")private String name;@JsonPropertyDescription("演員年齡")private Integer age;@JsonPropertyDescription("演員性別")private String gender;@JsonPropertyDescription("演員出生日期")private String birthday;@JsonPropertyDescription("演員國籍")private String nationality;
}
在 call 方法后面調用 entity 方法,把對應實體類的 class 傳遞進去即能做到結構化輸出
@GetMapping("/chat/actor")
public ActorInfo queryActorInfo(@RequestParam(value = "actorName") String actorName) {PromptTemplate promptTemplate = new PromptTemplate("查詢{actorName}演員的詳細信息");Prompt prompt = new Prompt(promptTemplate.render(Map.of("actorName", actorName)));ActorInfo response = openAiChatModel.prompt(prompt).call().entity(ActorInfo.class);return response;
}
結果符合要求
List 列表格式
在 entity 方法中傳入 new ListOutputConverter(new DefaultConversionService())
@GetMapping("/chat/actorMovieList")
public List<String> queryActorMovieList(@RequestParam(value = "actorName") String actorName) {PromptTemplate promptTemplate = new PromptTemplate("查詢{actorName}主演的電影");Prompt prompt = new Prompt(promptTemplate.render(Map.of("actorName", actorName)));List<String> response = openAiChatModel.prompt(prompt).call().entity(new ListOutputConverter(new DefaultConversionService()));return response;
}
Map 格式
tips: 目前在 Map 中暫不支持嵌套復雜類型,因此 Map 中不能返回實體類,而只能是 Object。
在 entity 方法中傳入 new ParameterizedTypeReference<>() {}
@GetMapping("/chat/actor")
public Map<String, Object> queryActorInfo(@RequestParam(value = "actorName") String actorName) {PromptTemplate promptTemplate = new PromptTemplate("查詢{actorName}演員及另外4名相關演員的詳細信息");Prompt prompt = new Prompt(promptTemplate.render(Map.of("actorName", actorName)));Map<String, Object> response = openAiChatModel.prompt(prompt).call().entity(new ParameterizedTypeReference<>() {});return response;
}
多模態
deepseek 暫時不支持多模態,因此這里選用 智譜:https://bigmodel.cn/
依賴與配置
<dependency><groupId>org.springframework.ai</groupId><artifactId>spring-ai-zhipuai</artifactId><version>1.0.0-M6</version>
</dependency>
spring:ai:zhipuai:api-key: ${ZHIPUAI_API_KEY}chat:options:model: ${ZHIPUAI_MODEL}temperature: 0.8
# api-key
ZHIPUAI_API_KEY=xxxxxxxxxxxxxxxxxxxxxxxxxxxxx.xxxxxxxxxxxxxxx
# 所選模型
ZHIPUAI_MODEL=glm-4v-plus-0111
理解圖片
在 src/main/resources/images 目錄下保存圖片
創建一個 ZhiPuAiChatModel,將用戶輸入和圖片封裝成一個 UserMessage,然后使用 call 方法傳入一個 prompt,最后獲得輸出
@Resource
private ZhiPuAiChatModel zhiPuAiChatModel;@GetMapping("/chat/pic")
public String pic() {Resource imageResource = new ClassPathResource("images/mcp.png");// 構造用戶消息var userMessage = new UserMessage("解釋一下你在這幅圖中看到了什么?",new Media(MimeTypeUtils.IMAGE_PNG, imageResource));ChatResponse chatResponse = zhiPuAiChatModel.call(new Prompt(userMessage));return chatResponse.getResult().getOutput().getText();
}
文生圖
這里需要使用 zhiPuAiImageModel,我們調用它的 call 方法,傳入一個 ImagePrompt,ImagePrompt 由**用戶圖片描述輸入 ImageMessage **和 **圖片描述信息 OpenAiImageOptions **所構成,
其中,
- model 要選擇適用于圖像生成任務的模型,這里我們選擇了 cogview-4-250304
- quality 為圖像生成圖像的質量,默認為 standard
- hd : 生成更精細、細節更豐富的圖像,整體一致性更高,耗時約20 秒
- standard :快速生成圖像,適合對生成速度有較高要求的場景,耗時約 5-10 秒
@Autowired
ZhiPuAiImageModel ziPuAiImageModel;@Autowired
private FileUtils fileUtils;@GetMapping("/outputImg")
public void outputImg() throws IOException {ImageMessage userMessage = new ImageMessage("一個仙人掌大象");OpenAiImageOptions chatOptions = OpenAiImageOptions.builder().model("cogview-4-250304").quality("hd").N(1).height(1024).width(1024).build();ImagePrompt prompt = new ImagePrompt(userMessage, chatOptions);// 調用ImageResponse imageResponse = ziPuAiImageModel.call(prompt);// 輸出的圖片Image image = imageResponse.getResult().getOutput();// 保存到本地InputStream in = new URL(image.getUrl()).openStream();fileUtils.saveStreamToFile(in,"src/main/resources/images", "pic"+RandomUtils.insecure().randomInt(0, 100)+".png");
}
@Component
public class FileUtils {public String saveStreamToFile(InputStream inputStream, String filePath, String fileName) throws IOException {// 創建目錄(如果不存在)Path dirPath = Paths.get(filePath);if (!Files.exists(dirPath)) {Files.createDirectories(dirPath);}// 構建完整路徑Path targetPath = dirPath.resolve(fileName);// 使用 try-with-resources 確保流關閉try (inputStream) {Files.copy(inputStream, targetPath, StandardCopyOption.REPLACE_EXISTING);}return targetPath.toAbsolutePath().toString();}
}
調用本地模型
_**tips: **_若想零成本調用大模型,并且保障隱私,可以閱讀本章節
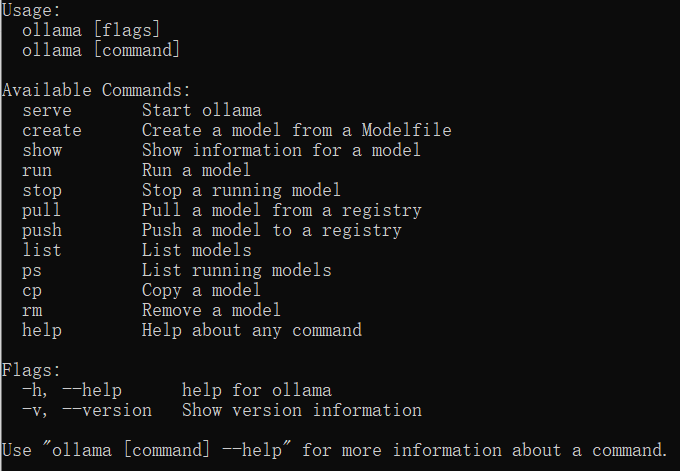
下載安裝 Ollama
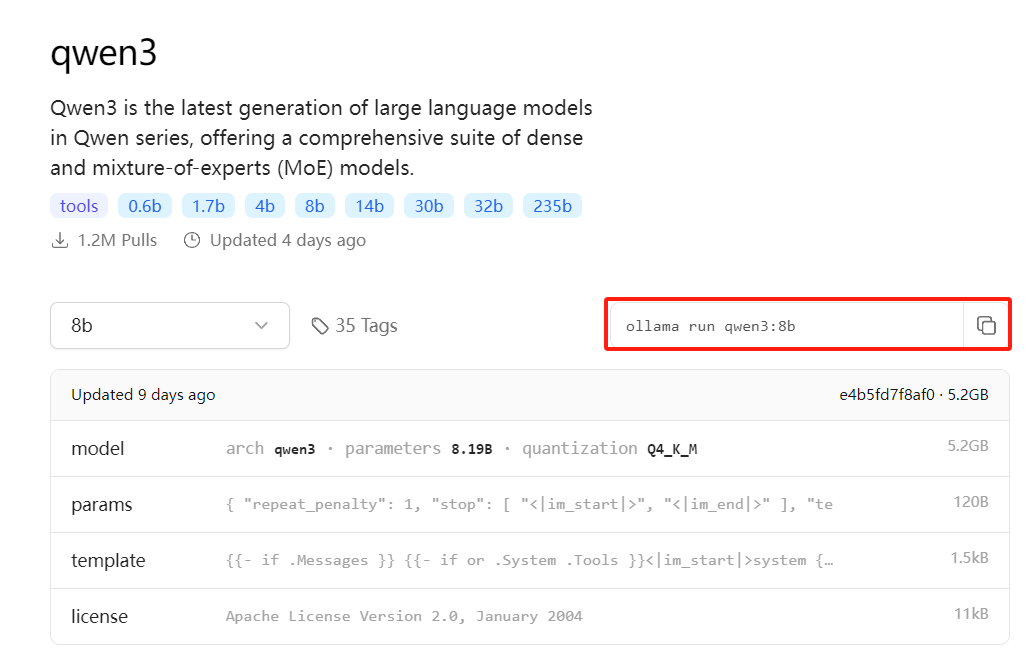
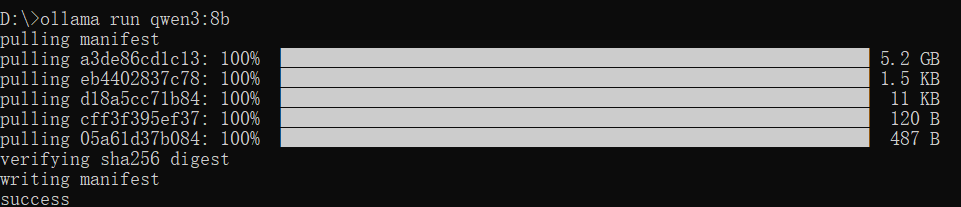
下載安裝 Ollama:https://ollama.com/ [Ollama 是一個開源的大型語言模型服務工具,旨在幫助用戶快速在本地運行大模型。通過簡單的安裝指令,用戶可以通過一條命令輕松啟動和運行開源的大型語言模型。Ollama 是 LLM 領域的 Docker],安裝完成后執行 ollama 得到如下輸出則表明安裝成功
選擇一個模型下載到本地:https://ollama.com/search,我這里選擇了 qwen3:8b
引入 ollama 依賴
<dependency><groupId>org.springframework.ai</groupId><artifactId>spring-ai-ollama-spring-boot-starter</artifactId>
</dependency>
配置
spring:ai:ollama:chat:model: ${OLLAMA_MODEL}base-url: ${OLLAMA_BASE_URL}
# 本地模型
OLLAMA_MODEL=qwen3:8b
# URL
OLLAMA_BASE_URL=http://localhost:11434
實際調用
/*** ollama本地模型測試* @param input* @return*/
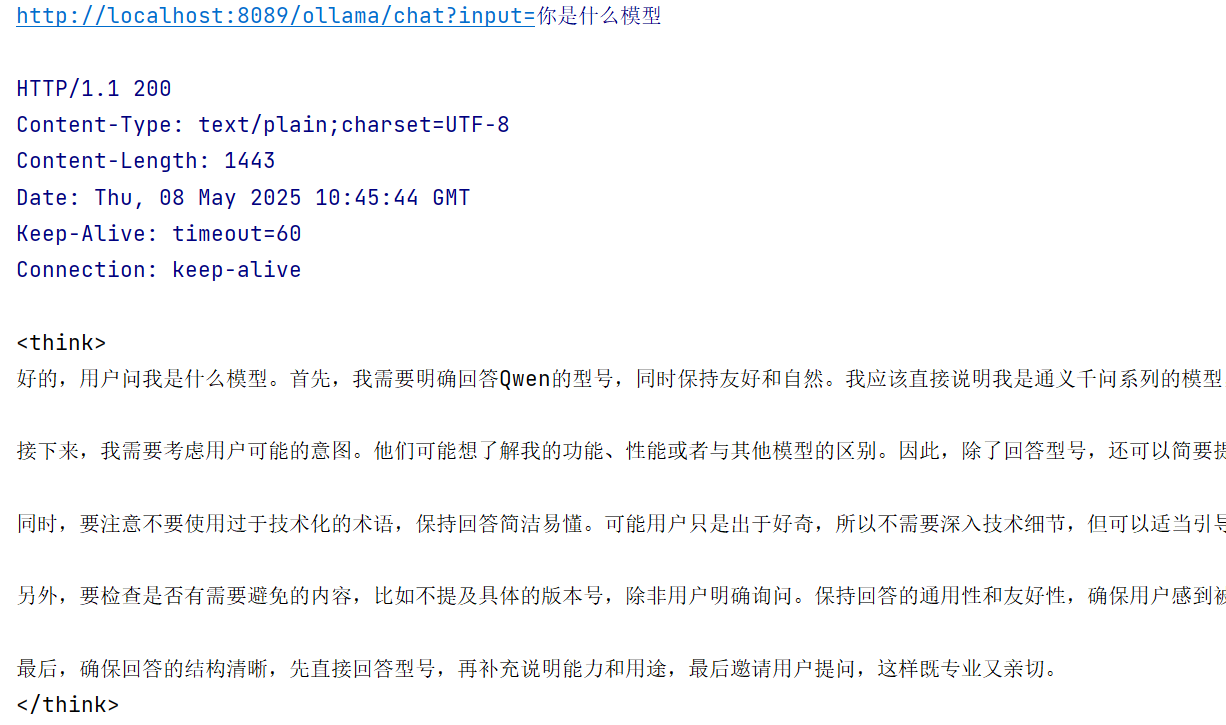
@GetMapping("/ollama/chat")
public String ollamaChat(@RequestParam(value = "input") String input) {Prompt prompt = new Prompt(input);return ollamaChatModel.call(prompt).getResult().getOutput().getText();
}
結果
對話記憶
內存記憶(短期)
MessageChatMemoryAdvisor 可以用來提供聊天記憶功能,這需要傳遞一個基于內存記憶的 ChatMemory
/*** 內存記憶/短期記憶* @param input* @return*/
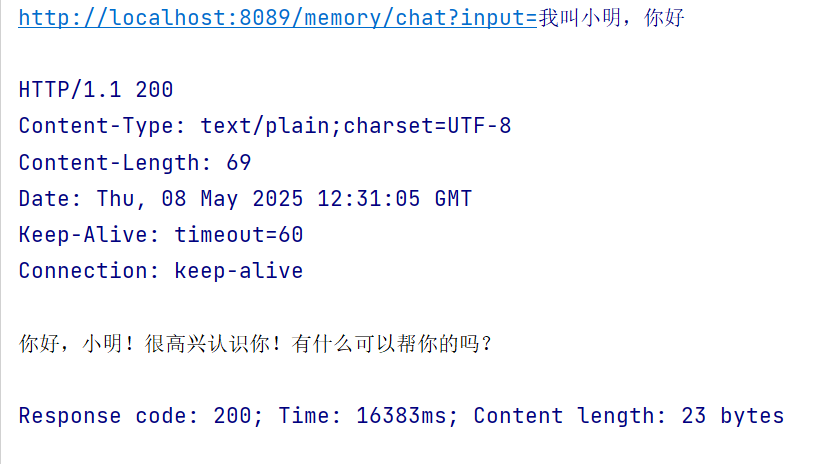
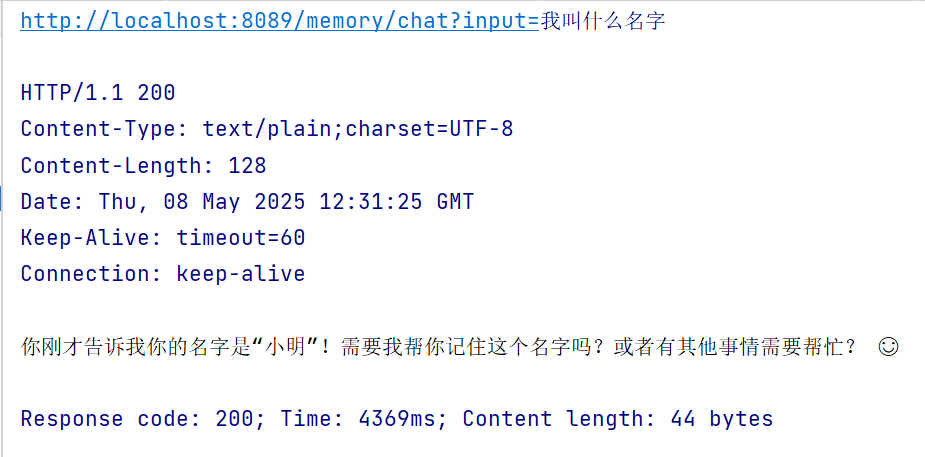
@GetMapping("/memory/chat")
public String chat(@RequestParam(value = "input") String input) {Prompt prompt = new Prompt(input);// 內存記憶的 ChatMemoryInMemoryChatMemory inMemoryChatMemory = new InMemoryChatMemory();return openAiChatClient.prompt(prompt).advisors(new MessageChatMemoryAdvisor(inMemoryChatMemory)).call().content();
}
測試
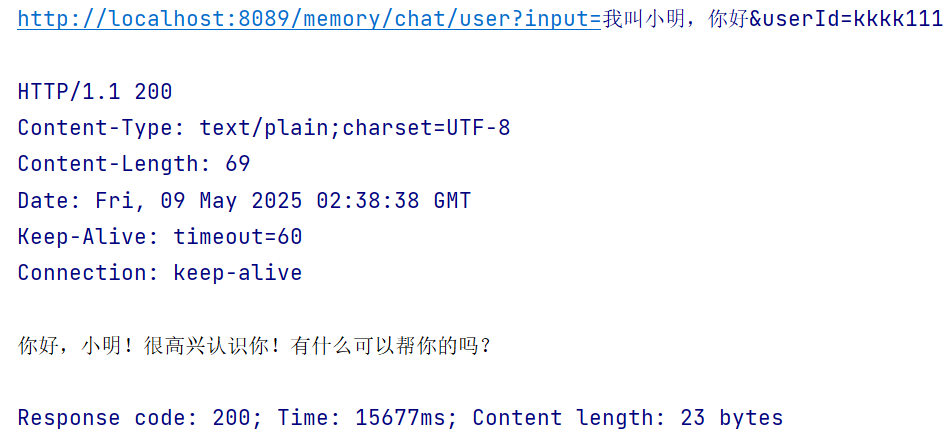
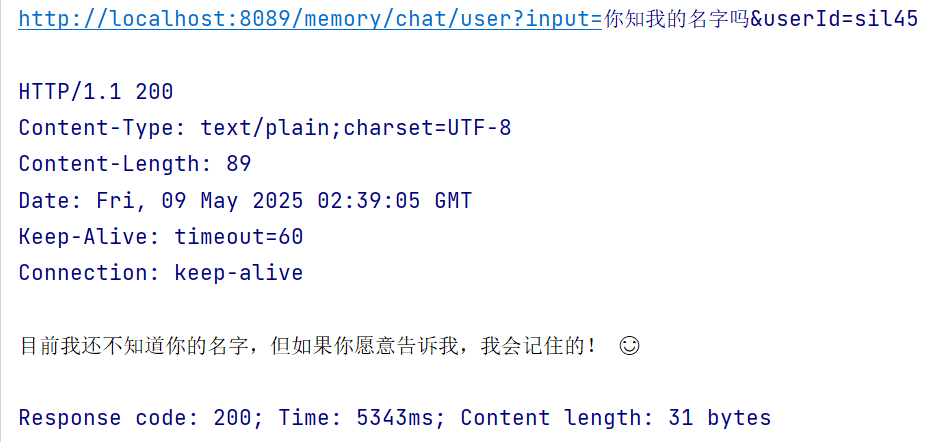
隔離
多用戶參與 AI 對話,每個用戶的對話記錄要做到互不干擾,因此要對不同用戶的記憶按一定規則做好隔離。
由于在配置類中已經設置好了默認的 Advisors 為基于內存的聊天記憶 InMemoryChatMemory,因此,我們只需調用 openAiChatClient 的 advisors 方法,并設置好相應的參數即可
其中,
chat_memory_conversation_id 表示 會話 ID,用于區分不同用戶的對話歷史
chat_memory_response_size 表示每次最多檢索 x 條對話歷史
@Bean("openAiChatClient")
public ChatClient openAiChatClient() {return ChatClient.builder(openAiChatModel)// 默認加載所有的工具,避免重復 new.defaultTools(toolCallbackProvider.getToolCallbacks())// 設置記憶.defaultAdvisors(new MessageChatMemoryAdvisor(new InMemoryChatMemory())).build();
}
/**
* 短期記憶,按用戶 ID 隔離
* @param input
* @param userId
* @return
*/
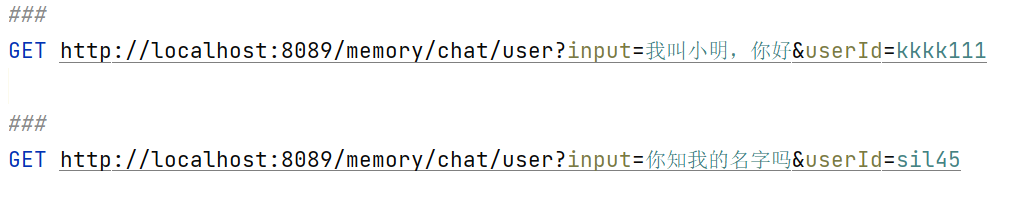
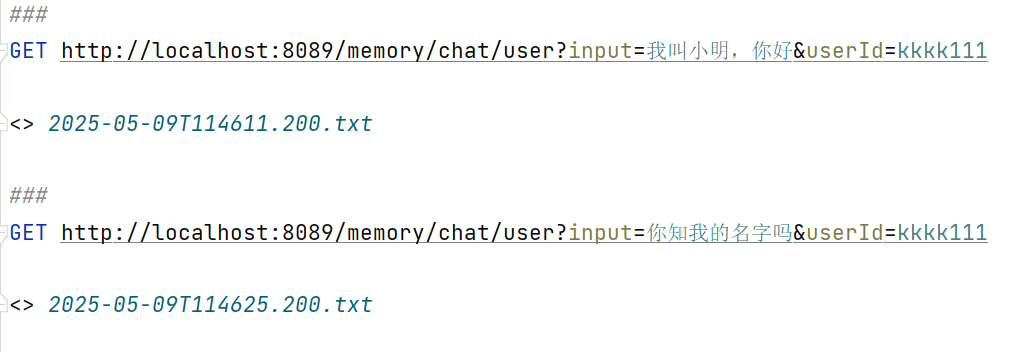
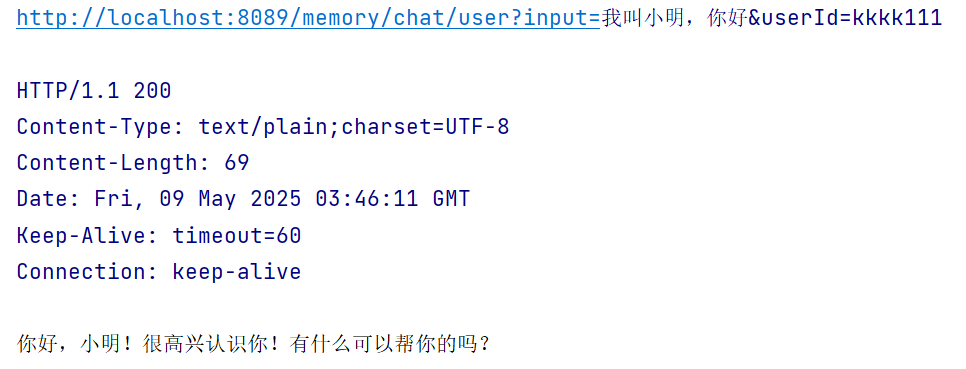
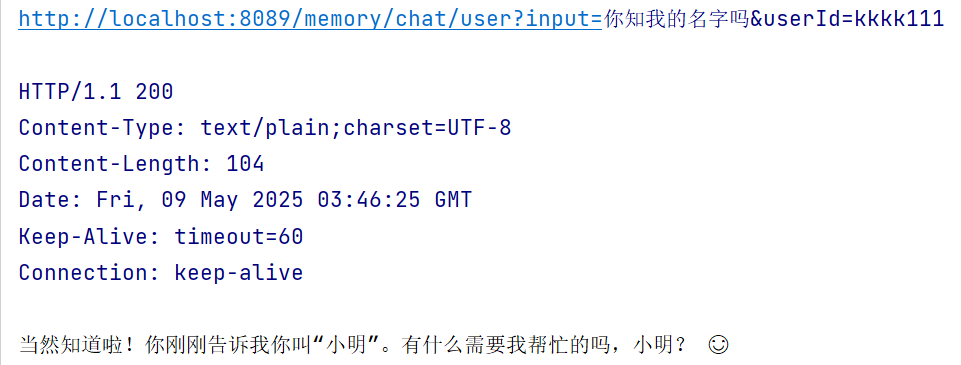
@GetMapping("/memory/chat/user")
public String chatByUser(@RequestParam(value = "input") String input, @RequestParam(value = "userId") String userId) {Prompt prompt = new Prompt(input);return openAiChatClient.prompt(prompt)// 設置記憶的參數.advisors(advisor -> advisor.param("chat_memory_conversation_id", userId).param("chat_memory_response_size", 100)).call().content();
}
測試
集成 Redis
基于內存的聊天記憶可能無法滿足開發者的需求,因此,我們可以構建一個基于 Redis 的長期記憶 RedisChatMemory
引入 Redis 依賴
<!-- redis -->
<dependency><groupId>org.springframework.boot</groupId><artifactId>spring-boot-starter-data-redis</artifactId>
</dependency>
yml 配置
spring:data:redis:host: localhostport: 6379password: xxxxx
Redis 配置類
創建了一個 RedisTemplate 實例
package cn.onism.mcp.config;import org.springframework.context.annotation.Bean;
import org.springframework.data.redis.connection.RedisConnectionFactory;
import org.springframework.data.redis.core.RedisTemplate;
import org.springframework.data.redis.serializer.Jackson2JsonRedisSerializer;
import org.springframework.data.redis.serializer.StringRedisSerializer;/*** @description: Redis配置類* @date: 2025/5/9*/
public class RedisConfig {@Beanpublic RedisTemplate<String, Object> redisTemplate(RedisConnectionFactory factory) {RedisTemplate<String, Object> redisTemplate = new RedisTemplate<>();redisTemplate.setConnectionFactory(factory);redisTemplate.setKeySerializer(new StringRedisSerializer());redisTemplate.setValueSerializer(new Jackson2JsonRedisSerializer<>(Object.class));redisTemplate.setHashKeySerializer(new StringRedisSerializer());redisTemplate.setHashValueSerializer(new Jackson2JsonRedisSerializer<>(Object.class));redisTemplate.afterPropertiesSet();return redisTemplate;}
}
定義消息實體類
用于存儲對話的 ID、類型和內容,同時實現了序列化接口以便在 Redis 中存儲
/*** @description: 聊天消息實體類* @date: 2025/5/9*/
@NoArgsConstructor
@AllArgsConstructor
@Data
public class ChatEntity implements Serializable {private static final long serialVersionUID = 1555L;/*** 聊天ID*/private String chatId;/*** 聊天類型*/private String type;/*** 聊天內容*/private String content;
}
構造 RedisChatMemory
創建一個 RedisChatMemory 并實現 ChatMemory 接口,重寫該接口的 3 個方法
其中,
add表示添加聊天記錄,conversationId 為會話 ID,messages 為消息列表
get表示獲取聊天記錄,lastN 表示獲取最后 lastN 條聊天記錄
clear表示清除聊天記錄
package cn.onism.mcp.memory;import cn.onism.mcp.model.entity.ChatEntity;
import com.fasterxml.jackson.databind.ObjectMapper;
import org.springframework.ai.chat.memory.ChatMemory;
import org.springframework.ai.chat.messages.*;
import org.springframework.data.redis.core.RedisTemplate;import java.util.ArrayList;
import java.util.Collections;
import java.util.List;
import java.util.concurrent.TimeUnit;/*** @description: 基于Redis的聊天記憶* @date: 2025/5/9*/
public class ChatRedisMemory implements ChatMemory {/*** 聊天記錄的Redis key前綴*/private static final String KEY_PREFIX = "chat:history:";private final RedisTemplate<String, Object> redisTemplate;public ChatRedisMemory(RedisTemplate<String, Object> redisTemplate) {this.redisTemplate = redisTemplate;}/*** 添加聊天記錄* @param conversationId* @param messages*/@Overridepublic void add(String conversationId, List<Message> messages) {String key = KEY_PREFIX + conversationId;List<ChatEntity> chatEntityList = new ArrayList<>();for (Message message : messages) {// 解析消息內容String[] strings = message.getText().split("</think>");String text = strings.length == 2 ? strings[1] : strings[0];// 構造聊天記錄實體ChatEntity chatEntity = new ChatEntity();chatEntity.setChatId(conversationId);chatEntity.setType(message.getMessageType().getValue());chatEntity.setContent(text);chatEntityList.add(chatEntity);}// 保存聊天記錄到Redis, 并設置過期時間為60分鐘redisTemplate.opsForList().rightPushAll(key, chatEntityList.toArray());redisTemplate.expire(key, 60, TimeUnit.MINUTES);}/*** 獲取聊天記錄* @param conversationId* @param lastN* @return List<Message>*/@Overridepublic List<Message> get(String conversationId, int lastN) {String key = KEY_PREFIX + conversationId;Long size = redisTemplate.opsForList().size(key);if (size == null || size == 0) {return Collections.emptyList();}// 取最后lastN條聊天記錄,如果聊天記錄數量少于lastN,則取全部int start = Math.max(0, size.intValue() - lastN);List<Object> objectList = redisTemplate.opsForList().range(key, start, -1);List<Message> outputList = new ArrayList<>();// 解析聊天記錄實體,并構造消息對象ObjectMapper mapper = new ObjectMapper();for (Object object : objectList){ChatEntity chatEntity = mapper.convertValue(object, ChatEntity.class);if(MessageType.USER.getValue().equals(chatEntity.getType())){outputList.add(new UserMessage(chatEntity.getContent()));}else if (MessageType.SYSTEM.getValue().equals(chatEntity.getType())){outputList.add(new SystemMessage(chatEntity.getContent()));}else if (MessageType.ASSISTANT.getValue().equals(chatEntity.getType())){outputList.add(new AssistantMessage(chatEntity.getContent()));}}return outputList;}/*** 清除聊天記錄* @param conversationId*/@Overridepublic void clear(String conversationId) {String key = KEY_PREFIX + conversationId;redisTemplate.delete(key);}
}
更改 ChatClient 配置
將 MessageChatMemoryAdvisor 中的參數替換為我們實現的 ChatRedisMemory
@Resource
private RedisTemplate<String, Object> redisTemplate;@Bean("openAiChatClient")
public ChatClient openAiChatClient() {return ChatClient.builder(openAiChatModel)// 默認加載所有的工具,避免重復 new.defaultTools(toolCallbackProvider.getToolCallbacks()).defaultAdvisors(new MessageChatMemoryAdvisor(new ChatRedisMemory(redisTemplate))).build();
}
測試
/*** RedisChatMemory* @param input* @param userId* @return String*/
@GetMapping("/memory/chat/user")
public String chatByUser(@RequestParam(value = "input") String input, @RequestParam(value = "userId") String userId) {Prompt prompt = new Prompt(input);return openAiChatClient.prompt(prompt).advisors(advisor -> advisor.param("chat_memory_conversation_id", userId).param("chat_memory_response_size", 100)).call().content();
}
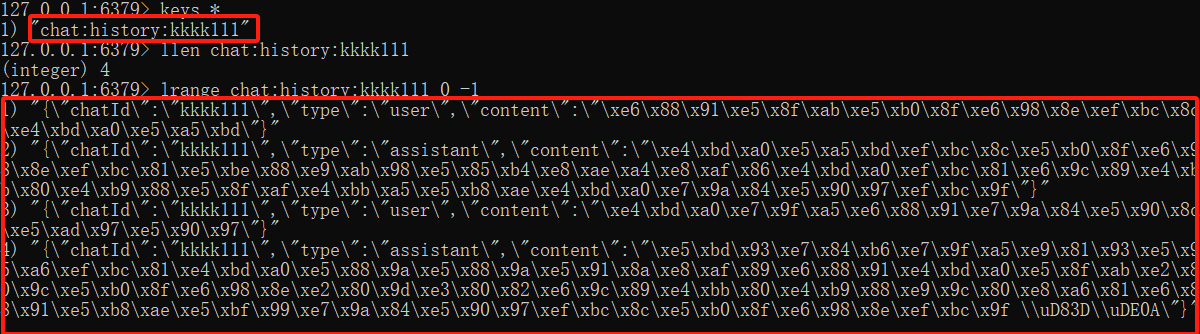
執行結果
可以看到,Redis 中有對應的記錄,我們可以通過 lrange key start end 命令獲取列表中的數據,其中 content 為 UTF-8 編碼
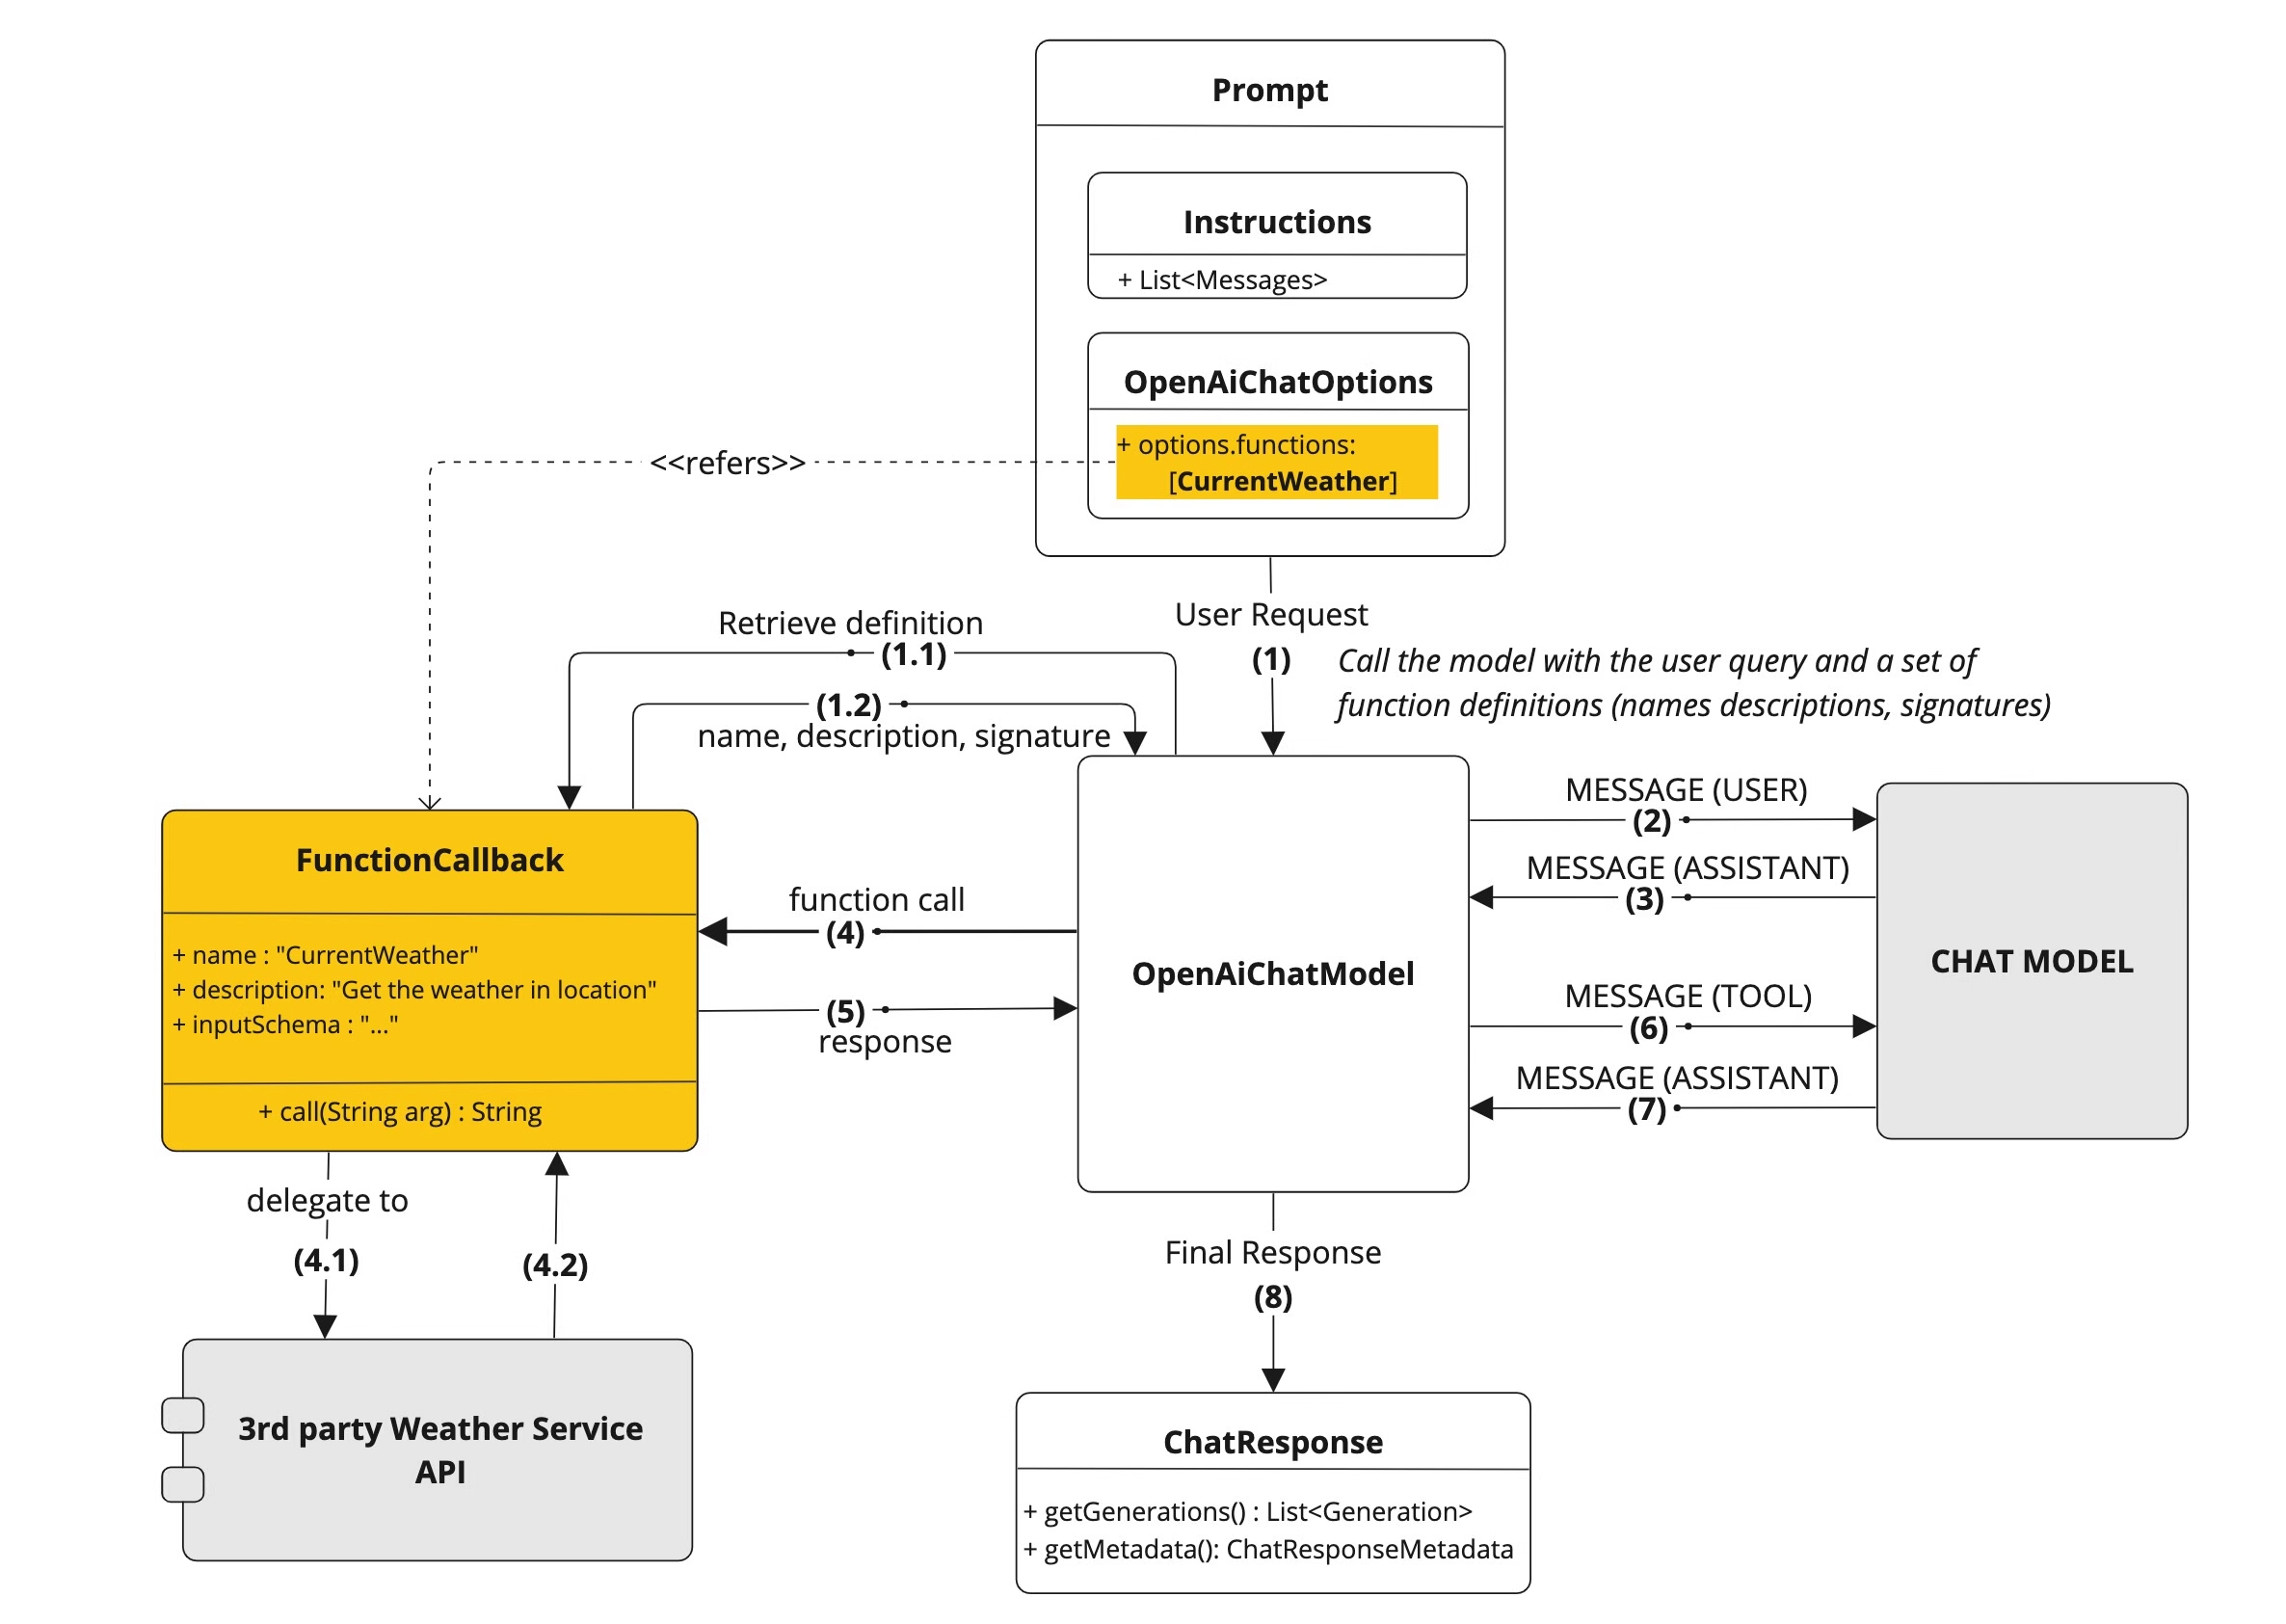
Tool/Function Calling
工具(Tool)或功能調用(Function Calling)允許大型語言模型在必要時調用一個或多個可用的工具,這些工具通常由開發者定義。工具可以是任何東西:網頁搜索、對外部 API 的調用,或特定代碼的執行等。
下面是工具調用的流程圖:
更加簡潔的流程圖:
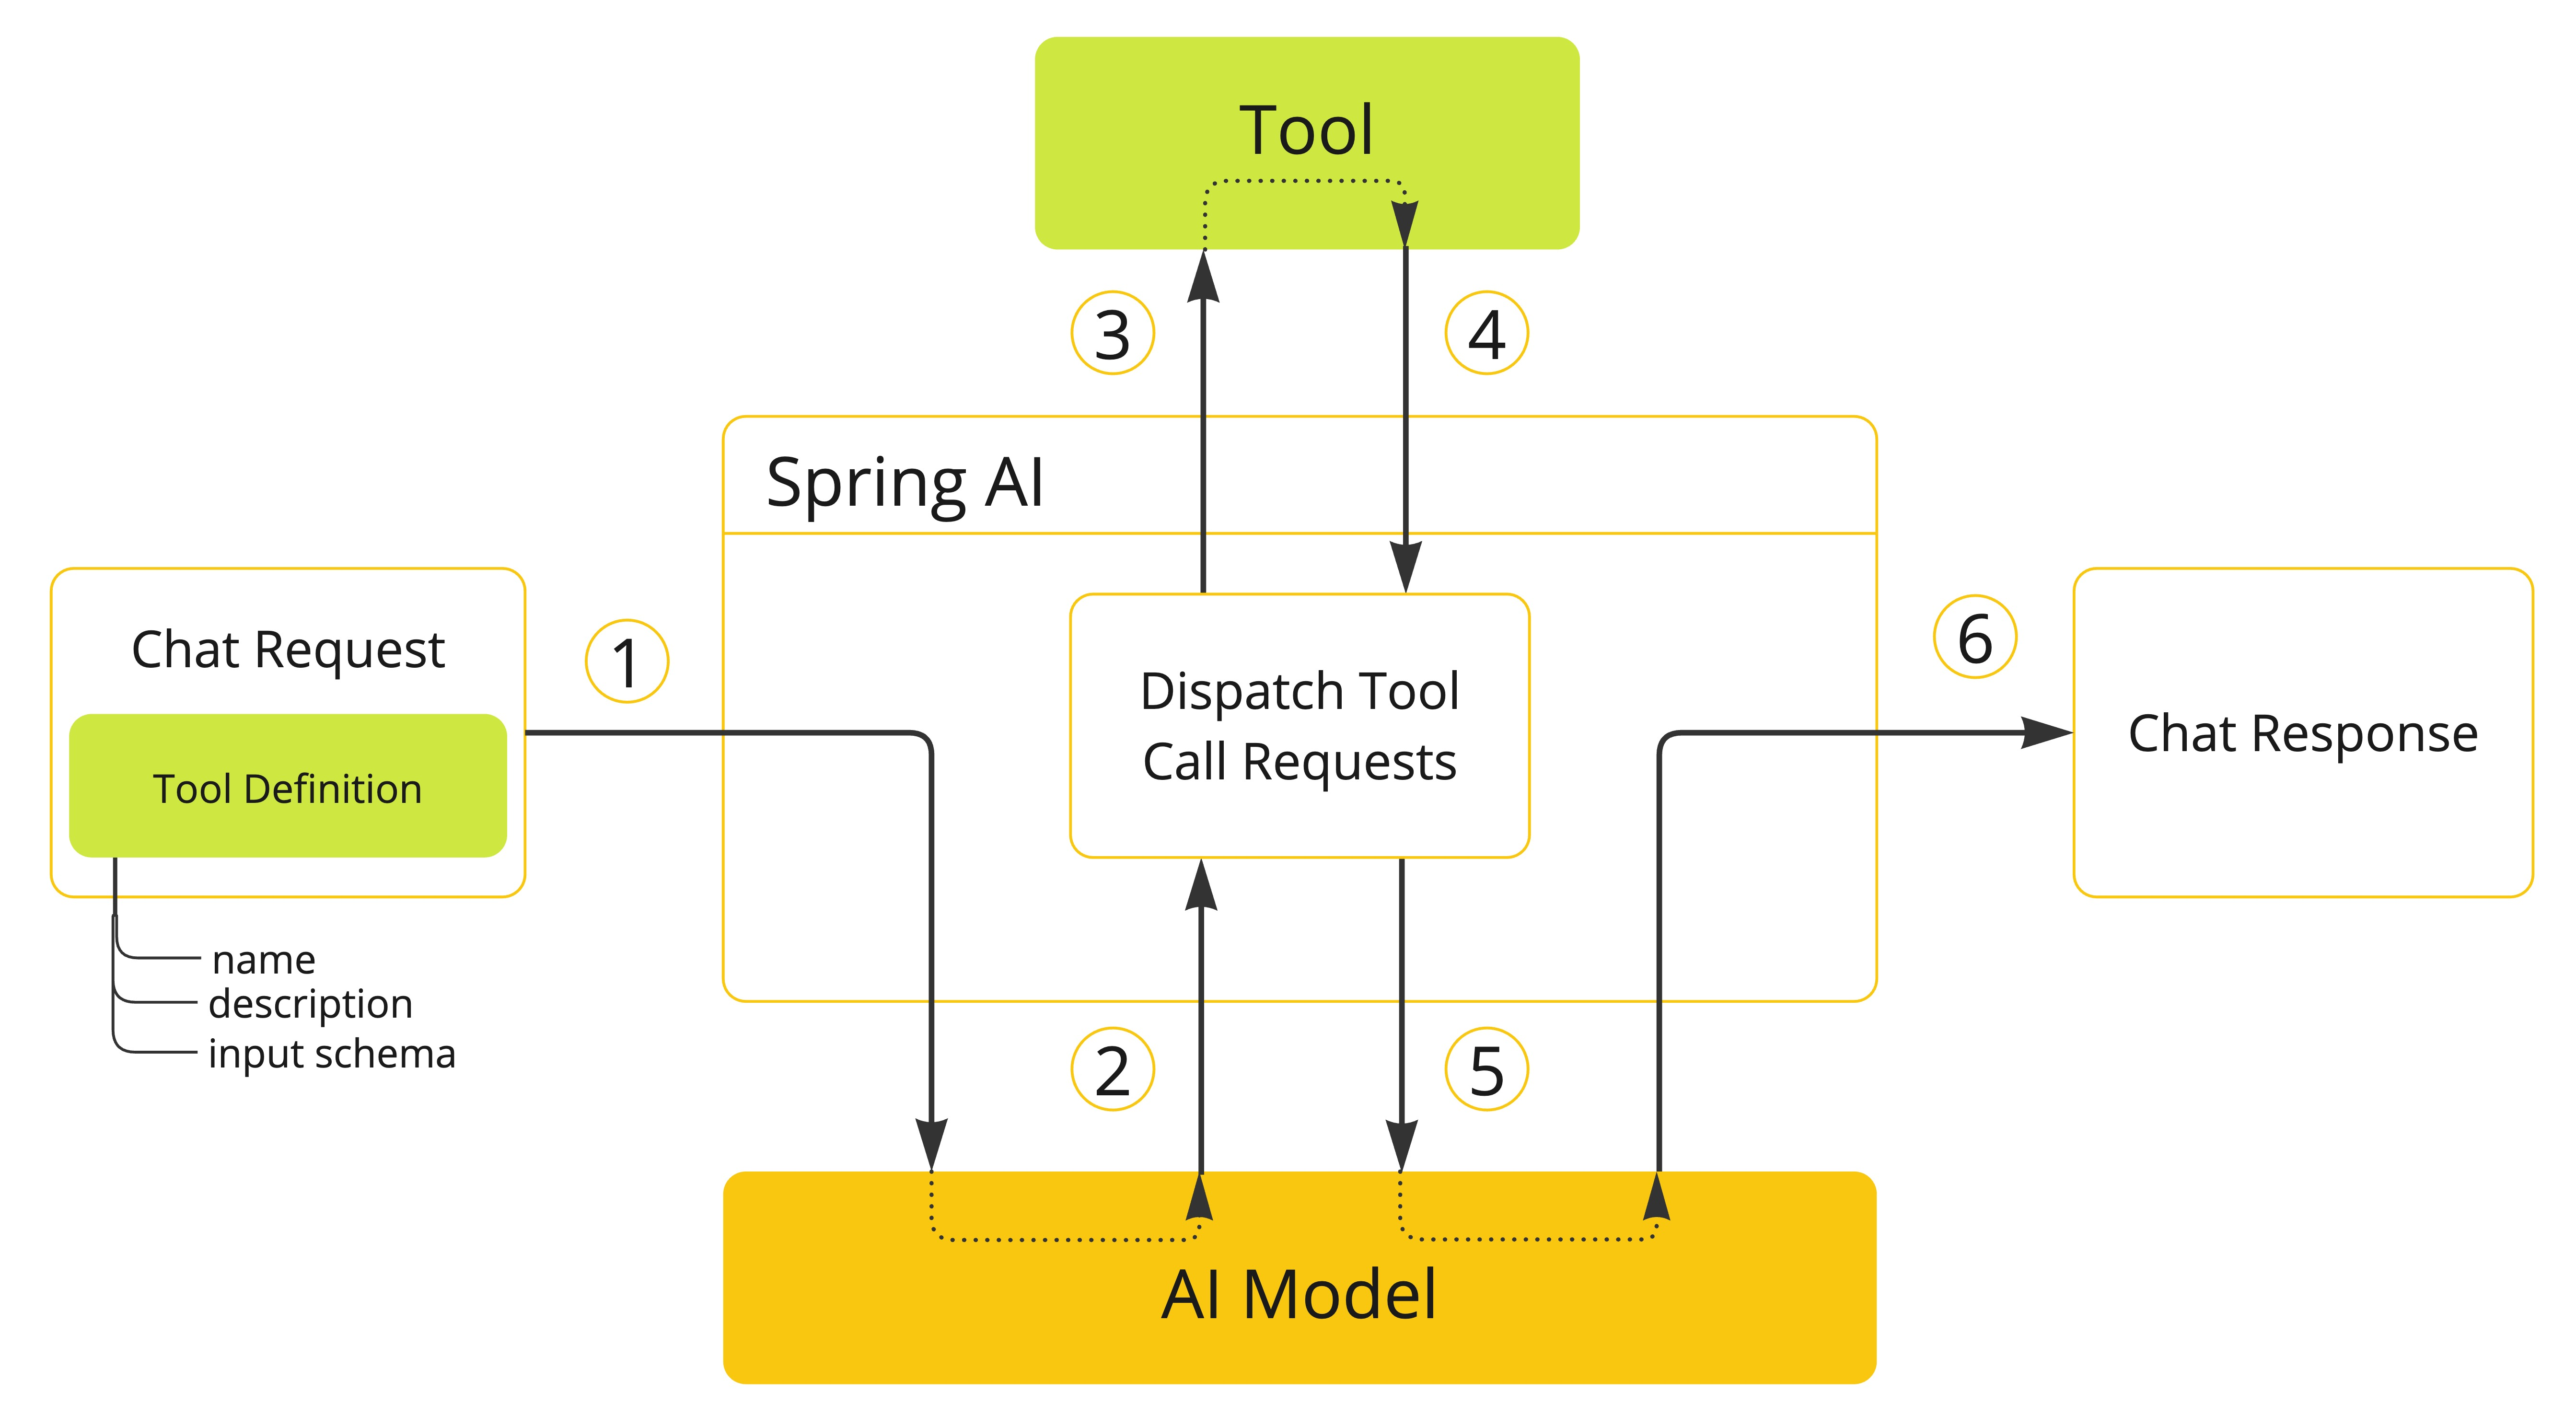
- 工具注冊階段,當需要為模型提供工具支持時,需在聊天請求中聲明工具定義。每個工具定義包含三個核心要素:工具名稱(唯一標識符)、功能描述(自然語言說明)、輸入參數結構(JSON Schema格式)
- 模型決策階段,模型分析請求后,若決定調用工具,將返回結構化響應,包含:目標工具名稱、符合預定義Schema的格式化參數
- 工具執行階段,客戶端應用負責根據工具名稱定位具體實現,使用驗證后的參數執行目標工具
- 工具響應階段,工具執行結果返回給應用程序
- 重新組裝階段,應用將標準化處理后的執行結果返回給模型再次處理
- 結果響應階段,模型結合用戶初始輸入以及工具執行結果再次加工返回給用戶
工具定義與使用
Methods as Tools
- 注解式定義
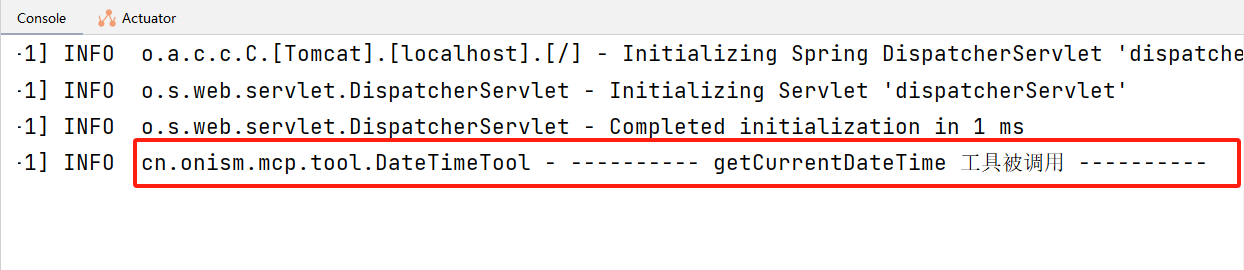
創建一個 DateTimeTool 工具類,在 getCurrentDateTime 方法上使用 @Tool 注解,表示將該方法標記為一個 Tool,description 表示對工具的描述,大模型會根據這個描述來理解該工具的作用
@Component
public class DateTimeTool {private static final Logger LOGGER = LoggerFactory.getLogger(DateTimeTool.class);@Tool(description = "獲取當前用戶的日期和時間")public String getCurrentDateTime() {LOGGER.info("---------- getCurrentDateTime 工具被調用 ----------");return LocalDateTime.now().atZone(LocaleContextHolder.getTimeZone().toZoneId()).toString();}
}
在使用時,可以在 ChatClient 配置類中將所有工具都提前加載到 ChatClient 中
@Configuration
public class ChatClientConfig {@Resourceprivate OpenAiChatModel openAiChatModel;@Resourceprivate ToolCallbackProvider toolCallbackProvider;@Resourceprivate RedisTemplate<String, Object> redisTemplate;@Bean("openAiChatClient")public ChatClient openAiChatClient() {return ChatClient.builder(openAiChatModel)// 默認加載所有的工具,避免重復 new.defaultTools(toolCallbackProvider.getToolCallbacks()).defaultAdvisors(new MessageChatMemoryAdvisor(new ChatRedisMemory(redisTemplate))).build();}
}
或者是不在配置類中加載所有工具,而是在調用 ChatClient 時將需要用到的工具傳遞進去,即使用 tools 方法,傳入工具類
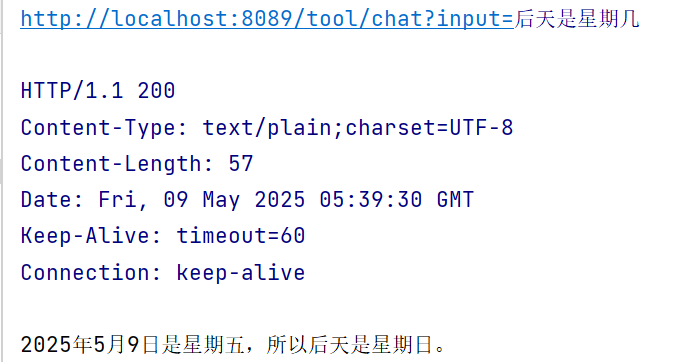
@GetMapping("/tool/chat")
public String toolChat(@RequestParam(value = "input") String input) {Prompt prompt = new Prompt(input);return openAiChatClient.prompt(prompt).tools(new DateTimeTool()).call().content();
}
測試后發現大模型的確調用了 DateTimeTool
- 編程式定義
我們可以不使用 @Tool 注解,而是采用編程式的方式構造一個 Tool
@Component
public class DateTimeTool {private static final Logger LOGGER = LoggerFactory.getLogger(DateTimeTool.class);// no annotationpublic String getCurrentDateTime() {LOGGER.info("---------- getCurrentDateTime 工具被調用 ----------");return LocalDateTime.now().atZone(LocaleContextHolder.getTimeZone().toZoneId()).toString();}
}
首先通過反射獲取方法,然后定義一個 ToolDefinition,最后創建一個 MethodToolCallback,將其傳入到 tools 方法中即可
@GetMapping("/tool/chat")
public String toolChat(@RequestParam(value = "input") String input) {Prompt prompt = new Prompt(input);// 通過反射獲取方法Method method = ReflectionUtils.findMethod(DateTimeTool.class, "getCurrentDateTime");// 工具定義ToolDefinition toolDefinition = ToolDefinition.builder(method).description("獲取當前用戶的日期和時間").build();// 創建一個 MethodToolCallbackMethodToolCallback methodToolCallback = MethodToolCallback.builder().toolDefinition(toolDefinition).toolMethod(method).toolObject(new DateTimeTool()).build();return openAiChatClient.prompt(prompt).tools(methodToolCallback).call().content();
}
Fuctions as Tools
除方法外,Function、Supplier、Consumer 等函數式接口也可以定義為 Tool
下面**模擬一個查詢天氣的服務,首先定義 WeatherRequest 和 WeatherResponse**
其中,@ToolParam 注解用于定義工具所需參數, description 為工具參數的描述,模型通過描述可以更好的理解參數的作用
/*** 天氣查詢請求參數*/
@Data
public class WeatherRequest {/*** 坐標*/@ToolParam(description = "經緯度,精確到小數點后4位,格式為:經度,緯度")String location;}
@Data
@AllArgsConstructor
@NoArgsConstructor
public class WeatherResponse {/*** 溫度*/private double temp;/*** 單位*/private Unit unit;
}
/*** 溫度單位*/
public enum Unit {C, F
}
接下來創建一個 WeatherService,實現 Function 接口,編寫具體邏輯。這里獲取天氣使用的是彩云科技開放平臺提供的免費的 API 接口:https://docs.caiyunapp.com/weather-api/,構造好請求后使用 HttpURLConnection 發送請求,讀取響應后使用 Jackson 解析 JSON,獲取天氣數據。
package cn.onism.mcp.tool.service;import cn.onism.mcp.tool.Unit;
import cn.onism.mcp.tool.WeatherRequest;
import cn.onism.mcp.tool.WeatherResponse;
import com.fasterxml.jackson.databind.JsonNode;
import com.fasterxml.jackson.databind.ObjectMapper;
import lombok.extern.slf4j.Slf4j;
import org.slf4j.Logger;
import org.slf4j.LoggerFactory;
import org.springframework.stereotype.Component;import java.io.BufferedReader;
import java.io.IOException;
import java.io.InputStreamReader;
import java.net.HttpURLConnection;
import java.net.URL;
import java.net.URLEncoder;
import java.nio.charset.StandardCharsets;
import java.util.function.Function;/*** @description: 天氣服務* @date: 2025/5/9*/
@Slf4j
@Component
public class WeatherService implements Function<WeatherRequest, WeatherResponse> {private static final Logger LOGGER = LoggerFactory.getLogger(WeatherService.class);private static final String TOEKN = "xxxxxxxxxxxxxxxxxx";/*** 實時天氣接口*/private static final String API_URL = "https://api.caiyunapp.com/v2.6/%s/%s/realtime";private double temp;private String skycon;@Overridepublic WeatherResponse apply(WeatherRequest weatherRequest) {LOGGER.info("Using caiyun api, getting weather information...");try {// 構造API請求String location = weatherRequest.getLocation();String encodedLocation = URLEncoder.encode(location, StandardCharsets.UTF_8);String apiUrl = String.format(API_URL,TOEKN,encodedLocation);URL url = new URL(apiUrl);// 發送請求HttpURLConnection connection = (HttpURLConnection) url.openConnection();connection.setRequestMethod("GET");// 讀取響應int responseCode = connection.getResponseCode();if (responseCode == HttpURLConnection.HTTP_OK) {BufferedReader in = new BufferedReader(new InputStreamReader(connection.getInputStream()));String inputLine;StringBuilder response = new StringBuilder();while ((inputLine = in.readLine()) != null) {response.append(inputLine);}in.close();// 使用Jackson解析JSONObjectMapper objectMapper = new ObjectMapper();JsonNode rootNode = objectMapper.readTree(response.toString());// 獲取天氣數據JsonNode resultNode = rootNode.get("result");LOGGER.info("獲取到天氣信息: " + resultNode.toString());temp = resultNode.get("realtime").get("temperature").asDouble();skycon = resultNode.get("realtime").get("skycon").asText();} else {System.out.println("請求失敗,響應碼為: " + responseCode);}} catch (IOException e) {e.printStackTrace();}return new WeatherResponse(temp, skycon, Unit.C);}
}
創建一個 WeatherTool 工具類,定義一個 Bean,Bean 名稱為工具名稱,@Description 中描述工具作用,該 Bean 調用了 WeatherService 中的方法
package cn.onism.mcp.tool;import cn.onism.mcp.tool.service.WeatherService;
import lombok.extern.slf4j.Slf4j;
import org.slf4j.Logger;
import org.slf4j.LoggerFactory;
import org.springframework.ai.tool.annotation.Tool;
import org.springframework.context.annotation.Bean;
import org.springframework.context.annotation.Description;
import org.springframework.stereotype.Component;import java.util.function.Function;/*** @description: 天氣工具類* @date: 2025/5/9*/@Slf4j
@Component
public class WeatherTool {private final WeatherService weatherService = new WeatherService();@Bean(name = "currentWeather")@Description("依據位置獲取天氣信息")public Function<WeatherRequest, WeatherResponse> currentWeather() {return weatherService::apply;}
}
將天氣工具和日期工具傳入 tools 方法中
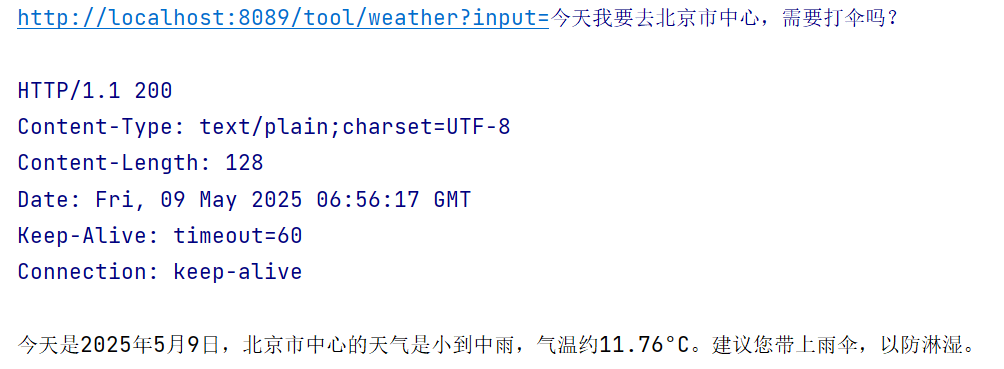
@GetMapping("/tool/weather")
public String toolFunctionAnnotation(@RequestParam(value = "input") String input) {Prompt prompt = new Prompt(input);return openAiChatClient.prompt(prompt).tools("currentWeather","getCurrentDateTime").call().content();
}
測試
可以看到,大模型首先會調用日期工具獲取時間,同時,我們向大模型詢問的地點會被自動解析為 location 經緯度參數,接著調用天氣工具獲取天氣信息
在之前的流程圖中,工具的調用會與大模型進行 2 次交互,第一次為發起請求,第二次在工具執行完成后帶著工具執行的結果再次調用大模型,而某些情況下,我們想在工具執行完成后直接返回,而不去調用大模型。在 @Tool 注解中令 returnDirect = true 即可

MCP
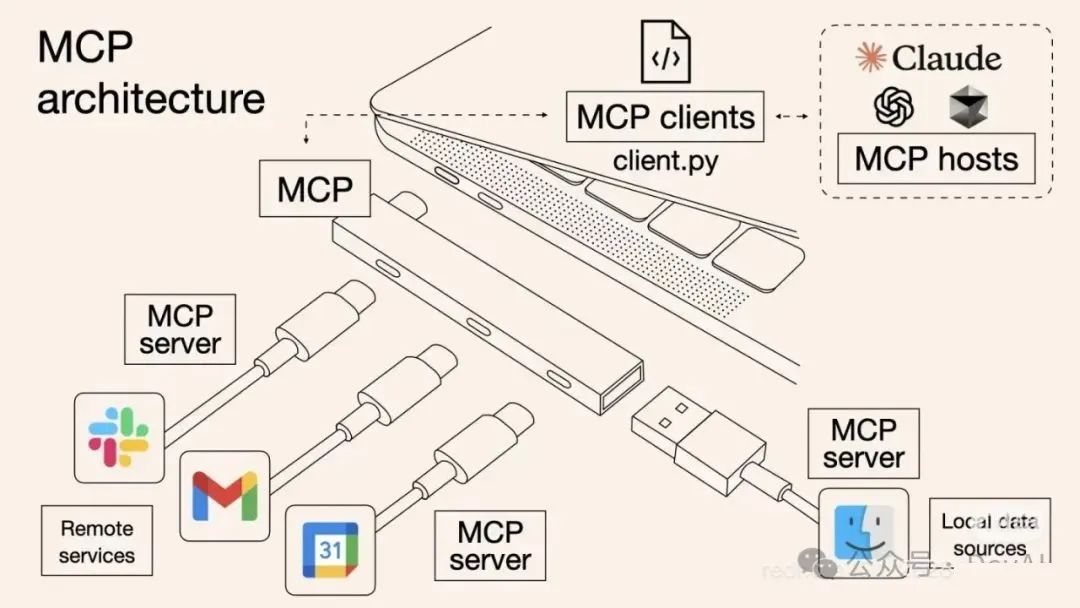
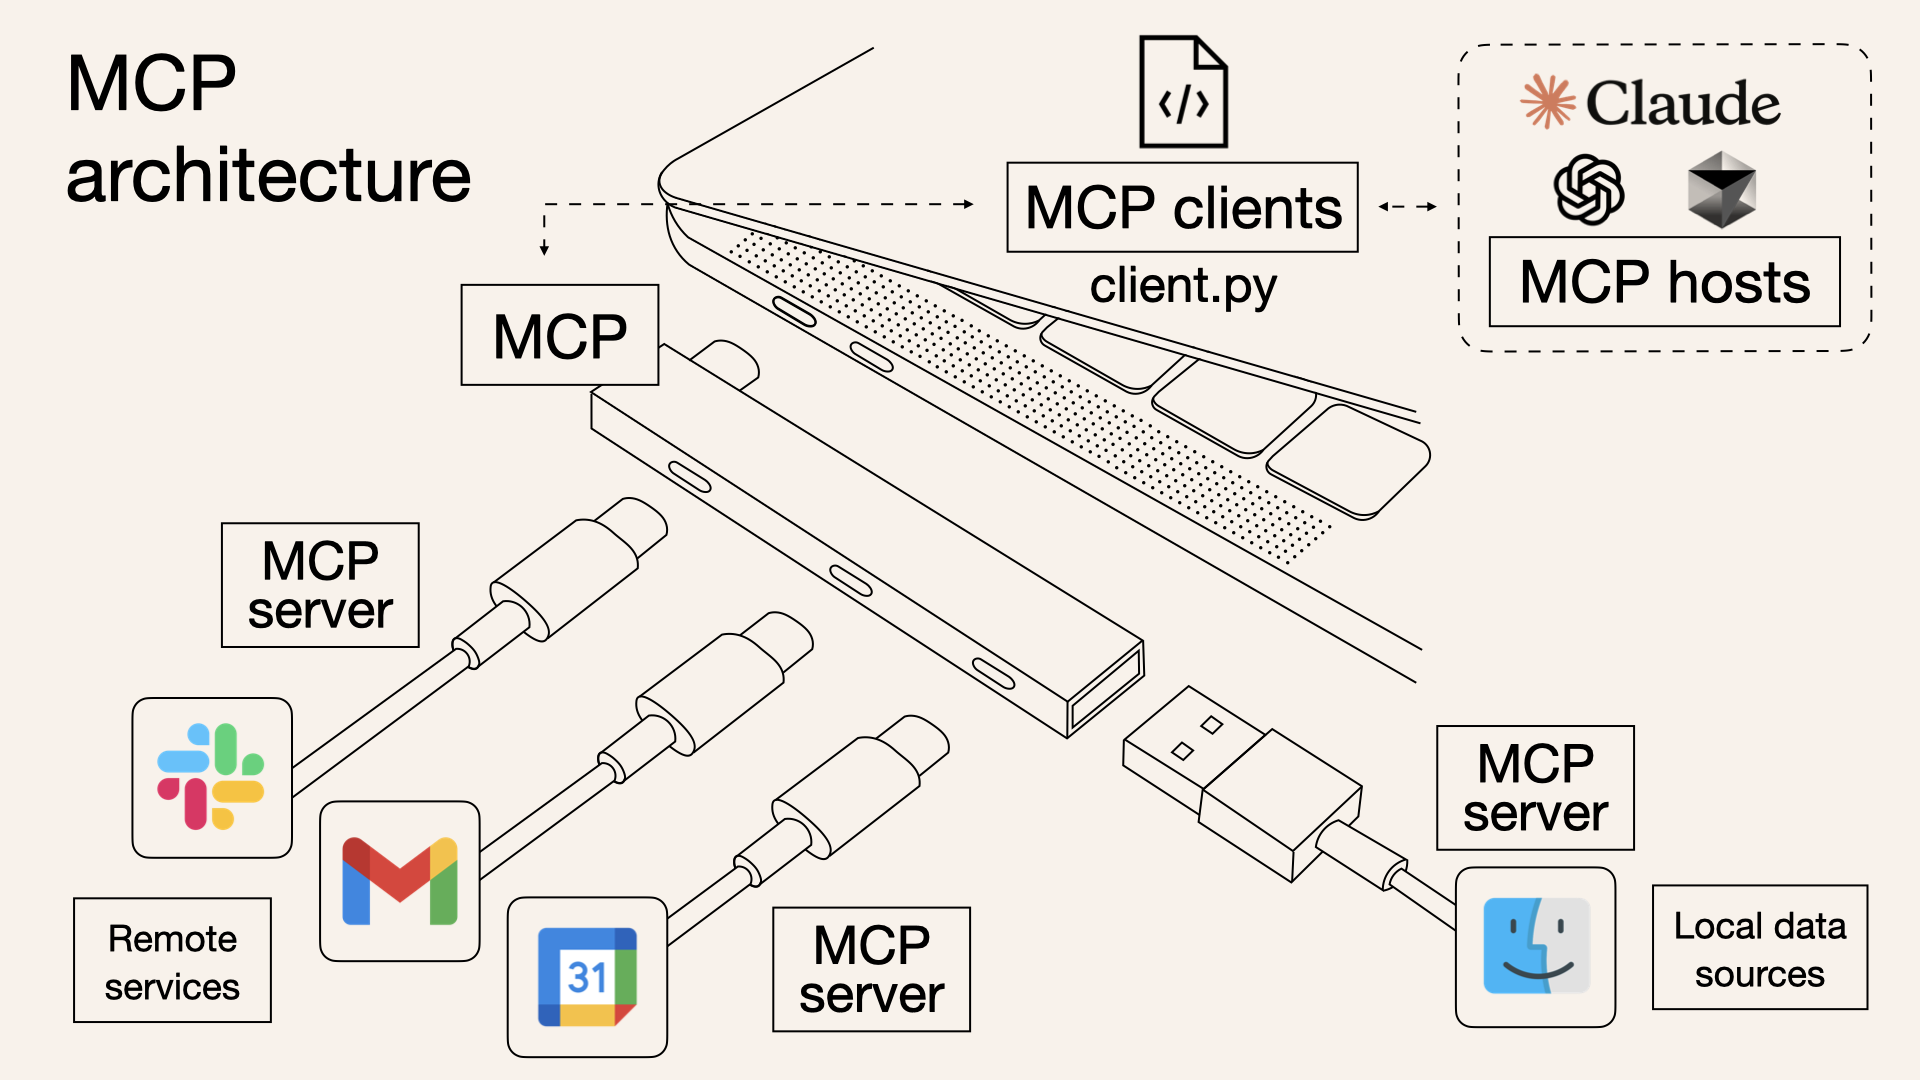
首先來看這張經典的圖,MCP(Model Context Protocol 模型上下文協議)可以被視為 AI 應用的 USB-C 端口,它為 AI 模型/應用與不同數據源/工具建立了統一對接規范,旨在標準化應用程序向大語言模型提供上下文的交互方式。
MCP 采用客戶端-服務器架構,
其中,
- **<font style="color:rgb(25, 27, 31);">MCP Hosts(宿主程序):</font>**<font style="color:rgb(25, 27, 31);">如 Claude Desktop、IDE 等,通過 MCP 訪問數據</font>
- **<font style="color:rgb(25, 27, 31);">MCP Clients(客戶端):</font>**<font style="color:rgb(25, 27, 31);">與服務器建立 1:1 連接,處理通信</font>
- **<font style="color:rgb(25, 27, 31);">MCP Servers(服務端):</font>**<font style="color:rgb(25, 27, 31);">輕量級程序,提供標準化的數據或工具訪問能力</font>
- **<font style="color:rgb(25, 27, 31);">Local Data Sources(本地數據源):</font>**<font style="color:rgb(25, 27, 31);">如文件、數據庫等,由 MCP 服務端安全訪問</font>
- **<font style="color:rgb(25, 27, 31);">Remote Services(遠程服務):</font>**<font style="color:rgb(25, 27, 31);">如 API、云服務等,MCP 服務端可代理訪問</font>


 集群配置指南(超簡單,脫離 ZooKeeper 集群)還包含了簡化測試指令的腳本!!!)


)

)
詳解)