?博客主頁:王樂予🎈
?年輕人要:Living for the moment(活在當下)!💪
🏆推薦專欄:【圖像處理】【千錘百煉Python】【深度學習】【排序算法】
目錄
- 😺一、MediaPipe概述
- 😺二、MediaPipe人臉檢測概述
- 😺三、程序實現
- 😺四、檢測結果
😺一、MediaPipe概述
MediaPipe 是一款由 Google Research 開發并開源的多媒體機器學習模型應用框架。
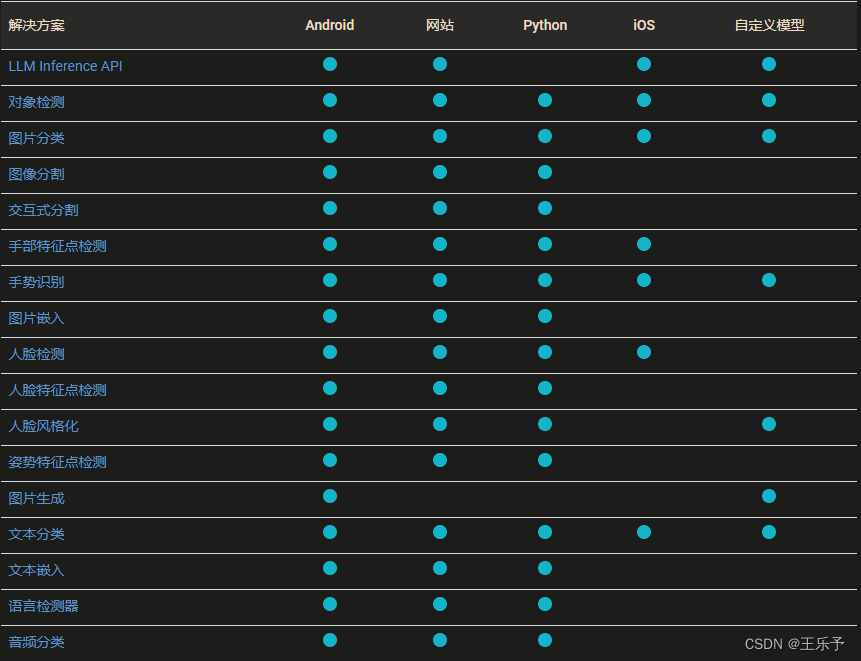
MediaPipe目前支持的解決方案(Solution)及支持的平臺如下圖所示:
😺二、MediaPipe人臉檢測概述
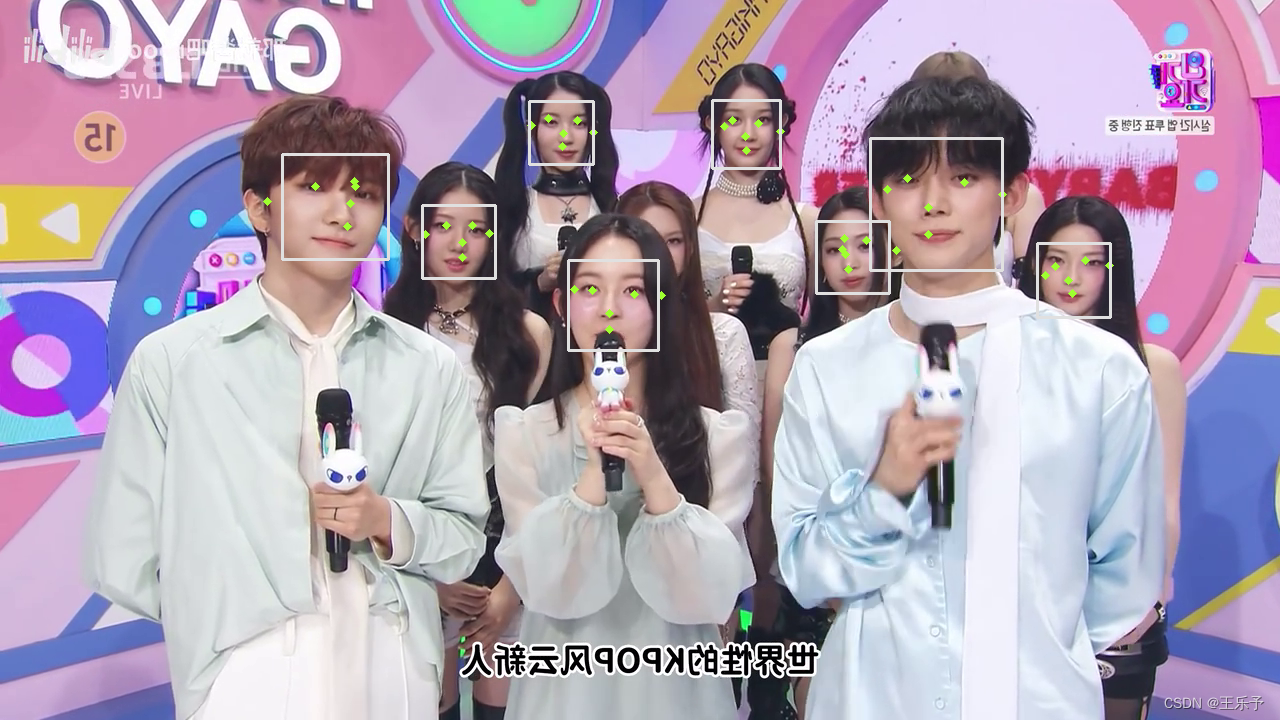
MediaPipe 人臉檢測器可以檢測圖片或視頻中的人臉。可以使用此任務在幀中定位人臉和面部特征。此任務使用可處理單張圖片或連續圖片流的機器學習 (ML) 模型。該任務會輸出人臉位置以及以下面部關鍵點:左眼、右眼、鼻尖、嘴巴、左眼區域和右眼區域。
MediaPipe人臉檢測所用模型是BlazeFace的變體,BlazeFace 是谷歌19年提出的一種針對移動 GPU 推斷進行優化的輕量級且精確的人臉檢測器。
BlazeFace: Sub-millisecond Neural Face Detection on Mobile GPUs
😺三、程序實現
import cv2
import mediapipe as mpmp_face_detection = mp.solutions.face_detection
face_detection = mp_face_detection.FaceDetection(min_detection_confidence=0.5, model_selection=1)cap = cv2.VideoCapture('../test.mp4')while cap.isOpened():success, image = cap.read()# Convert color space because MediaPipe requires images in RGB formatimage = cv2.cvtColor(cv2.flip(image, 1), cv2.COLOR_BGR2RGB)# Perform facial detectionresults = face_detection.process(image)# Convert back to BGR so that OpenCV can display imagesimage = cv2.cvtColor(image, cv2.COLOR_RGB2BGR)# Draw detected facial bounding boxesif results.detections:for detection in results.detections:mp_drawing = mp.solutions.drawing_utilsmp_drawing.draw_detection(image, detection, mp_drawing.DrawingSpec(thickness=4, circle_radius=2, color=(48, 255, 159)))cv2.imshow('MediaPipe Face Detection', image)if cv2.waitKey(1) & 0xFF == ord('q'):breakcap.release()
cv2.destroyAllWindows()
😺四、檢測結果


)


)


)
(以Modbus通信為例))


