文章目錄
- 前言
- 技術積累
- 什么是Websocket
- 什么是Redis發布訂閱
- Redis發布訂閱與消息隊列的區別
- 實戰演示
- SpringBoot整合Websoket
- Websoket集群負載均衡
- 實戰測試
- IDEA啟動兩臺服務端
- 配置nginx負載均衡
- 瀏覽器訪問模擬對話
前言
相信很多同學都用過websocket來實現服務端主動向客戶端推送消息吧,基本上所有的管理類系統都會有這個功能。因為有websocket的存在,使得前后的主動交互變得容易和低成本。其實在JAVA領域用SpringBoot框架集成Websoket還是很簡單的,今天我們重點不是集成而是通過Redis的發布訂閱實現Websocket集群通信,當然有條件的也可以用MQ代替。
技術積累
什么是Websocket
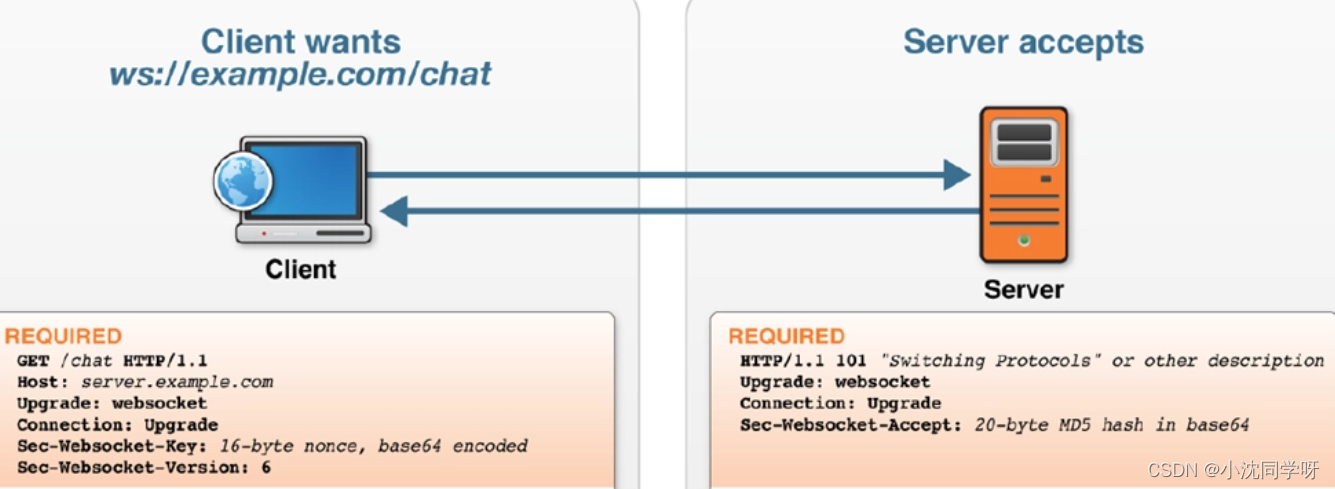
WebSocket是一種在單個TCP連接上進行全雙工通信的協議。WebSocket通信協議于2011年被IETF定為標準RFC 6455,并由RFC7936補充規范。WebSocket API也被W3C定為標準。
WebSocket使得客戶端和服務器之間的數據交換變得更加簡單,允許服務端主動向客戶端推送數據。在WebSocket API中,瀏覽器和服務器只需要完成一次握手,兩者之間就直接可以創建持久性的連接,并進行雙向數據傳輸。
什么是Redis發布訂閱
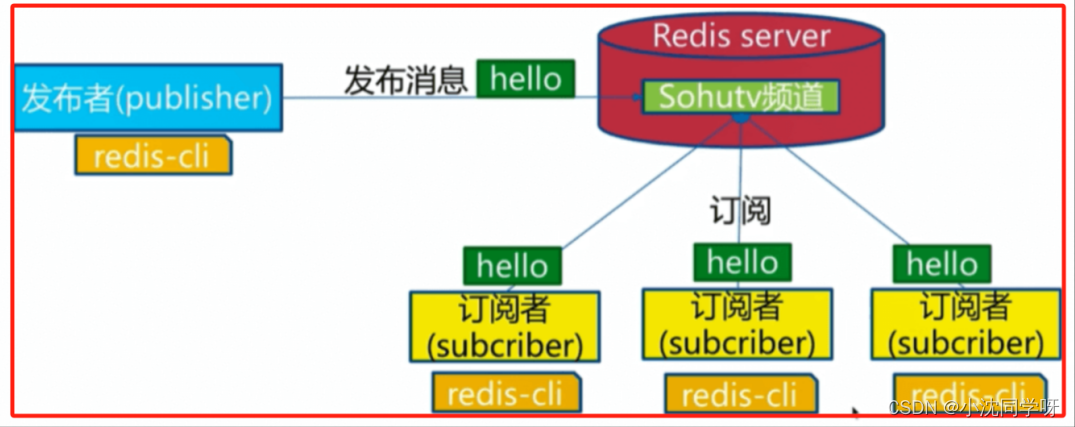
Redis 的發布訂閱(Pub/Sub)是一種消息通信模式:發送者(pub)發送消息,訂閱者(sub)接收消息。Redis 客戶端可以訂閱任意數量的頻道。當有新消息通過 PUBLISH 命令發送給頻道時,這個消息會被發送給訂閱它的所有客戶端。
Redis發布訂閱與消息隊列的區別
Redis的發布訂閱(Pub/Sub)和消息隊列是兩種不同的消息傳遞模式,它們的主要區別在于消息的處理方式和使用場景。
消息的處理方式:
在 Redis 的發布訂閱模式中,消息是即時的,也就是說,當消息發布后,只有當前在線且訂閱了該頻道的客戶端才能收到這個消息,消息不會被存儲,一旦發布,當前沒有在線的客戶端將無法接收到這個消息。
在消息隊列中,消息是持久化的,消息被發送到隊列后,會一直在隊列中等待被消費,即使沒有在線的消費者,消息也不會丟失,消費者下次上線后可以繼續從隊列中獲取到消息。
實戰演示
本次演示采用demo形式,僅僅提供演示Websocket集群的實現方式,以及解決消息負載均衡的問題。演示案例重點偏后端實現Websoket集群通訊,不涉及前后端心跳檢測,如果應用在生產環境前端需要增加心跳檢測與重復創建。
本實戰采用原生spring websocket,后續有時間再提供netty版本,以及產線版本。有條件的同學可以自己實現,原理都差不多。
SpringBoot整合Websoket
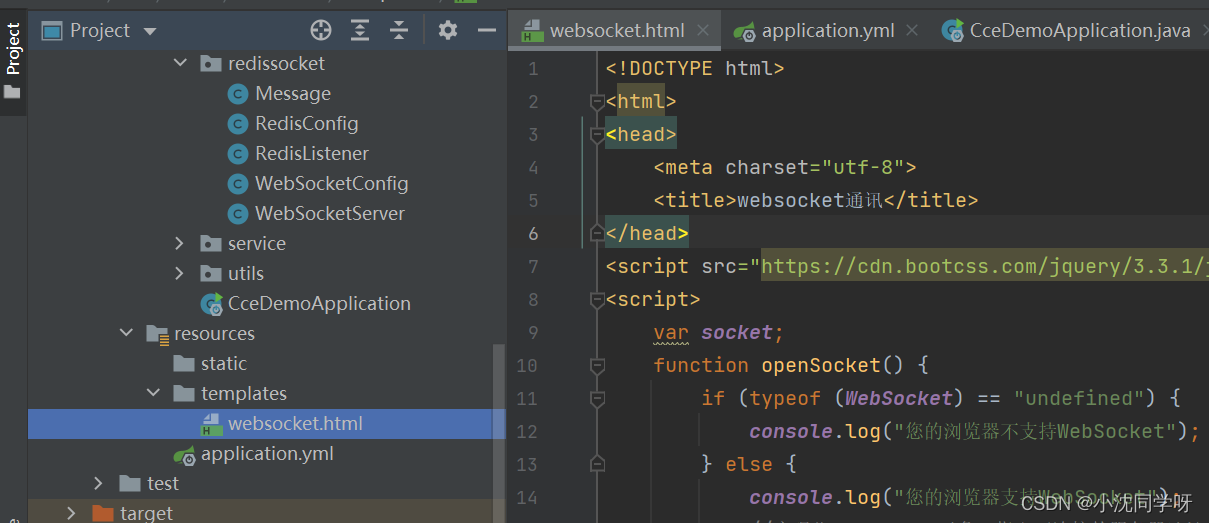
1、項目結構
2、springcloud 版本
<parent><groupId>org.springframework.boot</groupId><artifactId>spring-boot-starter-parent</artifactId><version>2.3.12.RELEASE</version><relativePath/> <!-- lookup parent from repository -->
</parent>
<properties><java.version>8</java.version><spring-cloud.version>Hoxton.SR12</spring-cloud.version>
</properties>
<dependencyManagement><dependencies><dependency><groupId>org.springframework.cloud</groupId><artifactId>spring-cloud-dependencies</artifactId><version>${spring-cloud.version}</version><type>pom</type><scope>import</scope></dependency></dependencies>
</dependencyManagement>
3、maven依賴
<dependency><groupId>com.alibaba</groupId><artifactId>fastjson</artifactId><version>1.2.68</version>
</dependency><dependency><groupId>org.springframework.boot</groupId><artifactId>spring-boot-starter-websocket</artifactId>
</dependency><!-- 整合thymeleaf前端頁面 -->
<dependency><groupId>org.springframework.boot</groupId><artifactId>spring-boot-starter-thymeleaf</artifactId>
</dependency>
4、配置文件
server:port: 8888
spring:profiles:active: devmvc:pathmatch:# Springfox使用的路徑匹配是基于AntPathMatcher的,而Spring Boot 2.6.X使用的是PathPatternMatchermatching-strategy: ant_path_matcherthymeleaf:mode: HTMLencoding: UTF-8content-type: text/htmlcache: falseprefix: classpath:/templates/
5、thymeleaf 頁面
websocket.html
<!DOCTYPE html>
<html>
<head><meta charset="utf-8"><title>websocket通訊</title>
</head>
<script src="https://cdn.bootcss.com/jquery/3.3.1/jquery.js"></script>
<script>var socket;function openSocket() {if (typeof (WebSocket) == "undefined") {console.log("您的瀏覽器不支持WebSocket");} else {console.log("您的瀏覽器支持WebSocket");//實現化WebSocket對象,指定要連接的服務器地址與端口  建立連接//等同于socket = new WebSocket("ws://localhost:8888/xxxx/im/25");//var socketUrl="${request.contextPath}/im/"+$("#userId").val();var socketUrl = "ws://192.168.1.4:7777/ws/" + $("#userId").val();socketUrl = socketUrl.replace("https", "ws").replace("http", "ws");console.log(socketUrl);if (socket != null) {socket.close();socket = null;}socket = new WebSocket(socketUrl);//打開事件socket.onopen = function () {console.log("websocket已打開");//socket.send("這是來自客戶端的消息" + location.href + new Date());};//獲得消息事件socket.onmessage = function (msg) {console.log("接收消息為:"+msg.data);};//關閉事件socket.onclose = function () {console.log("websocket已關閉");};//發生了錯誤事件socket.onerror = function () {console.log("websocket發生了錯誤");}}}//心跳檢測與重復驗證自己實現function sendMessage() {if (typeof (WebSocket) == "undefined") {console.log("您的瀏覽器不支持WebSocket");} else {console.log("您的瀏覽器支持WebSocket");console.log('發送消息為:{"fromUserId":"' + $("#userId").val() + '","toUserId":"' + $("#toUserId").val() + '","contentText":"' + $("#contentText").val() + '"}');socket.send('{"fromUserId":"' + $("#userId").val() + '","toUserId":"' + $("#toUserId").val() + '","contentText":"' + $("#contentText").val() + '"}');}}</script>
<body>
<p>【userId】:<div><input id="userId" name="userId" type="text" value="10"></div>
<p>【toUserId】:<div><input id="toUserId" name="toUserId" type="text" value="20"></div>
<p>【內容】:<div><input id="contentText" name="contentText" type="text" value="hello websocket"></div>
<p>【操作】:<div><button onclick="openSocket()">開啟socket</button></div>
<p>【操作】:<div><button onclick="sendMessage()">發送消息</button></div>
</body>
</html>
6、消息實體
Message.java
import lombok.Data;/*** Message* @author senfel* @version 1.0* @date 2024/5/17 14:39*/
@Data
public class Message {/*** 消息編碼*/private String code;/*** 來自(保證唯一)*/private String fromUserId;/*** 去自(保證唯一)*/private String toUserId;/*** 內容*/private String contentText;}
7、Websocket配置類
WebSocketConfig.java
import org.springframework.context.annotation.Bean;
import org.springframework.stereotype.Component;
import org.springframework.web.socket.server.standard.ServerEndpointExporter;
/*** WebSocketConfig* @author senfel* @version 1.0* @date 2024/5/16 16:51*/
@Component
public class WebSocketConfig {@Beanpublic ServerEndpointExporter serverEndpointExporter() {System.out.println("啟動websocket支持");return new ServerEndpointExporter();}
}Websocket 服務類
WebSocketServer.java
import com.example.ccedemo.config.SpringUtil;
import org.apache.commons.lang3.StringUtils;
import org.slf4j.Logger;
import org.slf4j.LoggerFactory;
import org.springframework.boot.autoconfigure.condition.ConditionalOnClass;
import org.springframework.data.redis.core.StringRedisTemplate;
import org.springframework.stereotype.Component;
import javax.websocket.*;
import javax.websocket.server.PathParam;
import javax.websocket.server.ServerEndpoint;
import java.util.concurrent.ConcurrentHashMap;
import java.util.concurrent.CopyOnWriteArraySet;/*** WebSocketServer* @author senfel* @version 1.0* @date 2024/5/16 16:59*/
@ConditionalOnClass(value = WebSocketConfig.class)
@Component
@ServerEndpoint("/ws/{deviceId}")
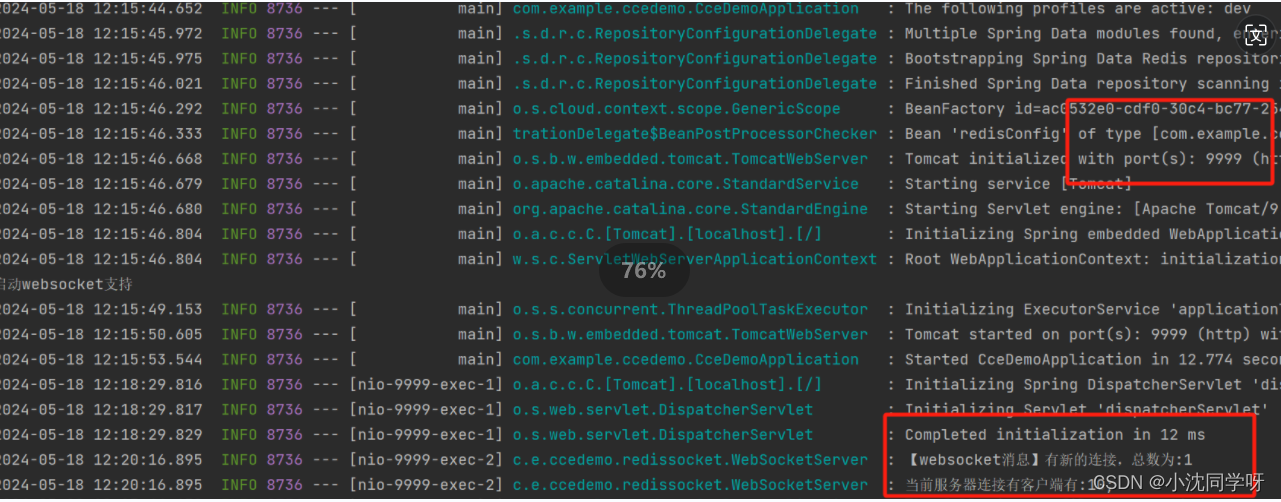
public class WebSocketServer {protected Logger logger = LoggerFactory.getLogger(this.getClass());/**與某個客戶端的連接會話,需要通過它來給客戶端發送數據*/private Session session;/*** 設備ID*/private String deviceId;/**concurrent包的線程安全Set,用來存放每個客戶端對應的MyWebSocket對象。雖然@Component默認是單例模式的,但springboot還是會為每個websocket連接初始化一個bean,所以可以用一個靜態set保存起來。注:底下WebSocket是當前類名*/private static CopyOnWriteArraySet<WebSocketServer> webSockets =new CopyOnWriteArraySet<>();/**用來存在線連接用戶信息*/private static ConcurrentHashMap<String,Session> sessionPool = new ConcurrentHashMap<String,Session>();/*** 鏈接成功調用的方法*/@OnOpenpublic void onOpen(Session session, @PathParam(value="deviceId")String deviceId) {try {if(StringUtils.isEmpty(deviceId)||deviceId.equals("undefined")){return;}this.session = session;this.deviceId = deviceId;webSockets.add(this);sessionPool.put(deviceId, session);logger.info("【websocket消息】有新的連接,總數為:"+webSockets.size());StringBuffer stringBuffer = new StringBuffer();sessionPool.forEach((key, value) -> {stringBuffer.append(key).append(";");});logger.info("當前服務器連接有客戶端有:"+stringBuffer.toString());} catch (Exception e) {}}/*** 鏈接關閉調用的方法*/@OnClosepublic void onClose() {try {webSockets.remove(this);sessionPool.remove(this.deviceId);logger.info("【websocket消息】連接斷開,總數為:"+webSockets.size());StringBuffer stringBuffer = new StringBuffer();sessionPool.forEach((key, value) -> {stringBuffer.append(key).append(";");});logger.info("當前服務器連接有客戶端有:"+stringBuffer.toString());} catch (Exception e) {}}/*** 收到客戶端消息后調用的方法* @param message*/@OnMessagepublic void onMessage(String message) {logger.info("【websocket消息】收到客戶端消息:"+message);SpringUtil.getBean(StringRedisTemplate.class).convertAndSend("webSocketMsgPush",message);}/** 發送錯誤時的處理* @param session* @param error*/@OnErrorpublic void onError(Session session, Throwable error) {logger.error("用戶錯誤,原因:"+error.getMessage());error.printStackTrace();}/*** 廣播消息* @author senfel* @date 2024/5/17 17:10* @return void*/public void sendAllMessage(String message) {logger.info("【websocket消息】廣播消息:"+message);for(WebSocketServer webSocket : webSockets) {try {if(webSocket.session.isOpen()) {webSocket.session.getAsyncRemote().sendText(message);}} catch (Exception e) {e.printStackTrace();}}}/*** 單點消息 單人* @param deviceId* @param message* @author senfel* @date 2024/5/17 17:10* @return void*/public void sendOneMessage(String deviceId, String message) {Session session = sessionPool.get(deviceId);if (session != null&&session.isOpen()) {try {logger.info("【websocket消息】 單點消息:"+message);session.getAsyncRemote().sendText(message);} catch (Exception e) {e.printStackTrace();}}}/*** 單點消息* @param deviceId* @param object* @author senfel* @date 2024/5/17 17:10* @return void*/public void sendOneObject(String deviceId, Object object) {Session session = sessionPool.get(deviceId);if (session != null&&session.isOpen()) {try {logger.info("【websocket消息】 單點消息(對象):"+object);session.getAsyncRemote().sendObject(object);} catch (Exception e) {e.printStackTrace();}}}/*** 單點消息(多人)* @param deviceIds* @param message* @author senfel* @date 2024/5/17 17:11* @return void*/public void sendMoreMessage(String[] deviceIds, String message) {for(String deviceId:deviceIds) {Session session = sessionPool.get(deviceId);if (session != null&&session.isOpen()) {try {logger.info("【websocket消息】 單點消息:"+message);session.getAsyncRemote().sendText(message);} catch (Exception e) {e.printStackTrace();}}}}}
8、controller提供接口
import org.springframework.web.bind.annotation.GetMapping;
import org.springframework.web.bind.annotation.RequestMapping;
import org.springframework.web.bind.annotation.RestController;
import org.springframework.web.servlet.ModelAndView;/*** TestController* @author senfel* @version 1.0* @date 2024/5/17 17:49*/
@RestController
@RequestMapping("/api/websocket")
public class BaseController {@GetMapping("page")public ModelAndView page(Long userId){ModelAndView websocket = new ModelAndView("websocket");websocket.addObject("userId",userId);return websocket;}
}
Websoket集群負載均衡
大家都知道Websoket是一個長鏈接,在不斷開的情況下服務端與客戶端是可以自由通訊的,這是因為服務端緩存了會話。
如果我們后端采用集群部署,那么可能多個用戶的緩存會話會分散在各個服務器上。在我們給指定用戶推送消息時就有可能調用服務器上并沒有這個用戶的會話。
所以,我們引入Redis發布訂閱,將消息進行轉發到所有的服務端,只有有會話緩存的服務端才會成功推送消息。講到這里就比較明顯了吧,完美解決Websoket負載均衡的問題。
1、maven引入Redis
<dependency><groupId>org.springframework.boot</groupId><artifactId>spring-boot-starter-data-redis</artifactId>
</dependency>
2、配置文件
spring:redis:host: 127.0.0.1port: 6379
3、Redis配置類
RedisConfig.java
import com.fasterxml.jackson.annotation.JsonAutoDetect;
import com.fasterxml.jackson.annotation.PropertyAccessor;
import com.fasterxml.jackson.databind.ObjectMapper;
import org.springframework.cache.annotation.CachingConfigurerSupport;
import org.springframework.cache.annotation.EnableCaching;
import org.springframework.context.annotation.Bean;
import org.springframework.context.annotation.Configuration;
import org.springframework.context.annotation.Primary;
import org.springframework.data.redis.connection.RedisConnectionFactory;
import org.springframework.data.redis.core.RedisTemplate;
import org.springframework.data.redis.listener.PatternTopic;
import org.springframework.data.redis.listener.RedisMessageListenerContainer;
import org.springframework.data.redis.listener.adapter.MessageListenerAdapter;
import org.springframework.data.redis.serializer.Jackson2JsonRedisSerializer;
import org.springframework.data.redis.serializer.StringRedisSerializer;/*** RedisConfig * @author senfel* @version 1.0* @date 2024/5/17 14:31*/
@Configuration
@EnableCaching
public class RedisConfig extends CachingConfigurerSupport {@Bean@Primarypublic RedisTemplate<String, Object> redisTemplate(RedisConnectionFactory factory) {RedisTemplate<String, Object> template = new RedisTemplate<>();template.setConnectionFactory(factory);Jackson2JsonRedisSerializer jacksonSeial = new Jackson2JsonRedisSerializer(Object.class);StringRedisSerializer stringRedisSerializer = new StringRedisSerializer();ObjectMapper om = new ObjectMapper();om.setVisibility(PropertyAccessor.ALL, JsonAutoDetect.Visibility.ANY);om.enableDefaultTyping(ObjectMapper.DefaultTyping.NON_FINAL);jacksonSeial.setObjectMapper(om);template.setValueSerializer(jacksonSeial);template.setKeySerializer(stringRedisSerializer);template.setHashKeySerializer(stringRedisSerializer);template.setHashValueSerializer(jacksonSeial);template.afterPropertiesSet();return template;}@BeanRedisMessageListenerContainer container(RedisConnectionFactory connectionFactory,MessageListenerAdapter topicAdapter) {RedisMessageListenerContainer container = new RedisMessageListenerContainer();container.setConnectionFactory(connectionFactory);//訂閱了主題 webSocketMsgPushcontainer.addMessageListener(topicAdapter, new PatternTopic("webSocketMsgPush"));return container;}/*** 消息監聽器適配器,綁定消息處理器** @return*/@BeanMessageListenerAdapter topicAdapter() {return new MessageListenerAdapter(new RedisListener());}
}
4、Redis訂閱監聽
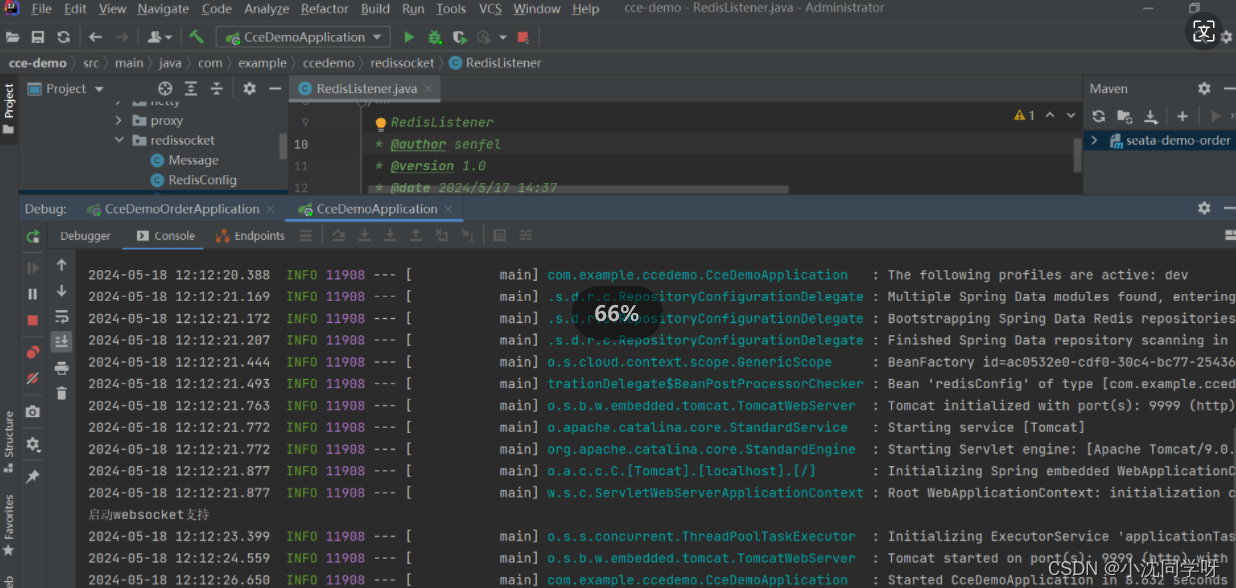
RedisListener.java
import com.alibaba.fastjson.JSONObject;
import com.example.ccedemo.config.SpringUtil;
import org.springframework.data.redis.connection.Message;
import org.springframework.data.redis.connection.MessageListener;/*** RedisListener* @author senfel* @version 1.0* @date 2024/5/17 14:37*/
public class RedisListener implements MessageListener {@Overridepublic void onMessage(Message msg, byte[] bytes) {System.out.println(".監聽到需要進行負載轉發的消息:" + msg.toString());com.example.ccedemo.redissocket.Message message = JSONObject.parseObject(msg.toString(), com.example.ccedemo.redissocket.Message.class);SpringUtil.getBean(WebSocketServer.class).sendOneMessage(message.getToUserId(), message.getContentText());}
}
實戰測試
我們本地啟動兩個服務,分別開啟端口8888、9999,然后用nginx暴露7777端口做一個負載均衡。
IDEA啟動兩臺服務端
配置nginx負載均衡
#服務器url變量定義
upstream api_service1 {server 192.168.1.4:8888;server 192.168.1.4:9999;
}#nginx配置websocket
map $http_upgrade $connection_upgrade {default upgrade;'' close;
}
server {listen  7777;large_client_header_buffers 4 16k;client_max_body_size 300m;client_body_buffer_size 128k;proxy_connect_timeout 600;proxy_read_timeout 600;proxy_send_timeout 600;proxy_buffer_size 64k;proxy_buffers   4 32k;proxy_busy_buffers_size 64k;proxy_temp_file_write_size 64k;proxy_http_version 1.1;root  /demo/page/dist;index  index.html;#apilocation /api/ {proxy_pass  http://api_service1/api/;proxy_set_header Host $http_host;}#nginx配置websocketlocation /ws/ { proxy_http_version 1.1; proxy_pass  http://api_service1/ws/;proxy_redirect off;proxy_set_header Host $host;  proxy_set_header X-Real-IP $remote_addr;proxy_read_timeout 3600s;proxy_set_header X-Forwarded-For $proxy_add_x_forwarded_for;proxy_set_header Upgrade $http_upgrade;proxy_set_header Connection $connection_upgrade;}#解決頁面刷新404location / {try_files $uri $uri/ @req;index index.html;}location @req {rewrite ^.*$ /index.html last;}
}
瀏覽器訪問模擬對話
1、瀏覽器開啟多個無痕界面
http://192.168.1.4:7777/api/websocket/page
模擬對話:
多個界面的用戶ID互補
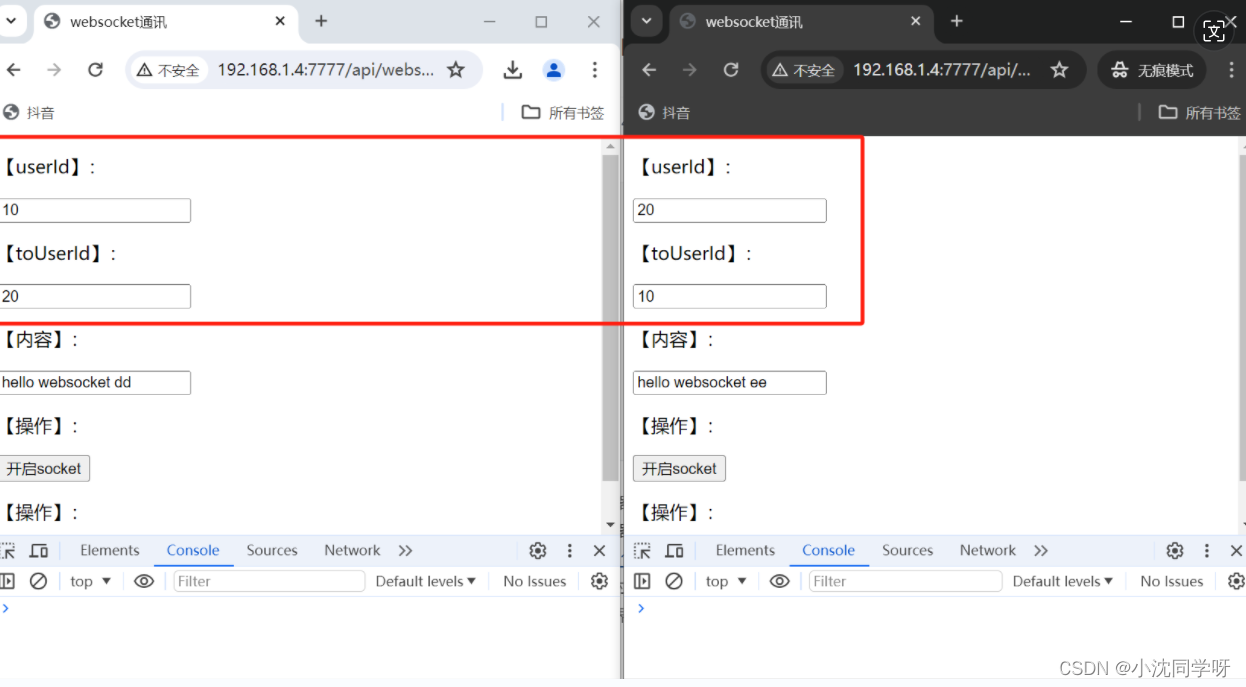
2、分別開啟soket,由于nginx輪詢策略會分別注冊在兩個服務端上
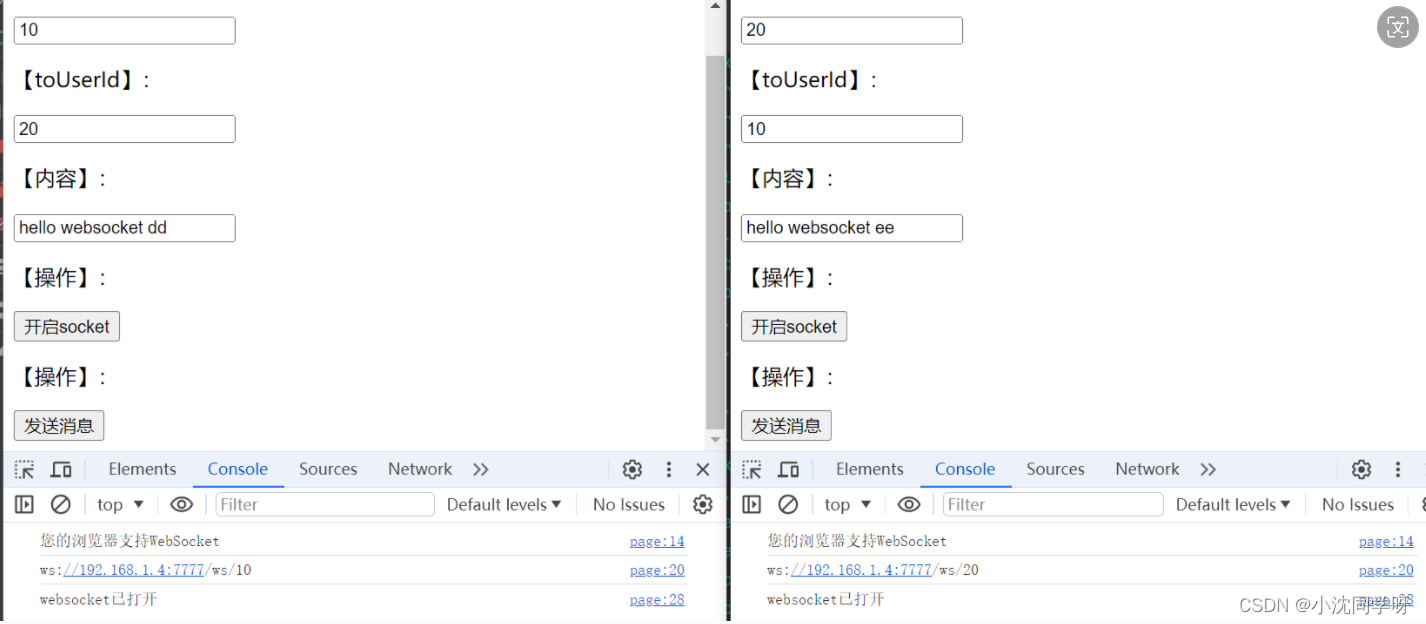
3、客戶端相互發送消息驗證
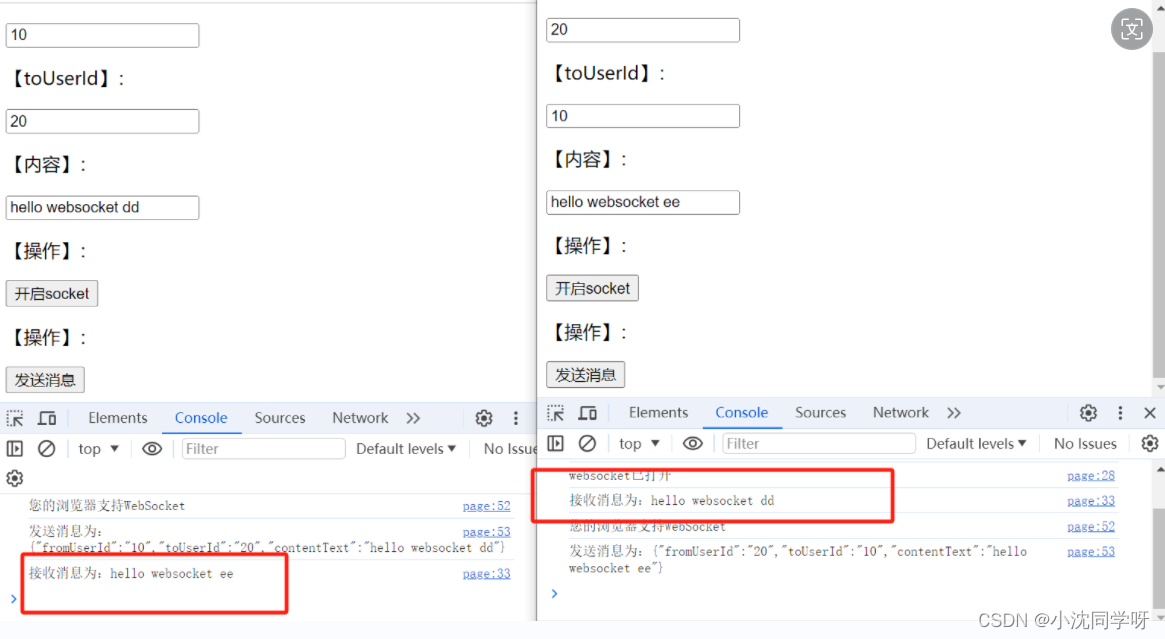
由以上圖片可知,我們兩個客戶端相互對話能夠接收到對方推送的消息。那么,由此也可以證明我們后端Websocke集群使用Redis發布訂閱的方式搭建成功。


:脈沖;超寬帶;測距;定位)

)
:知識點總結+思維導圖,考試速成!)
Nginx格式化插件,Nginx生產工具,Nginx常用命令)


)
