需求要求:業務人員有個非常復雜得excel表格,各種表頭等,但是模板是固定得。當然也可以實現在excel上搞出各種表格,但是不如直接用已有模板替換其中要動態得內容方便,這里我們用到CSDN得?xlsx-populate? 插件。
實列中我們使用node做一個服務
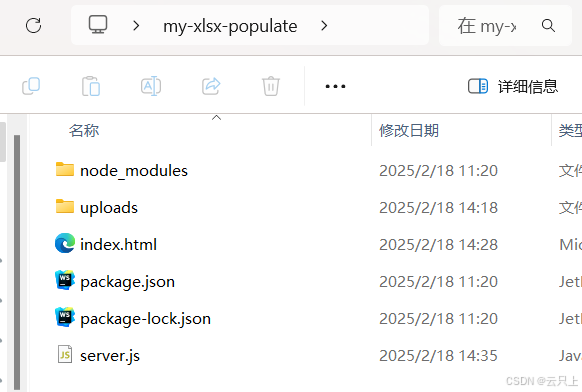
一、首先創建一個空白文件夾??my-xlsx-populate
1、創建index.html文件
這里得html主要用來點擊操作作用
<!DOCTYPE html>
<html lang="en"><head><meta charset="UTF-8"><meta name="viewport" content="width=device-width, initial-scale=1.0"><title>Excel 文件處理</title><style>body {font-family: Arial, sans-serif;display: flex;justify-content: center;align-items: center;height: 100vh;margin: 0;background-color: #f4f4f9;}button {padding: 10px 20px;background-color: #007BFF;color: #fff;border: none;border-radius: 4px;cursor: pointer;}button:hover {background-color: #0056b3;}</style>
</head><body><button id="processButton">處理文件</button><script>const processButton = document.getElementById('processButton');processButton.addEventListener('click', async () => {try {const response = await fetch('/process', {method: 'POST',headers: {'Content-Type': 'application/json'}});if (response.ok) {const blob = await response.blob();const url = window.URL.createObjectURL(blob);const a = document.createElement('a');a.href = url;a.download = '修改后.xlsx';a.click();window.URL.revokeObjectURL(url);} else {const errorText = await response.text();alert(`處理文件時出錯: ${errorText}`);}} catch (error) {alert(`網絡請求出錯: ${error.message}`);}});</script>
</body></html>
1、創建server.js文件
const express = require('express');
const XlsxPopulate = require('xlsx-populate');
const path = require('path');
const fs = require('fs');const app = express();// 檢查 uploads 目錄是否存在,不存在則創建
const uploadDir = path.join(__dirname, 'uploads');
if (!fs.existsSync(uploadDir)) {fs.mkdirSync(uploadDir);
}// 處理靜態文件,使得前端頁面可以被訪問
app.use(express.static(__dirname));// 處理文件處理請求
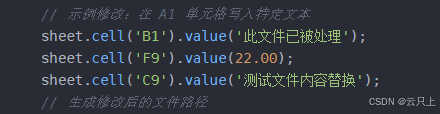
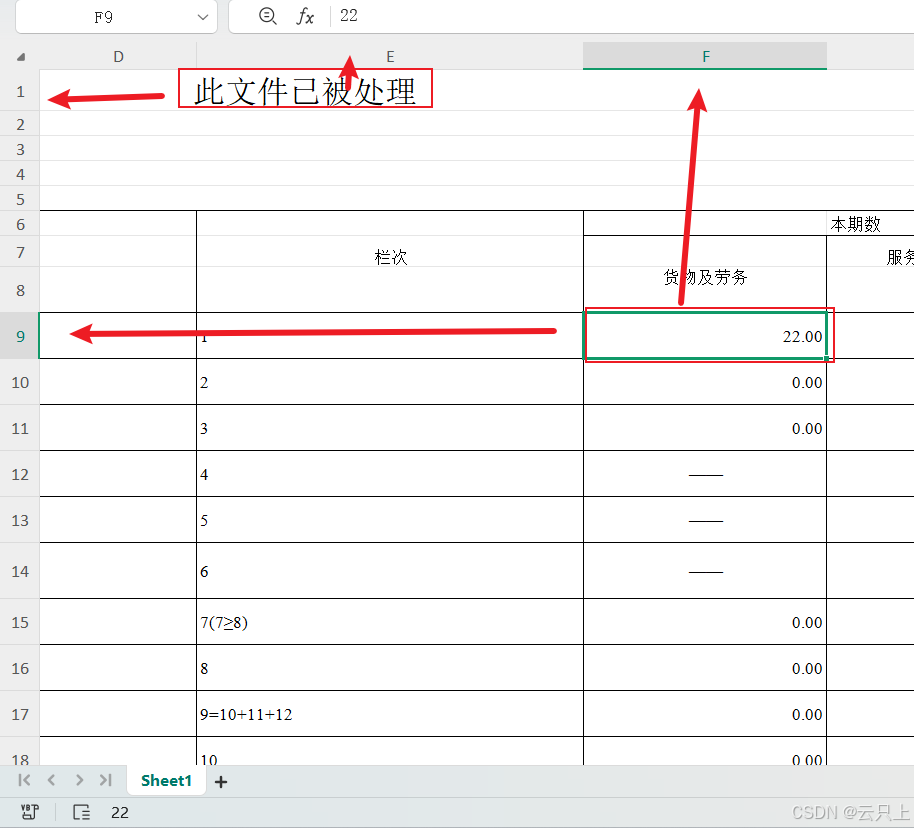
app.post('/process', async (req, res) => {try {// 獲取 uploads 目錄下的所有文件const files = fs.readdirSync(uploadDir);if (files.length === 0) {console.error('uploads 目錄中沒有文件');return res.status(400).send('uploads 目錄中沒有文件');}// 選擇第一個文件進行處理const selectedFile = path.join(uploadDir, files[0]);console.log('選定文件:', selectedFile);// 檢查文件擴展名const fileExtension = path.extname(selectedFile).toLowerCase();if (fileExtension !== '.xlsx') {console.error('文件擴展名不正確:', fileExtension);return res.status(400).send('僅支持 .xlsx 文件');}try {// 檢查文件是否可讀fs.accessSync(selectedFile, fs.constants.R_OK);// 讀取 Excel 文件const workbook = await XlsxPopulate.fromFileAsync(selectedFile);console.log('成功讀取文件:', selectedFile);const sheet = workbook.sheet(0);// 獲取第一行const firstRow = sheet.row(1);// 示例修改:在 A1 單元格寫入特定文本sheet.cell('B1').value('此文件已被處理');sheet.cell('F9').value(22.00);sheet.cell('C9').value('測試文件內容替換');// 生成修改后的文件路徑const outputPath = path.join(__dirname, 'output.xlsx');await workbook.toFileAsync(outputPath);// 檢查修改后的文件是否存在if (!fs.existsSync(outputPath)) {console.error('修改后的文件未生成:', outputPath);return res.status(500).send('修改后的文件未生成');}// 對文件名進行嚴格編碼const originalFileName = '修改后.xlsx';const encodedFileName = encodeURIComponent(originalFileName).replace(/'/g, '%27');// 設置響應頭res.setHeader('Content-Disposition', `attachment; filename="${encodedFileName}"`);res.setHeader('Content-Type', 'application/vnd.openxmlformats-officedocument.spreadsheetml.sheet');// 發送修改后的文件給客戶端下載res.download(outputPath, originalFileName, async (err) => {if (err) {console.error('下載文件時出錯:', err);res.status(500).send('下載文件時出錯');}try {// 刪除臨時文件if (fs.existsSync(selectedFile)) {fs.unlinkSync(selectedFile);}if (fs.existsSync(outputPath)) {fs.unlinkSync(outputPath);}} catch (unlinkErr) {console.error('刪除臨時文件時出錯:', unlinkErr);}});} catch (parseError) {console.error('解析 Excel 文件時出錯:', parseError.message);res.status(500).send(`解析 Excel 文件時出錯,請檢查文件是否損壞或格式是否正確: ${parseError.message}`);}} catch (error) {console.error('處理文件時出錯:', error.message);res.status(500).send(`處理文件時出錯: ${error.message}`);}
});// 啟動服務器
const port = 3000;
app.listen(port, () => {console.log(`服務器運行在端口 ${port}`);
});3.my-xlsx-populate目錄中下創建uploads文件里面存放 .xlxs文件模板
3.my-xlsx-populate目錄中右鍵打開CMD
安裝依賴:
npm init -y
npm install express multer xlsx-populate
具體結構:
啟動服務器:運行?server.js?文件
node server.js?打開頁面
在瀏覽器中訪問?http://localhost:3000
運行后下載文件打開:
server.js中代碼對應exce代碼中得坐標
下面我們會詳細介紹一下?xlsx-populate ,這做效果演示
下載修改完得excel文件
xlsx-populate介紹
xlsx-populate主要是為 Node.js 環境設計的,因為它依賴于一些僅在 Node.js 環境中可用的功能和庫,比如文件系統訪問(fs模塊)等。這意味著它不能直接在瀏覽器端的 JavaScript 中使用,因為瀏覽器環境缺乏對本地文件系統的直接訪問權限,并且存在安全限制。
生產環境中Linux中可以使用pm2來運行server.js文件保持node運行。
主要功能
- 讀寫Excel文件:可以打開現有的 .xlsx 文件進行編輯或創建新的文件。
- 數據處理:支持對單元格的數據進行各種操作,如設置值、公式計算等。
- 格式調整:能夠修改單元格的樣式,包括字體大小、顏色、背景色等。
- 圖片插入:支持在工作表中添加圖片。
- 圖表支持:可以在工作表內生成圖表。
-
示例修改:在單元格寫入特定文本
sheet.cell('B1').value('此文件已被處理');sheet.cell('F9').value(22.00);sheet.cell('C9').value('測試文件內容替換'); ??
? 2.?設置公式
sheet.cell('D1').formula('SUM(F9:F10)');3.設置樣式
sheet.cell('B1').style({fontColor: 'FF0000', // 紅色bold: true,horizontalAlignment: 'center'
});
3.插入圖片
const fs = require('fs');
const imageBuffer = fs.readFileSync('path/to/image.png');sheet.addImage({image: imageBuffer,type: 'picture',position: {x: 5, // 列號y: 5, // 行號}
});
4.添加或刪除行/列
// 添加一行在第3行的位置
sheet.insertRow(3);// 刪除第4行
sheet.deleteRow(4);
5.設置列寬和行高
// 設置列寬
sheet.column('C').width(20);// 設置行高
sheet.row(9).height(30);
更多高級和實用的操作方法:
6.?數據驗證(Data Validation)
你可以為單元格添加數據驗證規則。
sheet.cell('A1').dataValidation({type: 'list',allowBlank: true,formula1: '"Apple,Banana,Cherry"'
});
7.條件格式(Conditional Formatting)
為單元格或范圍設置條件格式。
sheet.range('A1:A10').conditionalFormat({type: 'cellIs',operator: 'greaterThan',formula: 50,style: {fill: 'FFFF00' // 黃色背景}
});
8.添加圖表
可以在工作表中插入圖表。
sheet.addChart({type: 'column', // 圖表類型range: sheet.range('A1:B10'), // 數據范圍position: {x: 12, // 列號y: 12  // 行號},width: 400,height: 300
});
9.?復制和移動區域
可以復制或移動指定的區域。
// 復制 A1:B2 區域到 C3
sheet.range('A1:B2').copyTo(sheet.range('C3'));// 移動 A1:B2 區域到 D4
sheet.range('A1:B2').moveTo(sheet.range('D4'));
10.獲取單元格值和屬性
獲取特定單元格的值、公式或其他屬性。
const value = sheet.cell('A1').value(); // 獲取單元格值
const formula = sheet.cell('A1').formula(); // 獲取單元格公式
const style = sheet.cell('A1').style(); // 獲取單元格樣式
11.批量操作
使用批量操作可以提高性能,尤其是在處理大量數據時。
sheet.batch(() => {for (let i = 1; i <= 100; i++) {sheet.cell(`A${i}`).value(i);}
});
12.設置頁眉和頁腳、
可以為工作表設置頁眉和頁腳。
sheet.headerFooter({oddHeader: '&C&"Arial,Bold"Page &P of &N',oddFooter: '&L&"Arial,Italic"Confidential&R&D&T'
});
13.?設置打印區域
可以指定打印區域和打印標題行/列。
sheet.printArea('A1:D20'); // 設置打印區域
sheet.printTitles({rows: '1:1', // 設置第一行為標題行columns: 'A:A' // 設置第一列為標題列
});
14.保存到流(Stream)
可以將修改后的文件保存到一個流中,而不是直接保存到文件系統。
const fs = require('fs');
const writeStream = fs.createWriteStream('output.xlsx');workbook.toStream().pipe(writeStream);15.凍結窗格
你可以設置工作表中的凍結窗格,方便查看大量數據時固定某些行或列。
sheet.freezePanes('B2'); // 凍結 B2 左上方的所有單元格16.隱藏行列
可以隱藏指定的行或列。
// 隱藏第3行
sheet.row(3).hidden(true);// 隱藏第C列
sheet.column('C').hidden(true);17.保護工作表
可以設置工作表的保護功能,防止未經授權的修改。
sheet.protect({password: 'your-password',selectLockedCells: false,selectUnlockedCells: true
});18.?設置超鏈接
可以在單元格中插入超鏈接。
sheet.cell('A1').hyperlink('https://www.example.com');
sheet.cell('A1').value('點擊這里訪問 Example.com');19.設置注釋
可以為單元格添加注釋。
sheet.cell('A1').comment({text: '這是一個示例注釋',author: '作者名字'
});20.?批量設置樣式
可以通過 range 方法對多個單元格應用相同的樣式。
sheet.range('A1:C3').style({fontColor: '0000FF', // 藍色字體bold: true,horizontalAlignment: 'center'
});21.設置單元格類型
可以設置單元格的數據類型(如日期、數字、文本等)。
sheet.cell('A1').type('date'); // 設置單元格為日期類型
sheet.cell('A1').value(new Date()); // 設置當前日期sheet.cell('B1').type('number'); // 設置單元格為數字類型
sheet.cell('B1').value(12345); // 設置數值22.導入和導出 JSON 數據
可以從 JSON 數據導入到 Excel 文件,或者將 Excel 文件導出為 JSON 數據。
// 導入 JSON 數據到 A1 開始的區域
const jsonData = [{ "Name": "John", "Age": 30, "City": "New York" },{ "Name": "Anna", "Age": 22, "City": "London" }
];
sheet.importData(jsonData, 'A1');// 將 A1 開始的區域導出為 JSON 數據
const exportedData = sheet.exportData('A1:C3');
console.log(exportedData);


)
)


:分頁)


ffmpeg音視頻同步)