YOLO V10安裝、使用、訓練大全
- 一、下載官方源碼
- 二、配置conda環境
- 三、安裝YOLOV10依賴
- 四、使用官方YOLO V10模型
- 1.下載模型
- 2.使用模型
- 2.1 圖片案例
- 五、制作數據集
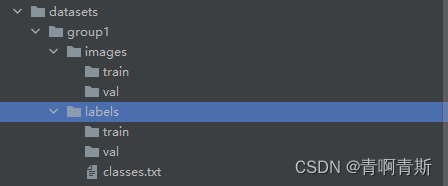
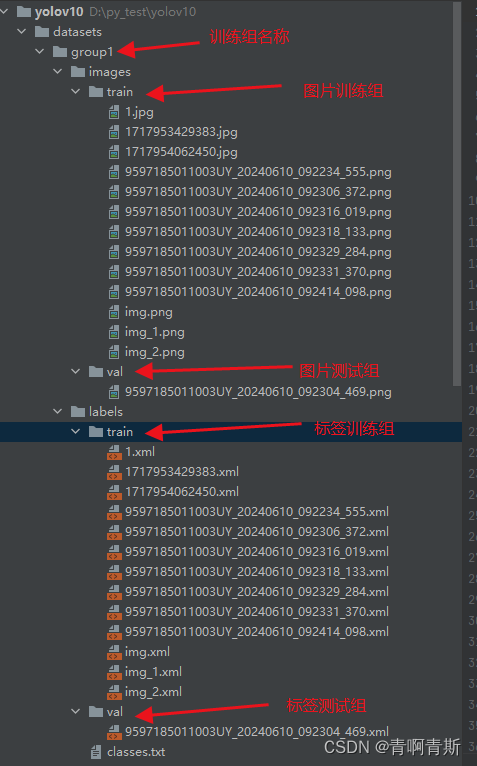
- 1.數據集目錄結構
- 2.標注工具
- 2.1 安裝標注工具
- 2.2 運行標注工具
- 2.3 設置自動保存
- 2.4 切換yolo模式
- 2.5 開始標注
- 2.6 數據集準備
- 2.6.1 數據集文件夾準備
- 2.6.2 xml格式轉yolo的txt訓練格式
- 3.訓練
- 3.1 創建訓練配置文件
- 3.2 命令訓練
- 3.3 代碼訓練
- 4.測試模型
- 4.1 圖片
- 4.1.1 命令行
- 4.1.2 代碼
- 4.2 視頻
- 4.2.1 命令行
- 4.2.2 代碼
一、下載官方源碼
- 源碼點擊下載
二、配置conda環境
# 1.在conda創建python3.9環境
conda create -n yolov10 python=3.9
# 2.激活切換到創建的python3.9環境
conda activate yolov10
三、安裝YOLOV10依賴
# 1.切換到yolov10源碼根目錄下,安裝依賴
# 注意:會自動根據你是否有GPU自動選擇pytorch版本進行按照,這里不需要自己去選擇pytorch和cuda按照,非常良心
pip install -r requirements.txt -i https://pypi.doubanio.com/simple
# 2.運行下面的命令,才可以在命令行使用yolo等命令
pip install -e .
四、使用官方YOLO V10模型
1.下載模型
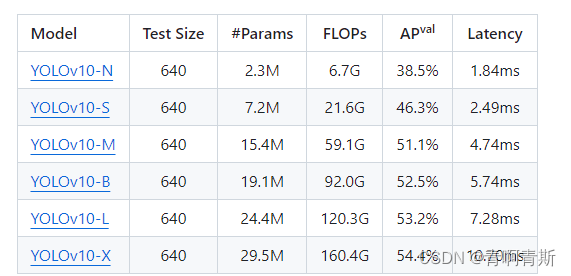
- 模型下載
- YOLOv10-N:https://github.com/THU-MIG/yolov10/releases/download/v1.1/yolov10n.pt
- YOLOv10-S:https://github.com/THU-MIG/yolov10/releases/download/v1.1/yolov10s.pt
- YOLOv10-M:https://github.com/THU-MIG/yolov10/releases/download/v1.1/yolov10m.pt
- YOLOv10-B:https://github.com/THU-MIG/yolov10/releases/download/v1.1/yolov10b.pt
- YOLOv10-L:https://github.com/THU-MIG/yolov10/releases/download/v1.1/yolov10l.pt
- YOLOv10-X:https://github.com/THU-MIG/yolov10/releases/download/v1.1/yolov10x.pt
- 下載完放入源碼根目錄
2.使用模型
2.1 圖片案例
import cv2
from ultralytics import YOLOv10# 加載模型
model = YOLOv10("yolov10m.pt")# 批量運算
results = model(["./datasets/group1/images/train/9597185011003UY_20240610_092234_555.png"], stream=True)for result in results:boxes_cls_len = len(result.boxes.cls)if not boxes_cls_len:# 沒有檢測到內容continuefor boxes_cls_index in range(boxes_cls_len):# 獲取類別idclass_id = int(result.boxes.cls[boxes_cls_index].item())# 獲取類別名稱class_name = result.names[class_id]# 獲取相似度similarity = result.boxes.conf[boxes_cls_index].item()# 獲取坐標值,左上角 和 右下角:lt_rb的值:[1145.1351318359375, 432.6763000488281, 1275.398681640625, 749.5224609375]lt_rb = result.boxes.xyxy[boxes_cls_index].tolist()# 轉為:[[1145.1351318359375, 432.6763000488281], [1275.398681640625, 749.5224609375]]lt_rb = [[lt_rb[0], lt_rb[1]], [lt_rb[0], lt_rb[1]]]print("類別:", class_name, "相似度:", similarity, "坐標:", lt_rb)# 圖片展示annotated_image = result.plot()annotated_image = annotated_image[:, :, ::-1]if annotated_image is not None:cv2.imshow("Annotated Image", annotated_image)cv2.waitKey(0)cv2.destroyAllWindows()
五、制作數據集
- 一般會將所有圖片放到一個文件夾,打完標注后,從總的文件夾中,分別分不同的圖片到訓練集和數據集
1.數據集目錄結構
2.標注工具
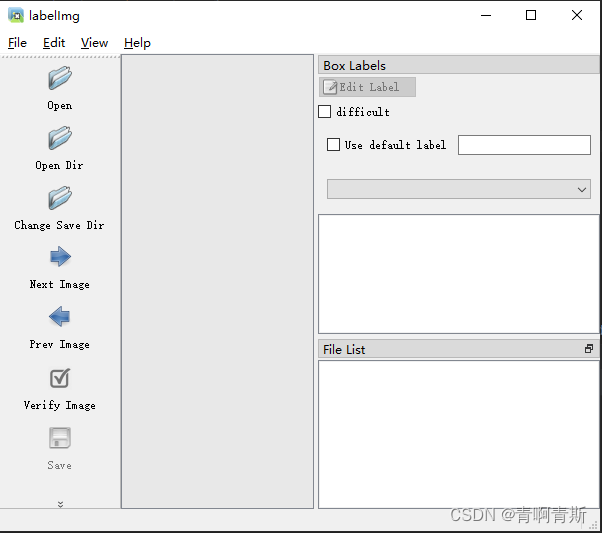
- Labelimg是一款開源的數據標注工具,可以標注三種格式。
- VOC標簽格式,保存為xml文件。
- yolo標簽格式,保存為txt文件。
- createML標簽格式,保存為json格式。
2.1 安裝標注工具
pip install labelimg -i https://pypi.doubanio.com/simple
2.2 運行標注工具
- labelimg:運行工具
- images:圖片文件夾路徑
- classes.txt:類別的文件
labelimg images label/classes.txt
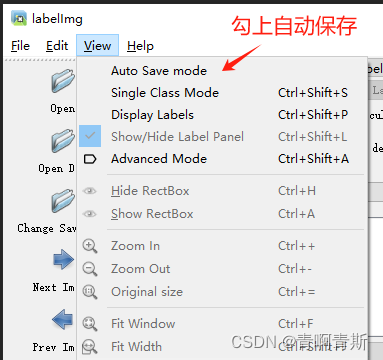
2.3 設置自動保存
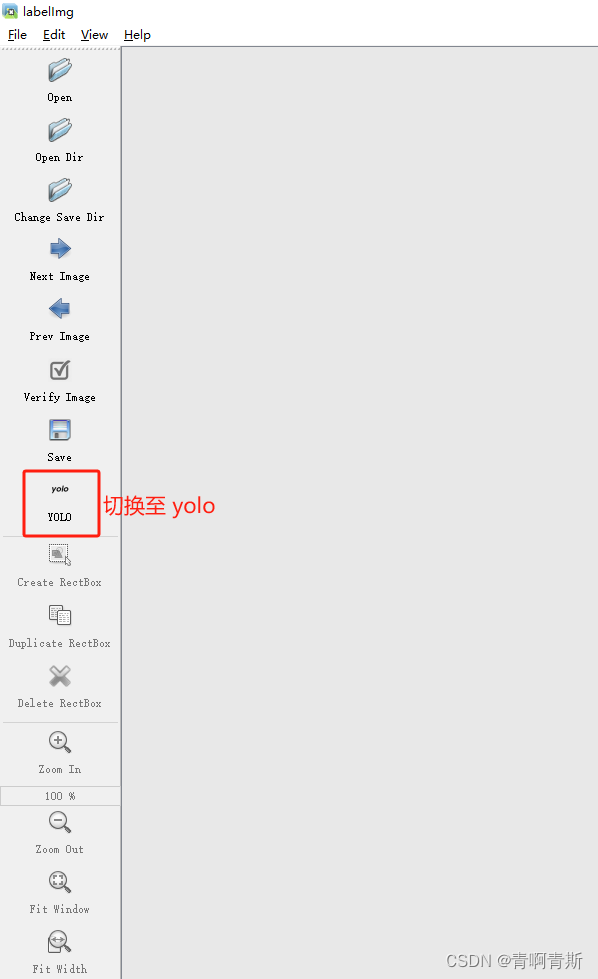
2.4 切換yolo模式
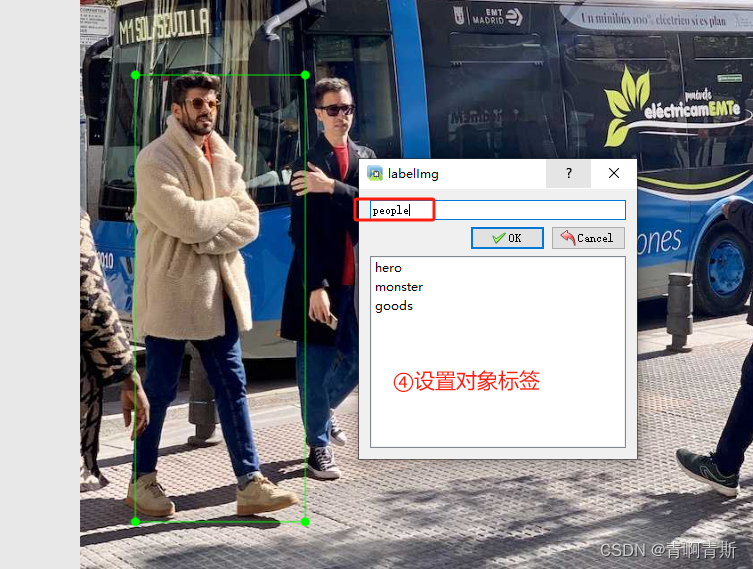
2.5 開始標注
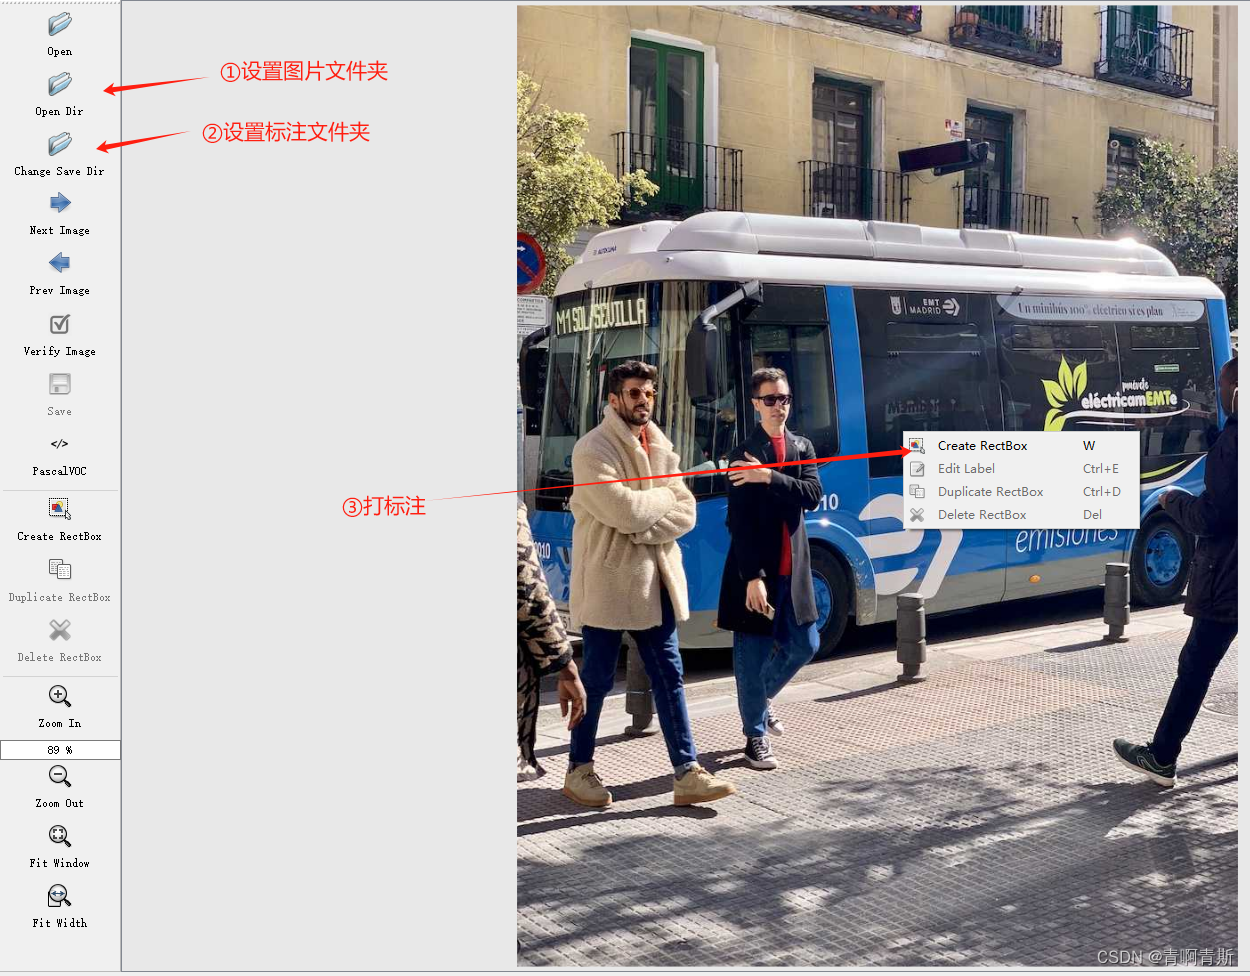
標注完退出軟件即可
2.6 數據集準備
2.6.1 數據集文件夾準備
yolo的label文件內容:
<class_index> <x_center> <y_center> <width> <height>
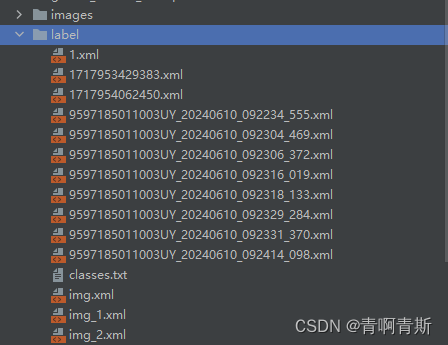
2.6.2 xml格式轉yolo的txt訓練格式
- 運行下面腳本,就會轉換
import os
import xml.etree.ElementTree as ETclasses = ['hero', 'monster', 'goods']def convert(size, box):dw = 1. / size[0]dh = 1. / size[1]x = (box[0] + box[1]) / 2.0y = (box[2] + box[3]) / 2.0w = box[1] - box[0]h = box[3] - box[2]x = x * dww = w * dwy = y * dhh = h * dhreturn (x, y, w, h)def convert_annotation(xml_file_paths, is_delete=False):"""將某個文件夾下面所有的xml轉換為yolo格式"""for xml_file_path in xml_file_paths:xml_file_dir, xml_file_name = os.path.split(xml_file_path)in_file = open(xml_file_path, 'r')out_file = open(os.path.join(xml_file_dir, xml_file_name[:-4]) + '.txt', 'w')tree = ET.parse(in_file)root = tree.getroot()size = root.find('size')w = int(size.find('width').text)h = int(size.find('height').text)for obj in root.iter('object'):cls = obj.find('name').textif cls not in classes:print(cls)continuecls_id = classes.index(cls)xmlbox = obj.find('bndbox')b = (float(xmlbox.find('xmin').text), float(xmlbox.find('xmax').text), float(xmlbox.find('ymin').text),float(xmlbox.find('ymax').text))bb = convert((w, h), b)out_file.write(str(cls_id) + " " + " ".join([str(a) for a in bb]) + '\n')def traverse_folder(folder_path):"""獲取某個文件夾下面所有的xml文件"""for root, dirs, files in os.walk(folder_path):for file in files:if file.lower().endswith(('.xml')):yield os.path.join(root, file)if __name__ == '__main__':convert_annotation(traverse_folder(os.path.join(".", "datasets", "group1", "labels")))
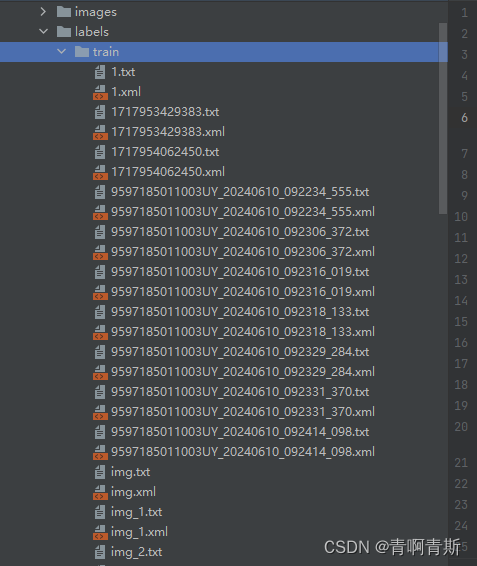
- txt格式就是yolo訓練的格式
3.訓練
3.1 創建訓練配置文件
- group1.yaml:文件和datasets文件夾同一個目錄
path: group1 # dataset root dir
train: images/train # train images (relative to 'path') 128 images
val: images/val # val images (relative to 'path') 128 images
test: # test images (optional)# Classes
names:0: hero1: monster2: goods
3.2 命令訓練
yolo task=detect mode=train data=group1.yaml model=yolov10m.pt epochs=100 batch=16 device=cpu plots=True
- 上述各個參數解釋如下,請根據自己的情況修改。
- yolo:運行yolo程序
- task=detect:指定任務為檢測(detect)。YOLO模型可以用于不同的任務,如檢測、分類等,這里明確指定為檢測任務。
- mode=train:指定模式為訓練(train)。這意味著你將使用提供的數據集來訓練模型。
- data=group1.yaml:指定你自己的數據集yaml文件
- model=yolov10m.pt: 指定下載的yolov10預訓練權重文件
- epochs=100:設置訓練輪次,可以先設置一個5輪或者10輪,測試看看,順利進行再設置大一點進行下一步訓練。
- batch=4:設置訓練集加載批次,主要是提高訓練速度,具體得看你的顯卡或者內存容量。如果顯存大,則可以設置大一些。或許訓練再詳細講解如何設置
- device=0:指定訓練設備,如果沒有gpu,則令device=cpu,如果有一個gpu,則令device=0,有兩個則device=0,1以此類推進行設置。
- plots:指定在訓練過程中生成圖表(plots)。這可以幫助你可視化訓練進度,如損失函數的變化等。
3.3 代碼訓練
- 待補充
4.測試模型
4.1 圖片
4.1.1 命令行
yolo task=detect mode=predict conf=0.25 save=True model=runs/detect/train/weights/best.pt source=test_images_1/veh2.jpg
- 上述各個參數解釋如下,請根據自己的情況修改。
- yolo:運行yolo程序
- task=detect:指定任務為檢測(detect)。YOLO模型可以用于不同的任務,如檢測、分類等,這里明確指定為檢測任務。
- mode=predict:設置模式為預測(predict)。這意味著模型將使用提供的權重和圖像進行預測,而不是進行訓練。
- conf=0.25:設置置信度閾值為0.25。這意味著只有模型預測置信度大于或等于0.25的檢測結果才會被考慮。
- save=True:指示模型保存預測結果。這通常會將結果保存為圖像文件,其中檢測到的對象會被標記出來。
- model=runs/detect/train/weights/best.pt:指定模型權重文件的位置。這里,best.pt是訓練過程中保存的最佳權重文件,用于進行預測。
- source=test_images_1/veh2.jpg:指定要檢測的源圖像。這里,veh2.jpg是要進行對象檢測的圖像文件。
4.1.2 代碼
from ultralytics import YOLOv10
import supervision as sv
import cv2classes = {0: 'licence'}model = YOLOv10('runs/detect/train6/weights/best.pt')
image = cv2.imread('veh2.jpg')results = model(source=image, conf=0.25, verbose=False)[0]
detections = sv.Detections.from_ultralytics(results)
# 使用新的標注器
bounding_box_annotator = sv.BoundingBoxAnnotator()
label_annotator = sv.LabelAnnotator()labels = [f"{classes[class_id]} {confidence:.2f}"for class_id, confidence in zip(detections.class_id, detections.confidence)
]# 首先使用邊界框標注器
annotated_image = bounding_box_annotator.annotate(image.copy(), detections=detections
)# 然后使用標簽標注器
annotated_image = label_annotator.annotate(annotated_image, detections=detections, labels=labels
)cv2.imshow('result', annotated_image)
cv2.waitKey()
cv2.destroyAllWindows()
4.2 視頻
4.2.1 命令行
yolo task=detect mode=predict conf=0.25 save=True model=runs/detect/train/weights/best.pt source=b.mp4
- 上述各個參數解釋如下,請根據自己的情況修改。
- yolo:運行yolo程序
- task=detect:指定任務為檢測(detect)。YOLO模型可以用于不同的任務,如檢測、分類等,這里明確指定為檢測任務。
- mode=predict:設置模式為預測(predict)。這意味著模型將使用提供的權重和圖像進行預測,而不是進行訓練。
- conf=0.25:設置置信度閾值為0.25。這意味著只有模型預測置信度大于或等于0.25的檢測結果才會被考慮。
- save=True:指示模型保存預測結果。這通常會將結果保存為圖像文件,其中檢測到的對象會被標記出來。
- model=runs/detect/train/weights/best.pt:指定模型權重文件的位置。這里,best.pt是訓練過程中保存的最佳權重文件,用于進行預測。
- source=b.mp4:指定要檢測的源視頻。
4.2.2 代碼
from ultralytics import YOLOv10
import supervision as sv
import cv2classes = {0: 'licence'}model = YOLOv10('runs/detect/train6/weights/best.pt')def predict_and_detect(image):results = model(source=image, conf=0.25, verbose=False)[0]detections = sv.Detections.from_ultralytics(results)# 使用新的標注器bounding_box_annotator = sv.BoundingBoxAnnotator()label_annotator = sv.LabelAnnotator()labels = [f"{classes[class_id]} {confidence:.2f}"for class_id, confidence in zip(detections.class_id, detections.confidence)]# 首先使用邊界框標注器annotated_image = bounding_box_annotator.annotate(image.copy(), detections=detections)# 然后使用標簽標注器annotated_image = label_annotator.annotate(annotated_image, detections=detections, labels=labels)return annotated_imagedef create_video_writer(video_cap, output_filename):# grab the width, height, and fps of the frames in the video stream.frame_width = int(video_cap.get(cv2.CAP_PROP_FRAME_WIDTH))frame_height = int(video_cap.get(cv2.CAP_PROP_FRAME_HEIGHT))fps = int(video_cap.get(cv2.CAP_PROP_FPS))# initialize the FourCC and a video writer objectfourcc = cv2.VideoWriter_fourcc(*'MP4V')writer = cv2.VideoWriter(output_filename, fourcc, fps,(frame_width, frame_height))return writervideo_path = 'b.mp4'
cap = cv2.VideoCapture(video_path)output_filename = "out.mp4"
writer = create_video_writer(cap, output_filename)while True:success, img = cap.read()if not success:breakframe = predict_and_detect(img)writer.write(frame)cv2.imshow("frame", frame)if cv2.waitKey(1) & 0xFF == 27:  # 按下Esc鍵退出breakcap.release()
writer.release()
)


)

)

:ROS中空地圖的生成與加載)

出mp4文件中的h264視頻數據和aac語音數據)

:智能管家)


