文章目錄
- 學習鏈接
- 環境準備
- 1. 搭建基本web應用
- 引入依賴
- ThirdApp啟動類
- 創建index頁面
- application.yml配置
- 訪問測試
- 2. 引入security
- 引入依賴
- ProjectConfig
- 訪問測試
- 第三方認證
- 簡介
- 注冊gitee客戶端
- 實現1
- 引入依賴
- application.yml配置文件
- 創建index.html頁面
- 啟動類
- InfoController
- ProjectConfig
- GiteeClient
- 訪問測試
- 實現2
- 引入依賴
- application.yml配置文件
- 創建index.html頁面
- 啟動類
- InfoController
- ProjectConfig
學習鏈接
Security OAuth2 授權 & JWT - 自己總結
OAuth2的授權流程和源碼分析 - 自己總結
SpringSecurity(十七)—OAuth2的運行機制(下)-實現一個簡單的單點登錄應用程序
springsecurity加入第三方授權認證
SpringBoot+Vue實現第三方Gitee登錄(一)
SpringBoot+Vue實現第三方Gitee登錄(二)
第三方登錄專欄 - 比較全very good
【OAuth2.0 Client 總結】對接github第三方登錄以及其他第三方登錄總結
Spring oauth2 authorization server示例項目
Spring Authorization Server - 專欄
Spring Boot+OAuth2,一個注解搞定單點登錄! - 已下載pdf到筆記文件夾,有時間就看看,包括代碼已fork到gitee
SpringSecurity(十四)—實現過濾器(下)整合短信認證
環境準備
全部代碼Gitee地址
1. 搭建基本web應用
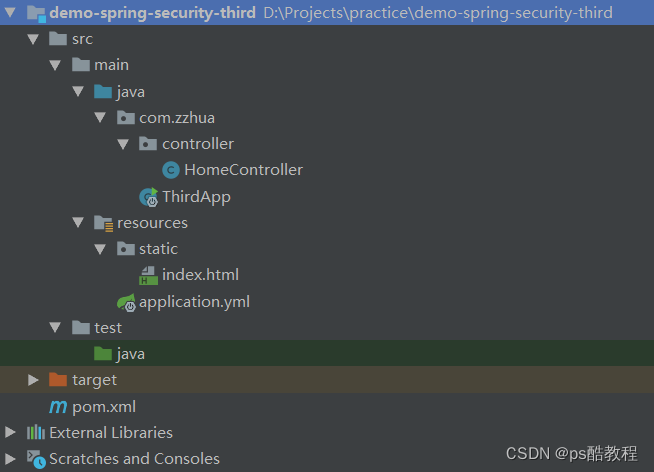
目錄結構如下
引入依賴
暫時只引入spring-boot-starter-web啟動器
<?xml version="1.0" encoding="UTF-8"?>
<project xmlns="http://maven.apache.org/POM/4.0.0"xmlns:xsi="http://www.w3.org/2001/XMLSchema-instance"xsi:schemaLocation="http://maven.apache.org/POM/4.0.0 http://maven.apache.org/xsd/maven-4.0.0.xsd"><modelVersion>4.0.0</modelVersion><groupId>com.zzhua</groupId><artifactId>demo-spring-security-third</artifactId><version>1.0-SNAPSHOT</version><properties><maven.compiler.source>1.8</maven.compiler.source><maven.compiler.target>1.8</maven.compiler.target><java.version>1.8</java.version><spring-boot-version>2.3.3.RELEASE</spring-boot-version><spring-cloud-version>Greenwich.RELEASE</spring-cloud-version></properties><dependencies><dependency><groupId>org.springframework.boot</groupId><artifactId>spring-boot-starter-web</artifactId></dependency></dependencies><dependencyManagement><dependencies><dependency><groupId>org.springframework.boot</groupId><artifactId>spring-boot-dependencies</artifactId><version>${spring-boot-version}</version><type>pom</type><scope>import</scope></dependency><dependency><groupId>org.springframework.cloud</groupId><artifactId>spring-cloud-dependencies</artifactId><version>${spring-cloud-version}</version><type>pom</type><scope>import</scope></dependency><dependency><groupId>javax.servlet</groupId><artifactId>javax.servlet-api</artifactId><version>3.1.0</version></dependency><dependency><groupId>javax.interceptor</groupId><artifactId>javax.interceptor-api</artifactId><version>1.2</version></dependency><dependency><groupId>com.alibaba</groupId><artifactId>fastjson</artifactId><version>1.2.47</version></dependency><dependency><groupId>mysql</groupId><artifactId>mysql-connector-java</artifactId><version>5.1.47</version></dependency><dependency><groupId>org.springframework.security</groupId><artifactId>spring-security-jwt</artifactId><version>1.1.1.RELEASE</version></dependency><dependency><groupId>org.springframework.security.oauth.boot</groupId><artifactId>spring-security-oauth2-autoconfigure</artifactId><version>2.1.2.RELEASE</version></dependency></dependencies></dependencyManagement><build><plugins><plugin><groupId>org.springframework.boot</groupId><artifactId>spring-boot-maven-plugin</artifactId><version>${spring-boot-version}</version><configuration><!--<mainClass>com.tuling.springbootsecurity.SpringBootSecurityApplication</mainClass>--></configuration><executions><execution><goals><goal>repackage</goal></goals></execution></executions></plugin><plugin><artifactId>maven-compiler-plugin</artifactId><configuration><source>1.8</source><target>1.8</target></configuration></plugin></plugins></build></project>
ThirdApp啟動類
@SpringBootApplication
public class ThirdApp {public static void main(String[] args) {SpringApplication.run(ThirdApp.class, args);}}
創建index頁面
在resources/static目錄下,創建index.html,內容如下:
<!DOCTYPE html>
<html lang="en">
<head><meta charset="UTF-8"><title>Title</title>
</head>
<body>
<h1>Welcome</h1>
</body>
</html>
application.yml配置
server:port: 9090
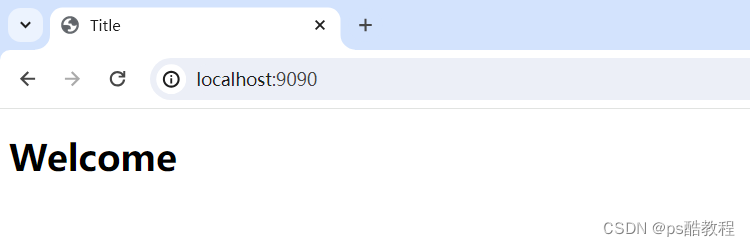
訪問測試
能訪問到如下頁面,就算成功
2. 引入security
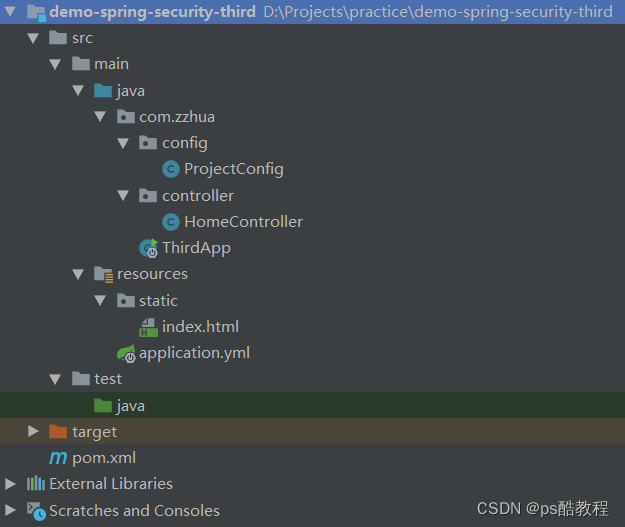
頁面結構如下
引入依賴
在上面的基礎上,添加security依賴,如下:
<?xml version="1.0" encoding="UTF-8"?>
<project xmlns="http://maven.apache.org/POM/4.0.0"xmlns:xsi="http://www.w3.org/2001/XMLSchema-instance"xsi:schemaLocation="http://maven.apache.org/POM/4.0.0 http://maven.apache.org/xsd/maven-4.0.0.xsd"><modelVersion>4.0.0</modelVersion><groupId>com.zzhua</groupId><artifactId>demo-spring-security-third</artifactId><version>1.0-SNAPSHOT</version><properties><maven.compiler.source>1.8</maven.compiler.source><maven.compiler.target>1.8</maven.compiler.target><java.version>1.8</java.version><spring-boot-version>2.3.3.RELEASE</spring-boot-version><spring-cloud-version>Greenwich.RELEASE</spring-cloud-version></properties><dependencies><dependency><groupId>org.springframework.boot</groupId><artifactId>spring-boot-starter-web</artifactId></dependency><dependency><groupId>org.springframework.cloud</groupId><artifactId>spring-cloud-starter-security</artifactId></dependency></dependencies><dependencyManagement><dependencies><dependency><groupId>org.springframework.boot</groupId><artifactId>spring-boot-dependencies</artifactId><version>${spring-boot-version}</version><type>pom</type><scope>import</scope></dependency><dependency><groupId>org.springframework.cloud</groupId><artifactId>spring-cloud-dependencies</artifactId><version>${spring-cloud-version}</version><type>pom</type><scope>import</scope></dependency><dependency><groupId>javax.servlet</groupId><artifactId>javax.servlet-api</artifactId><version>3.1.0</version></dependency><dependency><groupId>javax.interceptor</groupId><artifactId>javax.interceptor-api</artifactId><version>1.2</version></dependency><dependency><groupId>com.alibaba</groupId><artifactId>fastjson</artifactId><version>1.2.47</version></dependency><dependency><groupId>mysql</groupId><artifactId>mysql-connector-java</artifactId><version>5.1.47</version></dependency><dependency><groupId>org.springframework.security</groupId><artifactId>spring-security-jwt</artifactId><version>1.1.1.RELEASE</version></dependency><dependency><groupId>org.springframework.security.oauth.boot</groupId><artifactId>spring-security-oauth2-autoconfigure</artifactId><version>2.1.2.RELEASE</version></dependency></dependencies></dependencyManagement><build><plugins><plugin><groupId>org.springframework.boot</groupId><artifactId>spring-boot-maven-plugin</artifactId><version>${spring-boot-version}</version><configuration><!--<mainClass>com.tuling.springbootsecurity.SpringBootSecurityApplication</mainClass>--></configuration><executions><execution><goals><goal>repackage</goal></goals></execution></executions></plugin><plugin><artifactId>maven-compiler-plugin</artifactId><configuration><source>1.8</source><target>1.8</target></configuration></plugin></plugins></build></project>
ProjectConfig
@Configuration
@EnableWebSecurity
public class ProjectConfig extends WebSecurityConfigurerAdapter {@Overrideprotected void configure(HttpSecurity http) throws Exception {/* 配置表單登錄 *//* 1. 如果不添加上表單登錄, 那么直接訪問:localhost:9090 會顯示403的白頁, 這是因為ExceptionTranslationFilter此時用的authenticationEntryPoint的類型是: Http403ForbiddenEntryPoint2. 如果添加上表單登錄, 那么直接訪問:localhost:9090, 就會重定向到登錄表單頁, 這是因為在AbstractAuthenticationFilterConfigurer中, 會使用LoginUrlAuthenticationEntryPoint, 然后設置給ExceptionTranslationFilter的authenticationEntryPoint屬性 。同時, FormLoginConfigurer也會影響到DefaultLoginPageGeneratingFilter的配置, 在FormLoginConfigurer的initDefaultLoginFilter中會把DefaultLoginPageGeneratingFilter的formEnabled屬性設置為true, 而開啟登錄頁3. 如果添加上表單登錄, security會自動給http.authorizeRequests()對: 登錄頁、登錄請求處理、登錄失敗這些路徑 放開, 全部允許它們被訪問。這在AbstractAuthenticationFilterConfigurer的init方法中調用updateAccessDefaults有體現,同時再參考下: ExpressionUrlAuthorizationConfigurer類種的REGISTRY屬性、ExpressionUrlAuthorizationConfigurer的createMetadataSource方法就能明白了。4. 我覺得security難就難在這些地方, 通過不同配置器添加不同的過濾器, 配置器又能獲取到其它配置器的屬性或共享屬性來更改過濾器的配置, 反正就是各種都能改, 你也不知道它默認的行為會怎么改, 你還得知道它的配置器的執行順序, 雖然過濾器的順序是早已固定的定義在FilterComparator中,這樣的話, 如果不看源碼, 只是看它的文檔介紹怎么使用, 就很難辦。不過, 這樣也會讓它變得很靈活, 反正就是可以各種自定義, 各種配置都可以按自己的來實現,*/http.formLogin();/* 訪問任何資源都需要認證 */http.authorizeRequests().anyRequest().authenticated();}@Beanpublic PasswordEncoder passwordEncoder() {HashMap<String, PasswordEncoder> encoders = new HashMap<>();encoders.put("bcrypt", new BCryptPasswordEncoder());return new DelegatingPasswordEncoder("bcrypt", encoders);}@Beanpublic UserDetailsService userDetailsService() {return username -> {if ("zzhua".equals(username)) {return new User("zzhua", passwordEncoder().encode("zzhua"), AuthorityUtils.createAuthorityList("admin"));}return null;};}
}
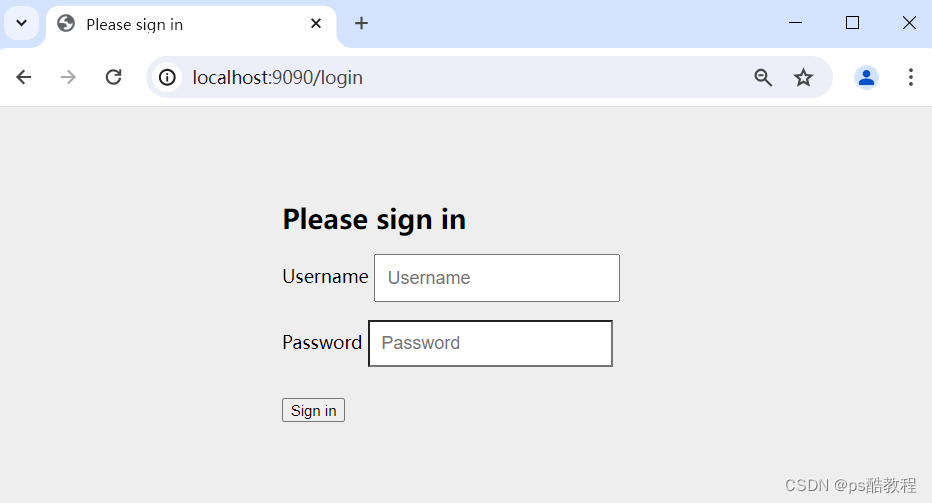
訪問測試
-
訪問:
localhost:9090時,會被重定向到:http://localhost:9090/login表單登錄界面
-
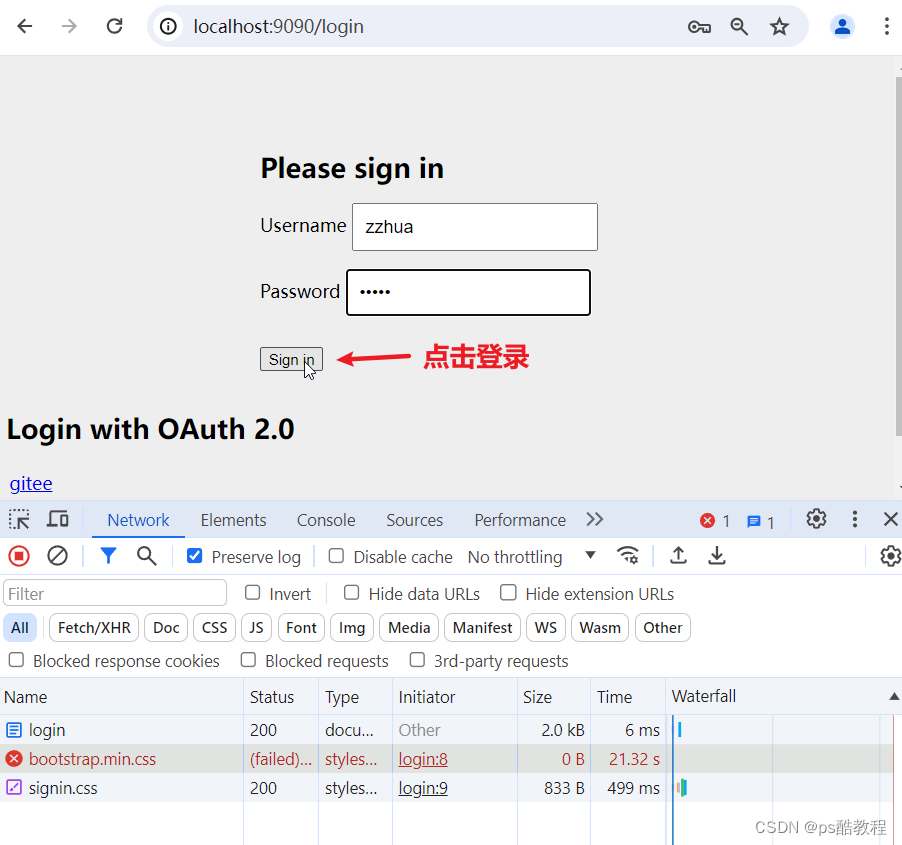
在表單登錄界面輸入用戶名和密碼,點擊登錄,跳轉到主頁:
http://localhost:9090/

第三方認證
簡介
當前我們系統是有自己的一套用戶體系的,在前面通過security搭建了1個非常簡單的登錄示例。可是,用戶要登錄我們的系統,需要先注冊賬號,然后填寫一大堆表單,包括:用戶名、密碼、驗證碼、性別、年齡、上傳頭像、綁定郵箱、綁定手機號等等一大堆,這就增加了用戶使用我們系統的成本。
因此可以使用比較可靠的第三方系統的用戶身份登錄我們的系統,但用戶仍然是第三方系統的用戶,只是用戶可以授權他在第三方系統的權限給我們系統,讓我們系統可以訪問這個用戶在第三方系統中的用戶信息、用戶資源等。
這樣用戶只需要授權他在第三方用戶系統中的資源給我們系統即可,而不需要填寫或以后再填寫其它信息的登錄方式,降低用戶注冊的成本,就是第三方登錄。
當然,拿到用戶在第三方系統中的用戶身份信息之后,我們可以自己生成這個用戶的賬號,然后使用這個用戶的賬號綁定 這個用戶在第三方系統中的唯一id,等到用戶他下次再使用第三方系統登錄我們系統的時候,就可以查詢到他之前是否已經使用第三方系統賬號登錄我們系統了,如果登陸過,則把這個賬號查出來,繼續使用。如果沒查詢出來,則生成1個賬號,并綁定第三方系統用戶唯一id,并且也可以設置默認密碼,或當用戶設置密碼時,才允許使用賬號、密碼 登錄我們系統
注冊gitee客戶端
首先,需要明白:是gitee的用戶 向 gitee認證服務器 請求授權給 我們系統 訪問 該gitee用戶在gitee中的用戶資源。這里面用的是授權碼模式。
我們系統對于gitee來說,屬于客戶端。gitee需要知道用戶請求授權給的系統的身份。假設gitee知道我們系統是個黑網站,gitee就肯定就直接拉黑我們系統了,肯定就不允許gitee的用戶授權給我們系統了,因此,gitee會對需要接入它的用戶的客戶端進行管理。因此,我們需要在gitee上注冊為客戶端。

實現1
引入依賴
<?xml version="1.0" encoding="UTF-8"?>
<project xmlns="http://maven.apache.org/POM/4.0.0"xmlns:xsi="http://www.w3.org/2001/XMLSchema-instance"xsi:schemaLocation="http://maven.apache.org/POM/4.0.0 http://maven.apache.org/xsd/maven-4.0.0.xsd"><modelVersion>4.0.0</modelVersion><groupId>com.zzhua</groupId><artifactId>demo-spring-security-third</artifactId><version>1.0-SNAPSHOT</version><properties><maven.compiler.source>1.8</maven.compiler.source><maven.compiler.target>1.8</maven.compiler.target><java.version>1.8</java.version><spring-boot-version>2.3.3.RELEASE</spring-boot-version><spring-cloud-version>Greenwich.RELEASE</spring-cloud-version></properties><dependencies><dependency><groupId>org.springframework.boot</groupId><artifactId>spring-boot-starter-web</artifactId></dependency><dependency><groupId>org.springframework.cloud</groupId><artifactId>spring-cloud-starter-security</artifactId></dependency><dependency><groupId>org.springframework.boot</groupId><artifactId>spring-boot-starter-oauth2-client</artifactId></dependency></dependencies><dependencyManagement><dependencies><dependency><groupId>org.springframework.boot</groupId><artifactId>spring-boot-dependencies</artifactId><version>${spring-boot-version}</version><type>pom</type><scope>import</scope></dependency><dependency><groupId>org.springframework.cloud</groupId><artifactId>spring-cloud-dependencies</artifactId><version>${spring-cloud-version}</version><type>pom</type><scope>import</scope></dependency><dependency><groupId>javax.servlet</groupId><artifactId>javax.servlet-api</artifactId><version>3.1.0</version></dependency><dependency><groupId>javax.interceptor</groupId><artifactId>javax.interceptor-api</artifactId><version>1.2</version></dependency><dependency><groupId>com.alibaba</groupId><artifactId>fastjson</artifactId><version>1.2.47</version></dependency><dependency><groupId>mysql</groupId><artifactId>mysql-connector-java</artifactId><version>5.1.47</version></dependency><dependency><groupId>org.springframework.security</groupId><artifactId>spring-security-jwt</artifactId><version>1.1.1.RELEASE</version></dependency><dependency><groupId>org.springframework.security.oauth.boot</groupId><artifactId>spring-security-oauth2-autoconfigure</artifactId><version>2.1.2.RELEASE</version></dependency></dependencies></dependencyManagement><build><plugins><plugin><groupId>org.springframework.boot</groupId><artifactId>spring-boot-maven-plugin</artifactId><version>${spring-boot-version}</version><configuration><!--<mainClass>com.tuling.springbootsecurity.SpringBootSecurityApplication</mainClass>--></configuration><executions><execution><goals><goal>repackage</goal></goals></execution></executions></plugin><plugin><artifactId>maven-compiler-plugin</artifactId><configuration><source>1.8</source><target>1.8</target></configuration></plugin></plugins></build></project>
application.yml配置文件
server:port: 9090
創建index.html頁面
<!DOCTYPE html>
<html lang="en">
<head><meta charset="UTF-8"><title>Title</title>
</head>
<body>
<h1>Welcome</h1>
</body>
</html>
啟動類
@SpringBootApplication
public class ThirdApp {public static void main(String[] args) {SpringApplication.run(ThirdApp.class, args);}}
InfoController
@RestController
public class InfoController {/* 只能使用第三方登錄的用戶, 才能訪問此接口, 否則會由于參數類型不對綁定不上去而報錯 */@GetMapping("info")public String info(OAuth2AuthenticationToken token) {System.out.println(token.getPrincipal());return "ok";}}
ProjectConfig
@Configuration
@EnableWebSecurity
public class ProjectConfig extends WebSecurityConfigurerAdapter {@Autowiredprivate GiteeClient giteeClient;@Overrideprotected void configure(HttpSecurity http) throws Exception {http.oauth2Login(c->c.clientRegistrationRepository(clientRegistrationRepository()));http.formLogin();http.authorizeRequests().anyRequest().authenticated();}private ClientRegistrationRepository clientRegistrationRepository(){return new InMemoryClientRegistrationRepository(giteeClient.clientRegistration());}@Beanpublic PasswordEncoder passwordEncoder() {HashMap<String, PasswordEncoder> encoders = new HashMap<>();encoders.put("bcrypt", new BCryptPasswordEncoder());return new DelegatingPasswordEncoder("bcrypt", encoders);}@Beanpublic UserDetailsService userDetailsService() {return username -> {if ("zzhua".equals(username)) {return new User("zzhua", passwordEncoder().encode("zzhua"), AuthorityUtils.createAuthorityList("admin"));}return null;};}
}
GiteeClient
@Component
public class GiteeClient {public ClientRegistration clientRegistration(){return ClientRegistration.withRegistrationId("gitee")  //起個名字,代表client,如clientId和clientSecret.clientId("XXX")  //此處要換成你在gitee上創建應用得到的.clientSecret("YYY") //此處要換成你在gitee上創建應用得到的.scope(new String[]{"user_info"})    //讀取用戶權限,參見你gitee上創建應用時的授權勾選.authorizationUri("https://gitee.com/oauth/authorize")   //這要看gitee的api,是user認證以及client認證獲取授權碼的地址.tokenUri("https://gitee.com/oauth/token") //這要看gitee的api,是client得到授權碼后去換token的gitee地址.userInfoUri("https://gitee.com/api/v5/user") //資源服務器api地址-也是client用access-token去獲取用戶user詳情的“用戶詳情資源服務器地址”-這里也是gitee】】.userNameAttributeName("id").clientName("gitee")  //為我們的應用client起了個名字.authorizationGrantType(AuthorizationGrantType.AUTHORIZATION_CODE)  //注是授權碼模式.redirectUriTemplate("{baseUrl}/{action}/oauth2/code/{registrationId}")  //本應用配置的gitee發回授權碼的地址.build();}
}
訪問測試
-
訪問:
localhost:9090后,被重定向到http://localhost:9090/oauth2/authorization/gitee這個地址,然后這個地址又自動被重定向到:https://gitee.com/oauth/authorize?response_type=code&client_id=7b3ed41b0138556c3e1c39089ef2fb2f1b1b9d06ecc65002472348c9fc9b9e95&scope=user_info&state=aHG4a0a1nCi3jOVQm2aLoGbrLVl8V-zRffgDmXgvj4M%3D&redirect_uri=http://localhost:9090/login/oauth2/code/gitee這個gitee的授權頁面,
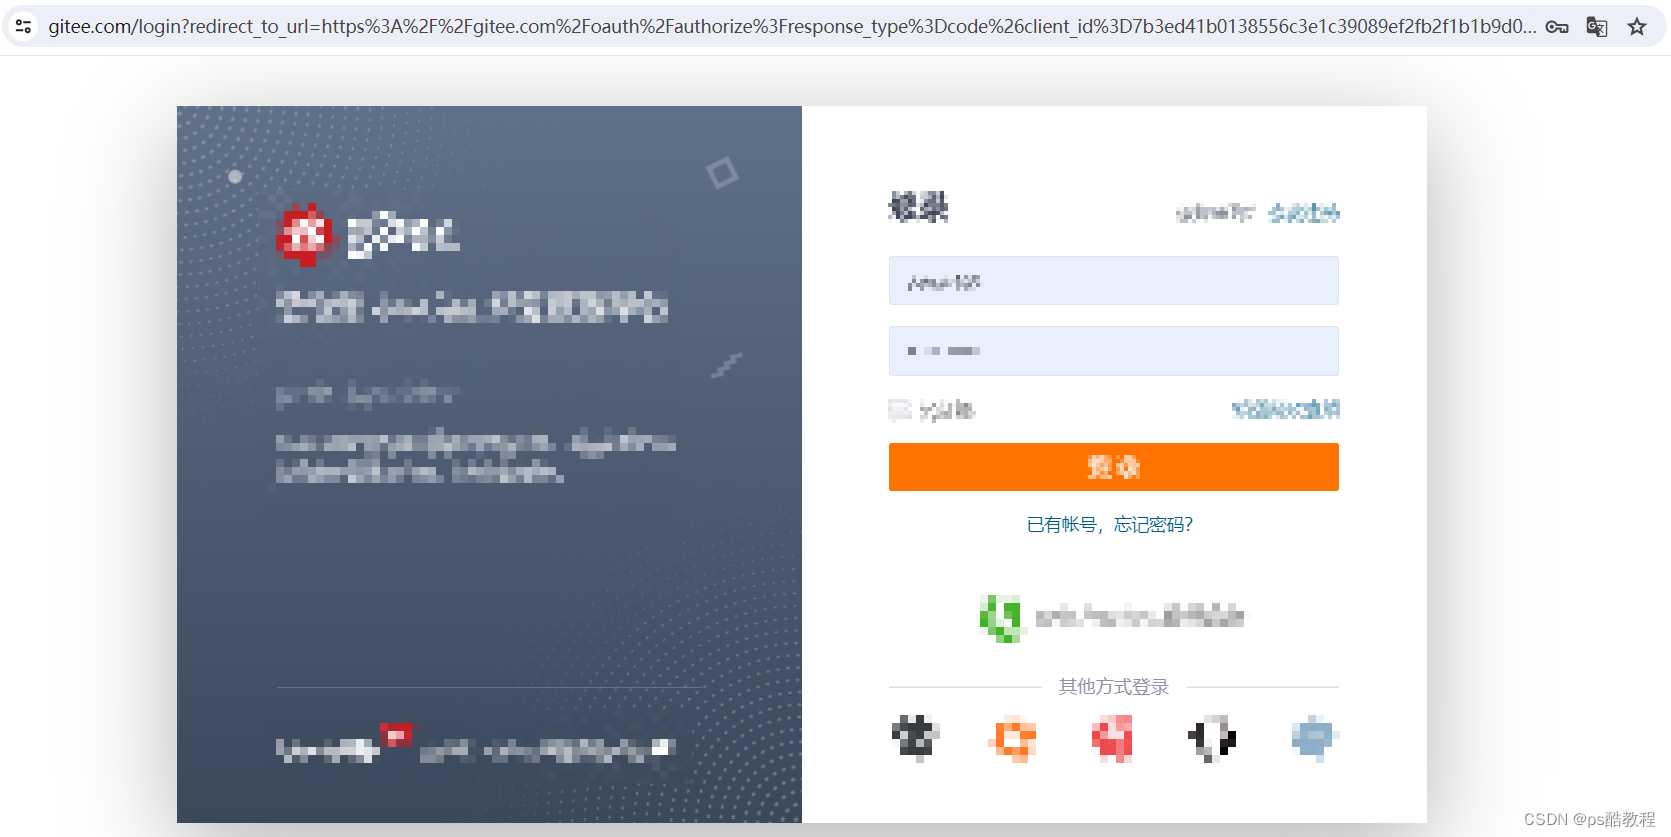
但是,由于我沒有登錄,所以又被重定向到https://gitee.com/login?redirect_to_url=https%3A%2F%2Fgitee.com%2Foauth%2Fauthorize%3Fresponse_type%3Dcode%26client_id%3D7b3ed41b0138556c3e1c39089ef2fb2f1b1b9d06ecc65002472348c9fc9b9e95%26scope%3Duser_info%26state%3DaHG4a0a1nCi3jOVQm2aLoGbrLVl8V-zRffgDmXgvj4M%253D%26redirect_uri%3Dhttp%3A%2F%2Flocalhost%3A9090%2Flogin%2Foauth2%2Fcode%2Fgitee這個gitee的登錄地址,登錄頁面如下:
-
填入gitee的用戶名和密碼,點擊登錄,它會把表單數據發送到登錄請求接口:
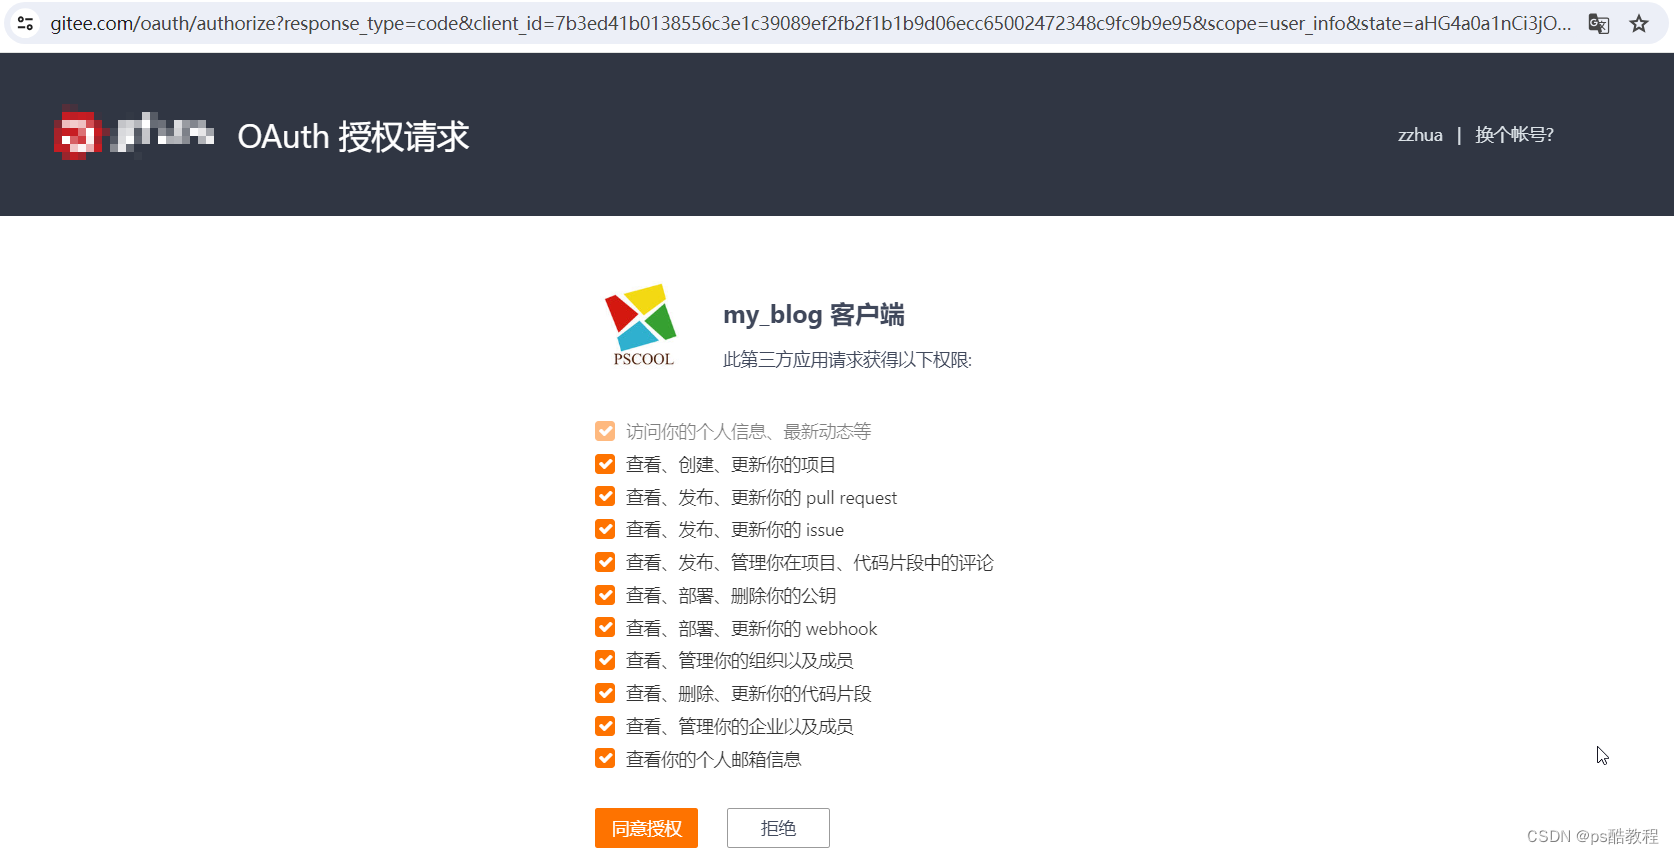
https://gitee.com/login,并攜帶用戶名和密碼。如果登錄成功,則會重定向到:https://gitee.com/oauth/authorize?response_type=code&client_id=7b3ed41b0138556c3e1c39089ef2fb2f1b1b9d06ecc65002472348c9fc9b9e95&scope=user_info&state=aHG4a0a1nCi3jOVQm2aLoGbrLVl8V-zRffgDmXgvj4M%3D&redirect_uri=http://localhost:9090/login/oauth2/code/gitee授權頁面,請求用戶授權
-
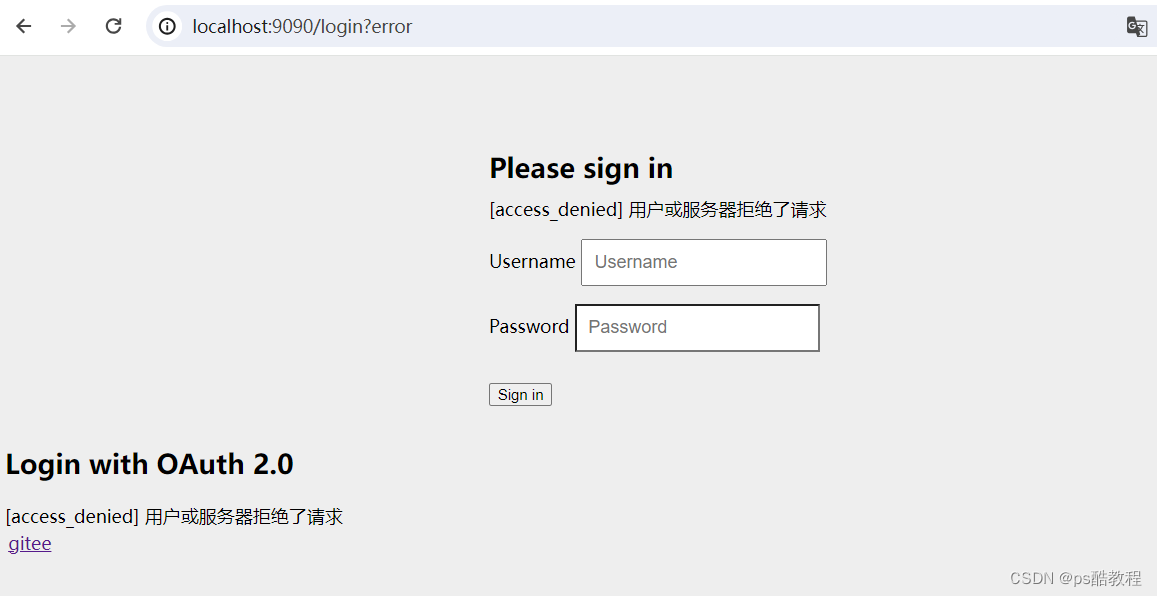
如果用戶點擊拒絕,會對gitee的授權接口發起請求:
https://gitee.com/oauth/authorize,并攜帶表單數據。然后gitee服務器發現當前用戶拒絕授權給我們系統,就會讓瀏覽器重定向到:http://localhost:9090/login/oauth2/code/gitee?error=access_denied&error_description=%E7%94%A8%E6%88%B7%E6%88%96%E6%9C%8D%E5%8A%A1%E5%99%A8%E6%8B%92%E7%BB%9D%E4%BA%86%E8%AF%B7%E6%B1%82&state=aHG4a0a1nCi3jOVQm2aLoGbrLVl8V-zRffgDmXgvj4M%3D,然后又自動重定向到:http://localhost:9090/login?error了,此時,頁面如下:
-
如果用戶點擊同意,會對gitee的授權接口發起請求:
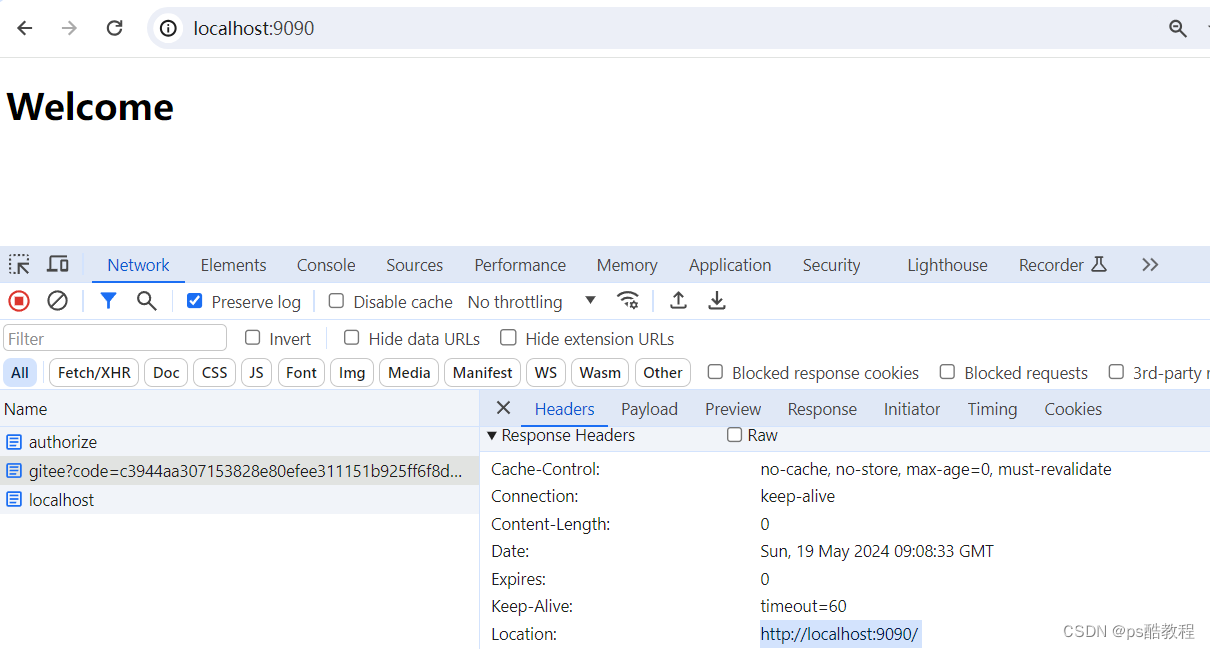
https://gitee.com/oauth/authorize,并攜帶表單數據。然后gitee服務器發現當前用戶同意授權給我們系統,就會讓瀏覽器重定向到:http://localhost:9090/login/oauth2/code/gitee?code=c3944aa307153828e80efee311151b925ff6f8d4e6c35850ed2ebe4e665f6f1f&state=b1X4XuCXNF50zmbY3HiXInh0inHsPXhGgH2pOZ9xliE%3D,看里面是攜帶了code授權碼和state的,然后又自動重定向到:http://localhost:9090/了,此時,頁面如下:
-
訪問:
http://localhost:9090/info,此時頁面如下:
控制臺打印的數據如下:Name: [5029907], Granted Authorities: [[ROLE_USER, SCOPE_emails, SCOPE_enterprises, SCOPE_gists, SCOPE_groups, SCOPE_hook, SCOPE_issues, SCOPE_keys, SCOPE_notes, SCOPE_projects, SCOPE_pull_requests, SCOPE_user_info]], User Attributes: [ {id=5029907, login=zzhua195, name=zzhua, avatar_url=https://gitee.com/assets/no_portrait.png, url=https://gitee.com/api/v5/users/zzhua195, html_url=https://gitee.com/zzhua195, remark=, followers_url=https://gitee.com/api/v5/users/zzhua195/followers, following_url=https://gitee.com/api/v5/users/zzhua195/following_url{/other_user}, gists_url=https://gitee.com/api/v5/users/zzhua195/gists{/gist_id}, starred_url=https://gitee.com/api/v5/users/zzhua195/starred{/owner}{/repo}, subscriptions_url=https://gitee.com/api/v5/users/zzhua195/subscriptions, organizations_url=https://gitee.com/api/v5/users/zzhua195/orgs, repos_url=https://gitee.com/api/v5/users/zzhua195/repos, events_url=https://gitee.com/api/v5/users/zzhua195/events{/privacy}, received_events_url=https://gitee.com/api/v5/users/zzhua195/received_events, type=User, blog=null, weibo=null, bio=null, public_repos=301, public_gists=0, followers=4, following=17, stared=133, watched=415, created_at=2019-05-23T10:19:09+08:00, updated_at=2024-05-19T16:59:39+08:00, email=null} ] -
清空瀏覽器的所有緩存,訪問:
http://localhost:9090/login,會來到我們系統自己的登錄頁,輸入用戶憑據后,點擊登錄

此時,再去訪問:http://localhost:9090/info,會返回500的錯誤頁面,因為當前用戶類型并不是通過第三方gitee來登錄的。
實現2
只是將代碼配置改成配置文件配置
引入依賴
與上面一致
<?xml version="1.0" encoding="UTF-8"?>
<project xmlns="http://maven.apache.org/POM/4.0.0"xmlns:xsi="http://www.w3.org/2001/XMLSchema-instance"xsi:schemaLocation="http://maven.apache.org/POM/4.0.0 http://maven.apache.org/xsd/maven-4.0.0.xsd"><modelVersion>4.0.0</modelVersion><groupId>com.zzhua</groupId><artifactId>demo-spring-security-third</artifactId><version>1.0-SNAPSHOT</version><properties><maven.compiler.source>1.8</maven.compiler.source><maven.compiler.target>1.8</maven.compiler.target><java.version>1.8</java.version><spring-boot-version>2.3.3.RELEASE</spring-boot-version><spring-cloud-version>Greenwich.RELEASE</spring-cloud-version></properties><dependencies><dependency><groupId>org.springframework.boot</groupId><artifactId>spring-boot-starter-web</artifactId></dependency><dependency><groupId>org.springframework.cloud</groupId><artifactId>spring-cloud-starter-security</artifactId></dependency><dependency><groupId>org.springframework.boot</groupId><artifactId>spring-boot-starter-oauth2-client</artifactId></dependency></dependencies><dependencyManagement><dependencies><dependency><groupId>org.springframework.boot</groupId><artifactId>spring-boot-dependencies</artifactId><version>${spring-boot-version}</version><type>pom</type><scope>import</scope></dependency><dependency><groupId>org.springframework.cloud</groupId><artifactId>spring-cloud-dependencies</artifactId><version>${spring-cloud-version}</version><type>pom</type><scope>import</scope></dependency><dependency><groupId>javax.servlet</groupId><artifactId>javax.servlet-api</artifactId><version>3.1.0</version></dependency><dependency><groupId>javax.interceptor</groupId><artifactId>javax.interceptor-api</artifactId><version>1.2</version></dependency><dependency><groupId>com.alibaba</groupId><artifactId>fastjson</artifactId><version>1.2.47</version></dependency><dependency><groupId>mysql</groupId><artifactId>mysql-connector-java</artifactId><version>5.1.47</version></dependency><dependency><groupId>org.springframework.security</groupId><artifactId>spring-security-jwt</artifactId><version>1.1.1.RELEASE</version></dependency><dependency><groupId>org.springframework.security.oauth.boot</groupId><artifactId>spring-security-oauth2-autoconfigure</artifactId><version>2.1.2.RELEASE</version></dependency></dependencies></dependencyManagement><build><plugins><plugin><groupId>org.springframework.boot</groupId><artifactId>spring-boot-maven-plugin</artifactId><version>${spring-boot-version}</version><configuration><!--<mainClass>com.tuling.springbootsecurity.SpringBootSecurityApplication</mainClass>--></configuration><executions><execution><goals><goal>repackage</goal></goals></execution></executions></plugin><plugin><artifactId>maven-compiler-plugin</artifactId><configuration><source>1.8</source><target>1.8</target></configuration></plugin></plugins></build></project>
application.yml配置文件
server:port: 9090
spring:security:oauth2:client:registration:gitee:client-id: YOUR_IDclient-secret: YOUR_SECRETauthorization-grant-type: authorization_coderedirect-uri: '{baseUrl}/{action}/oauth2/code/{registrationId}'client-name: giteeprovider: giteescope:- user_infoprovider:gitee:authorization-uri: https://gitee.com/oauth/authorizetoken-uri: https://gitee.com/oauth/tokenuser-info-uri: https://gitee.com/api/v5/useruser-name-attribute: id
創建index.html頁面
與上面一致
<!DOCTYPE html>
<html lang="en">
<head><meta charset="UTF-8"><title>Title</title>
</head>
<body>
<h1>Welcome</h1>
</body>
</html>
啟動類
與上面一致
@SpringBootApplication
public class ThirdApp {public static void main(String[] args) {SpringApplication.run(ThirdApp.class, args);}}
InfoController
與上面一致
@RestController
public class InfoController {/* 只能使用第三方登錄的用戶, 才能訪問此接口, 否則會由于參數類型不對綁定不上去而報錯 */@GetMapping("info")public String info(OAuth2AuthenticationToken token) {System.out.println(token.getPrincipal());return "ok";}}
ProjectConfig
@Configuration
@EnableWebSecurity
public class ProjectConfig extends WebSecurityConfigurerAdapter {@Overrideprotected void configure(HttpSecurity http) throws Exception {http.oauth2Login();http.formLogin();http.authorizeRequests().anyRequest().authenticated();}@Beanpublic PasswordEncoder passwordEncoder() {HashMap<String, PasswordEncoder> encoders = new HashMap<>();encoders.put("bcrypt", new BCryptPasswordEncoder());return new DelegatingPasswordEncoder("bcrypt", encoders);}@Beanpublic UserDetailsService userDetailsService() {return username -> {if ("zzhua".equals(username)) {return new User("zzhua", passwordEncoder().encode("zzhua"), AuthorityUtils.createAuthorityList("admin"));}return null;};}
}


)


)
)
+ubuntu18.04)


