文章目錄
- 一文講清楚React的render優化,包括shouldComponentUpdate、PureComponent和memo
- 1. React的渲染render機制
- 2. shouldComponentUpdate
- 2.1 先上單組件渲染,驗證state變化
- 2.2 上父子組件,驗證props
- 2. PureComponent
- 2.1 單組件驗證state
- 2.2 父子組件驗證props
- 3.React.memo
- 4. 總結
一文講清楚React的render優化,包括shouldComponentUpdate、PureComponent和memo
1. React的渲染render機制
- 我們都知道,在React中,state和props的改變以及父組件人render執行都會造成render的重新執行
- 關于這點不懂的,看這篇文章一文講清楚React中的render機制
- 但是在某些復雜的業務場景下,如果大量的子組件在沒有發生任何變化的情況下被更新,就會造成一定的性能影響
- 我們希望的是,只有在子組件state和props有變化,且判定為需要重新渲染的情況下再執行render進行渲染
- 能不能做到呢,恭喜,還真能做到
- 我們可以通過三駕馬車,shouldComponentUpdate、PureComponent、memo來實現
2. shouldComponentUpdate
- 見名知意,組件應不應該更新,所以這里應該有一個條件判斷,如果返回true,則更新,如果返回false,則不更新
- 判斷什么呢,判斷state和props是否發生變化,如果變化了,說明頁面需要重新渲染,那我們就是返回true,反之亦然
- 話不多說,上代碼
2.1 先上單組件渲染,驗證state變化
import React from 'react'
class App extends React.Component{constructor(props){super(props)this.state={num:0}}handleClick=()=>{this.setState({num:0})}render(){console.log('render() has been executed')return(<div><div>{this.state.num}</div><button onClick={this.handleClick}>button</button></div>)}
}
export default App
- 我們首次運行后發現,render() has been executed被打印了一次,說明render執行了一次,這是正常的,首席渲染
- 然后我們點擊button,發現render() has been executed又被打印了一次,說明render又執行了一次渲染,但是我們在button里面沒有改變state的狀態,num還是0,render理論上不執行才是最好的選擇
- 這時候shouldComponentUpdate就派上用場了
- 我們只要在shouldComponentUpdate里面判斷state是否發生了變化,如果沒有,返回false,這樣render就不會執行了
- 上代碼
import React from 'react'
class App extends React.Component{constructor(props){super(props)this.state={num:0}}shouldComponentUpdate(nextProps,nextState,nextContent){//nextProps表示即將接受的新的props//nextState表示即將接受的心得State,//這里我們通過判斷nextState.num === this.state.num,如果是返回false,阻止render執行;如果true,render繼續渲染if(nextState.num ===  this.state.num){return false }else{return true}}handleClick=()=>{this.setState({num:0})}render(){console.log('render() has been executed')return(<div><div>{this.state.num}</div><button onClick={this.handleClick}>button</button></div>)}
}
export default App
- 這時候我們再運行,首次還是會打印render() has been executed,說明render首次渲染,這是正常的情況
- 然后我們點擊button,發現render() has been executed沒有再被打印,說明我們通過shouldComponentUpdate已經阻止了本次render渲染,應為狀態沒有發生變化
- 這時候我們改變一下handleClick方式,讓發state狀態發生變化,看render會不會執行
import React from 'react'
class App extends React.Component{constructor(props){super(props)this.state={num:0}}shouldComponentUpdate(nextProps,nextState,nextContent){//nextProps表示即將接受的新的props//nextState表示即將接受的心得State,//這里我們通過判斷nextState.num === this.state.num,如果是返回false,阻止render執行;如果true,render繼續渲染if(nextState.num ===  this.state.num){return false }else{return true}}handleClick=()=>{this.setState({num:this.state.num+1})}render(){console.log('render() has been executed')return(<div><div>{this.state.num}</div><button onClick={this.handleClick}>button</button></div>)}
}
export default App
- 運行,點擊button發現打印render() has been executed,說明render執行渲染了,因為state發生變化了
- 如此,shouldComponentUpdate邏輯驗證完畢
2.2 上父子組件,驗證props
- 直接上代碼
import React from 'react'
//定義子組件
class Child extends React.Component{constructor(props){super(props)}render(){console.log(' Child render() has been executed')return (<div>childNum :{this.props.childNum}</div>)}
}
class App extends React.Component{constructor(props){super(props)this.state={num:0,childNum:0}}   handleClick=()=>{this.setState({num:this.state.num+1})}render(){return(<div><div>num :{this.state.num}</div><Child childNum={this.state.childNum}></Child><button onClick={this.handleClick}>button</button></div>)}
}
export default App
-
我們運行,首次子組件render會執行,打印Child render() has been executed
-
然后我們點擊父組件的button給num自增1,這時候父組件因為state發生變化了,要執行 render,但是傳遞給子組件的props并沒有發生變化,我們沒有對ChildNum做任何處理
-
但是我們會發現,點擊button的時候打印了Child render() has been executed,說明子組件的render執行了,子組件被重新渲染了,這不是我們想要的
-
我們希望props不發生變化的時候,子組件不執行render,這首shouldComponentUpdate該上場了
import React from 'react'
//定義子組件
class Child extends React.Component{constructor(props){super(props)}shouldComponentUpdate(nextProps,nextState,nextContext){//nextProps表示即將接受的新的props//nextState表示即將接受的心得State,//這里我們通過判斷nextState.num === this.state.num,如果是返回false,阻止render執行;如果true,render繼續渲染if(nextProps.childNum === this.props.childNum){return false}else{return true}}render(){console.log(' Child render() has been executed')return (<div>childNum :{this.props.childNum}</div>)}
}
class App extends React.Component{constructor(props){super(props)this.state={num:0,childNum:0}}   handleClick=()=>{this.setState({num:this.state.num+1})}render(){return(<div><div>num :{this.state.num}</div><Child childNum={this.state.childNum}></Child><button onClick={this.handleClick}>button</button></div>)}
}
export default App
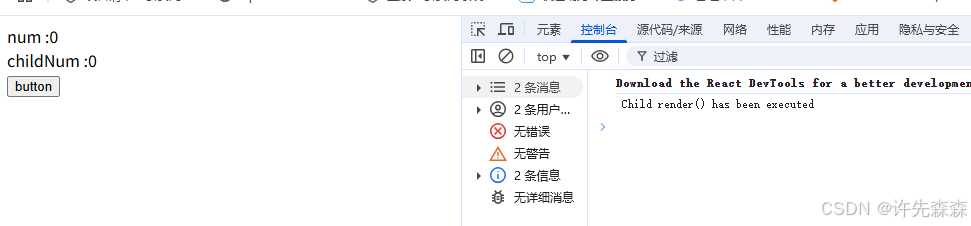
- 我們再運行,點擊button,發現子組件的render方法并沒有執行,因為props沒有發生變化
- 這時候我們改變一下父組件的handleClick方法,讓childNum也變化一下,看子組件render會不會執行
import React from 'react'
//定義子組件
class Child extends React.Component{constructor(props){super(props)}shouldComponentUpdate(nextProps,nextState,nextContext){//nextProps表示即將接受的新的props//nextState表示即將接受的心得State,//這里我們通過判斷nextState.num === this.state.num,如果是返回false,阻止render執行;如果true,render繼續渲染if(nextProps.childNum === this.props.childNum){return false}else{return true}}render(){console.log(' Child render() has been executed')return (<div>childNum :{this.props.childNum}</div>)}
}
class App extends React.Component{constructor(props){super(props)this.state={num:0,childNum:0}}   handleClick=()=>{this.setState({num:this.state.num+1,childNum:this.state.childNum+1//讓子組件的props也發生變化})}render(){return(<div><div>num :{this.state.num}</div><Child childNum={this.state.childNum}></Child><button onClick={this.handleClick}>button</button></div>)}
}
export default App
- 運行,點擊button,發現子組件的render又被執行了,完美,props驗證完畢
2. PureComponent
2.1 單組件驗證state
- 上面我們通過在shouldComponent先state和props的判斷邏輯,決定要不要執行render,這樣的問題在于每次都要寫,就比較麻煩,如果React能提供一套內置的比較邏輯,這樣我們就不用每次寫了,有沒有這樣的功能呢,有,那就是PureComponent
- PureComponent通過淺比較props和state自動實現shouldComponentUpdate,從而決定render是否執行,他是React.Component的一個變體,我們直接實現繼承就可以實現
- 淺比較比較好理解吧,不懂的自行研究一下,因為是淺比較,所以PureComponent適合一下數據結構簡單扁平的基本類型
- 話不多說上代碼
import React from 'react'
class App extends React.PureComponent{constructor(props){super(props)this.state={num:0}}handleClick=()=>{this.setState({num:0})}render(){console.log('render() has been executed')return(<div><div>{this.state.num}</div><button onClick={this.handleClick}>button</button></div>)}
}
export default App
- 運行,點擊button,發現render不行執行,
- 改變handleClick,再次驗證
import React from 'react'
class App extends React.PureComponent{constructor(props){super(props)this.state={num:0}}handleClick=()=>{this.setState({num:this.state.num+1})}render(){console.log('render() has been executed')return(<div><div>{this.state.num}</div><button onClick={this.handleClick}>button</button></div>)}
}
export default App
- 運行點擊button,發現render被執行,驗證完畢
2.2 父子組件驗證props
- 類比結合1.2和2.1,小伙伴們資興市實現以下,不會的留言解答
3.React.memo
- 上面我們討論的都是類組件的state和props的變化產生的render性能優化
- 針對函數組件,React提出了memo
- memo的作用可以理解為只比較props的PureComponent,因為函數組件沒有狀態么
- 上代碼
import React from 'react'
const Child=function Child(props){console.log('child function has been executed')return (<div>num from props:{props.num}</div>)
}
function App(props){const [num,setNum]=React.useState(0)const [count,setCount]=React.useState(0)return(<div><div>count:{count}</div><Child num={num}></Child><button onClick={()=>{setCount(count=>count+1)}}>button</button></div>)
}
export default App
- 運行,首次渲染子組件,打印child function has been executed
- 點擊button,打印child function has been executed,說明子組件又被重新渲染了,是因為雖然num的值沒有變化,但是count的值改變導致父組件重新渲染,進一步導致子組件重新渲染
- 這時候我們加個React.memo,讓props不發生變化的情況下,子組件不被重新渲染
import React from 'react'
const Child=React.memo(function Child(props){console.log('child function has been executed')return (<div>num from props:{props.num}</div>)
})
function App(props){const [num,setNum]=React.useState(0)const [count,setCount]=React.useState(0)return(<div><div>count:{count}</div><Child num={num}></Child><button onClick={()=>{setCount(count=>count+1)}}>button</button></div>)
}
export default App
- 運行,點擊button,不打印,子組件不重新渲染
- 然后改變父組件的num,讓num也變化起來,看看子組件渲染情況
import React from 'react'
const Child=React.memo(function Child(props){console.log('child function has been executed')return (<div>num from props:{props.num}</div>)
})
function App(props){const [num,setNum]=React.useState(0)const [count,setCount]=React.useState(0)return(<div><div>count:{count}</div><Child num={num}></Child><button onClick={()=>{setCount(count=>count+1);setNum(num=>num+1)}}>button</button></div>)
}
export default App
- 運行,點擊button,子組件重新被渲染,驗證完畢
4. 總結
- 根據不同的業務場景和數據結構,選用不同的render性能優化方式
)

))

多協議標記交換 MPLS)


格式全解析:從 RP 到 Word 的選擇與實踐)


)


 with Kafka Connect:實時數據同步的完整指南)
