在各類安全事故中,火災因其突發性強、破壞力大,一直是威脅人們生命財產安全的重大隱患。傳統的火災檢測方式多依賴煙霧傳感器、溫度傳感器等,存在響應滯后、易受環境干擾等問題。隨著深度學習技術的飛速發展,基于計算機視覺的火災檢測方法憑借其實時性強、檢測范圍廣等優勢,逐漸成為研究熱點。本文將簡單介紹一款基于深度學習的火災智能檢測系統的設計與實現過程。
一、系統整體設計
本火災智能檢測系統旨在通過深度學習技術實現對火災的精準、快速響應,并及時發出報警信息。系統主要由數據采集模塊、模型訓練模塊、火災檢測模塊、報警模塊和可視化界面模塊五部分組成,各模塊協同工作,形成一個完整的火災檢測閉環。
數據采集模塊負責獲取監測場景的圖像或視頻數據,支持攝像頭實時拍攝、視頻文件導入以及靜態圖片上傳三種方式,確保系統能適應不同的應用場景。模型訓練模塊是系統的核心,通過大量的火災圖像數據訓練深度學習模型,使其具備準確識別火焰的能力。火災檢測模塊利用訓練好的模型對采集到的數據進行分析處理,判斷是否存在火情。一旦檢測到火災,報警模塊立即觸發語音報警,連續播報三次 “發生火情”,同時可視化界面模塊會展示檢測結果,包括火情位置、檢測時間等信息,方便用戶及時了解情況并采取相應措施。
二、關鍵技術實現
(一)數據集構建
高質量的數據集是訓練出高性能深度學習模型的基礎。為了讓模型能夠準確識別不同場景、不同光照條件下的火焰,我們收集了大量的火災圖像數據,包括從公開數據集(如 FIRE-SMOKE Dataset、UCF101 中的火災相關視頻幀)中獲取的樣本,以及通過模擬火災場景拍攝的圖像。
在數據預處理階段,我們對收集到的圖像進行了一系列操作。首先進行圖像去噪,去除圖像中的噪聲干擾,提高圖像質量;然后進行尺寸統一,將所有圖像調整為固定的尺寸(如 224×224),以便輸入到模型中進行訓練;最后進行數據增強,通過旋轉、縮放、翻轉、亮度調整等方式擴充數據集,增加樣本的多樣性,避免模型過擬合。
(二)深度學習模型選擇與訓練
經過對比多種深度學習模型在火災檢測任務上的性能,我們最終選擇了YOLOv8?模型作為本系統的核心檢測模型。YOLOv8?模型具有檢測速度快、精度高的特點,能夠滿足實時檢測的需求。、
【從訓練集劃分驗證集】
import shutil
import osdef handle(src_detect_dir, dst_detect_dir, freq=5):src_detect_images_dir = os.path.join(src_detect_dir, "images")src_detect_labels_dir = os.path.join(src_detect_dir, "labels")dst_detect_images_dir = os.path.join(dst_detect_dir, "images")dst_detect_labels_dir = os.path.join(dst_detect_dir, "labels")if not os.path.exists(dst_detect_images_dir):os.makedirs(dst_detect_images_dir)if not os.path.exists(dst_detect_labels_dir):os.makedirs(dst_detect_labels_dir)i = 0filenames = os.listdir(src_detect_images_dir)print(len(filenames),filenames)for filename in filenames:if i % freq == 0:name = Nonenames = filename.split(".")if len(names) == 2:name = names[0]print("parse1:", len(names), "name=", name)else:if filename.endswith(".jpg"):name = filename[0:-4]print("parse2:", len(names), "name=", name)if name:src_image_path = os.path.join(src_detect_images_dir, name+".jpg")src_label_path = os.path.join(src_detect_labels_dir, name+".txt")dst_image_path = os.path.join(dst_detect_images_dir, name+".jpg")dst_label_path = os.path.join(dst_detect_labels_dir, name+".txt")try:shutil.copyfile(src_image_path, dst_image_path)shutil.copyfile(src_label_path, dst_label_path)print("--------%d---------" % i)print("src_image_path=", src_image_path)print("src_label_path=", src_label_path)os.remove(src_image_path)os.remove(src_label_path)except Exception as e:print("copy失敗:",e,src_image_path)try:os.remove(src_image_path)except: passtry:os.remove(src_label_path)except: passtry:os.remove(dst_image_path)except: passtry:os.remove(dst_label_path)except: passelse:print("filename=%s format error" % str(filename))i += 1if __name__ == '__main__':# 將訓練樣本按照指定頻率拆分一部分到測試樣本handle(src_detect_dir=r"C:\Users\dell\OneDrive\桌面\Project_YOLO\yolo_dataset\all_train\train",dst_detect_dir=r"C:\Users\dell\OneDrive\桌面\Project_YOLO\yolo_dataset\all_train\valid",freq=10 #表示每10張拆一張)
在模型訓練過程中,我們使用 PyTorch 框架搭建訓練環境。首先將數據集按照 8:2 的比例劃分為訓練集和驗證集,訓練集用于模型參數的學習,驗證集用于評估模型的性能并調整超參數。設置初始學習率為 0.001,采用 SGD 優化器,訓練輪次為 100 輪。在訓練過程中,通過監控損失函數的變化和驗證集上的準確率,適時調整學習率和其他超參數,以提高模型的性能。
【模型訓練】
from ultralytics import YOLO
# 1.加載訓練路徑
data_path = './signs.yaml'# 加載預訓練模型
# model = YOLO('./yolov8n.pt')  # 模型文件路徑
model = YOLO('./runs/detect/train/weights/last.pt')
# 配置模型的訓練參數
model.train(data=data_path, #指定訓練數據的配置文件路徑epochs=300, #訓練總次數    要300次以上imgsz=640,  #輸入模型的圖片尺寸batch=2,  #此時每一輪10圖片分成5次 每次讓你訓練2次 每兩張結束 拿驗證集驗證一下device='cpu', # 設備workers=0,  #模型訓練的線程patience=30,resume=True
)
print("訓練完成")
訓練完成后,對模型進行評估,主要評估指標包括準確率、召回率和 F1 值。經過多次訓練和優化,模型在測試集上的準確率達到了 95% 以上,能夠滿足實際應用的需求。
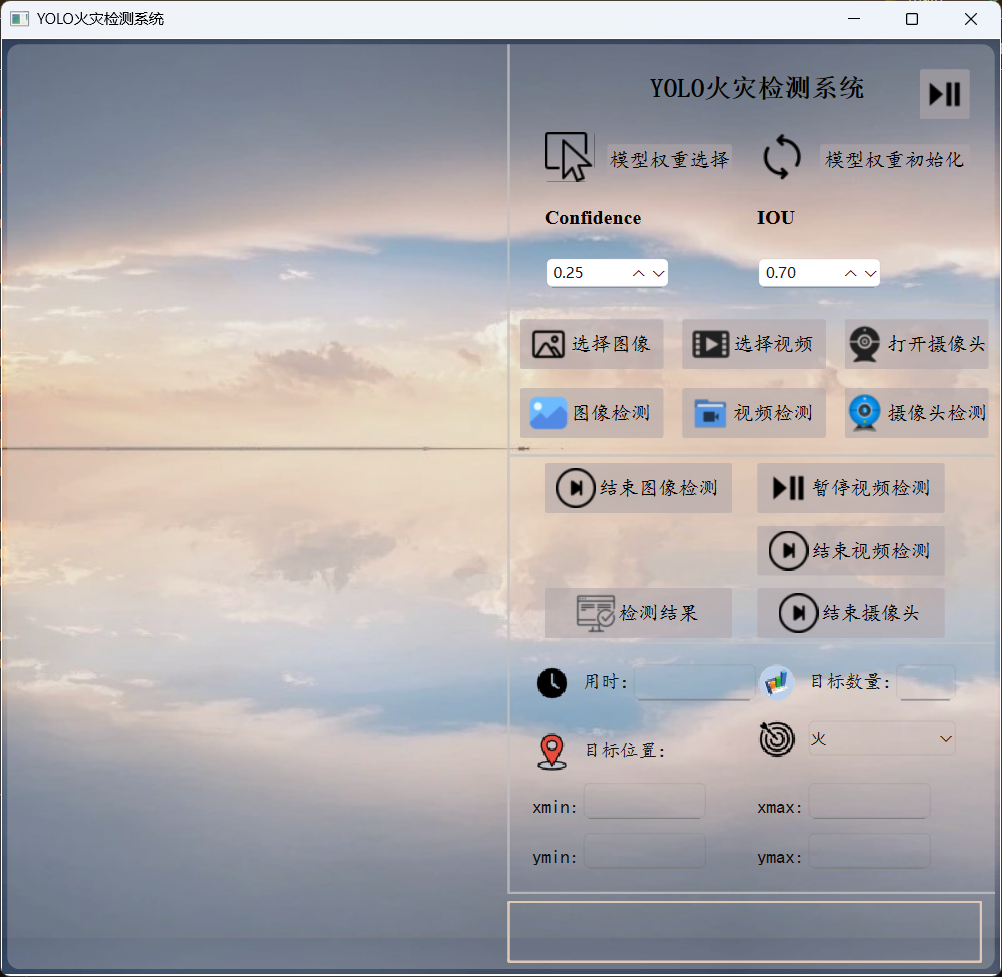
(三)可視化界面設計【PyQt6】
為了方便用戶操作和查看檢測結果,我們設計了一個簡潔直觀的可視化界面。界面主要包含以下幾個部分:
- 數據輸入區域:用戶可以選擇攝像頭實時監測、導入視頻文件或上傳靜態圖片。
- 檢測結果展示區域:實時顯示處理后的圖像或視頻,并用紅色邊界框標記出檢測到的火焰位置。
- 信息提示區域:顯示火情發生的時間、位置等信息,以及系統的運行狀態。
- 操作按鈕區域:提供開始檢測、停止檢測、保存檢測結果等功能按鈕。
需要在終端使用命令將ui文件轉為py文件才能繼續下面的操作。
(四)火災檢測與報警實現
火災檢測模塊通過調用訓練好的 YOLOv5 模型,對采集到的圖像或視頻幀進行處理。對于實時視頻流,系統每隔一定時間(如 300ms)截取一幀圖像進行檢測;對于視頻文件和靜態圖片,則直接進行檢測。
模型檢測到火焰后,會返回火焰在圖像中的位置坐標(以邊界框的形式表示)。系統根據這些坐標信息,判斷是否存在火情。當檢測到火情時,報警模塊立即啟動,通過調用語音合成接口,連續播報三次 “發生火情”。同時,系統會記錄火情發生的時間和位置信息,以便后續查詢和分析。
【AI分析火情】
import os
from dashscope import MultiModalConversation
def ai_analysis(self,local_path):# 將xxxx/test.jpg替換為你本地圖像的絕對路徑# local_path = r"C:\Users\dell\OneDrive\桌面\Project_YOLO\test\images\1.jpg"image_path = f"file://{local_path}"messages = [{'role':'user','content': [{'image': image_path},{'text': '請分析視頻內容,判斷是否為真實火災場景,''需考慮以下因素:1. 火焰形態 2. 煙霧特征 3. 環境背景 4. 潛在干擾源"''如果你認為極有可能是火災請輸出:發生火情;否則輸出:未檢測到火情'}]}]response = MultiModalConversation.call(# 若沒有配置環境變量,請用百煉API Key將下行替換為:api_key="sk-xxx",api_key='sk-ef17891e64364da887c6a3ff1a12d89d',model="qvq-max",  # 此處以qvq-max為例,可按需更換模型名稱。messages=messages,stream=True,)# 定義完整思考過程reasoning_content = ""# 定義完整回復answer_content = ""# 判斷是否結束思考過程并開始回復is_answering = Falseprint("=" * 20 + "思考過程" + "=" * 20)for chunk in response:# 如果思考過程與回復皆為空,則忽略message = chunk.output.choices[0].messagereasoning_content_chunk = message.get("reasoning_content", None)if (chunk.output.choices[0].message.content == [] andreasoning_content_chunk == ""):passelse:# 如果當前為思考過程if reasoning_content_chunk != None and chunk.output.choices[0].message.content == []:print(chunk.output.choices[0].message.reasoning_content, end="")reasoning_content += chunk.output.choices[0].message.reasoning_content# 如果當前為回復elif chunk.output.choices[0].message.content != []:if not is_answering:print("\n" + "=" * 20 + "完整回復" + "=" * 20)is_answering = Trueprint(chunk.output.choices[0].message.content[0]["text"], end="")answer_content += chunk.output.choices[0].message.content[0]["text"]# return f'{"="*5}思考過程{"="*5}\n{reasoning_content}\n{"="*5}分析結果{"="*5}\n{answer_content}'return answer_content# 需要打印完整思考過程與完整回復,請將以下代碼解除注釋后運行# print("=" * 20 + "完整思考過程" + "=" * 20 + "\n")# print(f"{reasoning_content}")# print("=" * 20 + "完整回復" + "=" * 20 + "\n")# print(f"{answer_content}")
【主文件】
# 保存為臨時文件
import os
import tempfile
import uuidfrom PySide6.QtTextToSpeech import QTextToSpeech
from analysis import ai_analysis
import sys
from pathlib import Path
import cv2
from PIL import Image
from PIL.ImageOps import exif_transposefrom PySide6 import QtCore
from PySide6.QtGui import QPixmap, QImage, Qt
from PySide6.QtWidgets import (QWidget, QApplication, QPushButton, QFileDialog,QMessageBox, QLabel, QLineEdit, QComboBox, QDoubleSpinBox, QTextEdit)
from fire_pre import Ui_Form
from ultralytics import YOLO# 封裝一個我的窗口
class Fire(QWidget,Ui_Form):def __init__(self):super().__init__()self.model_pt=''self.image_pth=''self.video_path = ''# 加載自己的窗口self.setupUi(self)# 找到ui界面的組件self.original_view:QLabel=self.original_viewself.tested_view:QLabel=self.tested_viewself.btn1:QPushButton=self.btn1self.btn2:QPushButton=self.btn2# 檢測圖像self.btn4_1:QPushButton=self.btn4_1self.btn4_4: QPushButton = self.btn4_4# 檢測視頻self.is_video_paused = False            # 視頻播放狀態self.is_video_detecting = False         # 視頻檢測狀態self.btn4_2: QPushButton = self.btn4_2  # 選擇視頻self.btn4_5: QPushButton = self.btn4_5  # 檢測視頻self.btn6_2:QPushButton=self.btn6_2     # 暫停檢測self.btn6_3:QPushButton=self.btn6_3     # 結束檢測# 攝像頭實時檢測self.btn4_3:QPushButton=self.btn4_3     # 打開攝像頭self.btn4_6:QPushButton=self.btn4_6     # 實時檢測self.btn6_4:QPushButton=self.btn6_4     # 關閉攝像頭,結束檢測# 查看任意檢測結果self.btn6_5:QPushButton=self.btn6_5# 檢測結果詳情顯示self.edit1:QLineEdit=self.edit1         # 檢測用時self.edit2: QLineEdit = self.edit2      # 檢測到的目標數量self.edit3: QLineEdit = self.edit3      # 目標位置xminself.edit4: QLineEdit = self.edit4      # xmaxself.edit5: QLineEdit = self.edit5      # yminself.edit6: QLineEdit = self.edit6      # ymax# 檢測目標self.cbb:QComboBox=self.cbbself.cbb.addItem('火')self.cbb.setCurrentText('火')# 置信度/閾值self.ds1:QDoubleSpinBox=self.ds1self.ds2:QDoubleSpinBox=self.ds2# 設置初始值和范圍self.ds1.setRange(0.0, 1.0)  # 置信度范圍0-1self.ds1.setValue(0.25)  # 默認值0.25self.ds2.setRange(0.0, 1.0)  # IOU范圍0-1self.ds2.setValue(0.7)  # 默認值0.7# ai分析self.textedit:QLabel=self.textedit# 新增火災分析定時器self.analysis_timer = QtCore.QTimer(self)self.analysis_timer.setInterval(30000)  # 30秒間隔self.analysis_timer.timeout.connect(self.analyze_fire_risk)# 實例化一個語音播報者 QTextToSpeechself.engine=Noneengines=QTextToSpeech.availableEngines()if engines:self.engine = engines[0]self.speaker = QTextToSpeech(self.engine, self)else:self.speaker = QTextToSpeech(self)# 檢查語音引擎是否成功初始化if len(self.speaker.availableVoices())==0:QMessageBox.warning(self, "語音功能", "未找到可用的語音引擎,語音播報功能將無法使用")else:# 設置默認語音if not self.engine:  # 如果沒有指定引擎,嘗試設置第一個可用語音voices = self.speaker.availableVoices()if voices:self.speaker.setVoice(voices[0])self.speaker.stateChanged.connect(self.on_speech_state_changed)# 播放次數計數器self.play_cont = 0# 是否已觸發self.alarm_triggered = False# 槽函數self.btn1.clicked.connect(self.model_weights)self.btn2.clicked.connect(self.model_init)self.btn4_1.clicked.connect(self.read_image)self.btn4_4.clicked.connect(self.test_image)self.btn4_2.clicked.connect(self.open_vidio)self.btn4_5.clicked.connect(self.start_video_detection)self.btn4_3.clicked.connect(self.open_camera)self.btn4_6.clicked.connect(self.start_continuous_detection)self.btn6_2.clicked.connect(self.toggle_video_play)  # 暫停/繼續視頻self.btn6_3.clicked.connect(self.stop_video_detection)  # 停止視頻檢測self.btn6_4.clicked.connect(self.close_camera)self.btn6_5.clicked.connect(self.view_history)# 文件框選擇模型權重def model_weights(self):# 彈出文件對話框  【絕對路徑】file_path,_=QFileDialog.getOpenFileName(self,'選擇文件','./','所有文件(*)')if file_path:QMessageBox.information(self,'模型權重',f'已選擇文件:\n{file_path}')self.model_pt=file_path# 模型初始化權重def model_init(self):file_path = r'C:\Users\dell\OneDrive\桌面\07 AI neural network\08 Project_YOLO\runs\detect\train\weights\best.pt'QMessageBox.information(self, '模型權重', f'已選擇文件:\n{file_path}')self.model_pt=file_path"""圖像檢測"""# 加載圖像def read_image(self):file_path, _ = QFileDialog.getOpenFileName(self, '選擇文件', './', '所有文件(*)')if not file_path:returntry:# 使用pathlib處理路徑image_path = Path(file_path)self.image_pth=image_path# 打開并預處理圖像with Image.open(image_path) as img:# 自動修正EXIF方向信息img = exif_transpose(img)# 轉換為RGB模式if img.mode != 'RGB':img = img.convert('RGB')# 轉換為QImageqt_image = QImage(img.tobytes(),img.width,img.height,img.width * 3,QImage.Format.Format_RGB888)# 創建QPixmap并縮放pixmap = QPixmap.fromImage(qt_image)scaled_pixmap = pixmap.scaled(self.original_view.size(),Qt.AspectRatioMode.KeepAspectRatio,Qt.TransformationMode.SmoothTransformation)# 顯示圖像self.original_view.setPixmap(scaled_pixmap)self.original_view.setAlignment(Qt.AlignmentFlag.AlignCenter)except Exception as e:QMessageBox.critical(self,"圖像加載失敗",f"無法加載圖像文件:\n{str(e)}")# 圖像檢測def test_image(self):conf=float(self.ds1.value())iou=float(self.ds2.value())model_rec=YOLO(self.model_pt)# 檢測照片 自動保存結果到runs/detect/exp目錄results=model_rec(self.image_pth,show=False,save=True,conf=conf,iou=iou)# 在tested_view上顯示出檢測后的圖像# 獲取保存路徑(YOLOv8默認保存路徑)save_dir = Path(results[0].save_dir)output_path = save_dir / self.image_pth.name# 驗證輸出文件是否存在if not output_path.exists():raise FileNotFoundError(f"未找到預測結果文件:{output_path}")# 加載處理后的圖像with Image.open(output_path) as img:# 自動修正EXIF方向信息img = exif_transpose(img)# 轉換為RGB模式if img.mode != 'RGB':img = img.convert('RGB')# 轉換為QImageqt_image = QImage(img.tobytes(),img.width,img.height,img.width * 3,QImage.Format.Format_RGB888)# 創建QPixmap并縮放pixmap = QPixmap.fromImage(qt_image)scaled_pixmap = pixmap.scaled(self.tested_view.size(),Qt.AspectRatioMode.KeepAspectRatio,Qt.TransformationMode.SmoothTransformation)# 顯示檢測結果self.tested_view.setPixmap(scaled_pixmap)self.tested_view.setAlignment(Qt.AlignmentFlag.AlignCenter)"""視頻檢測"""# 打開視頻def open_vidio(self):file_path, _ = QFileDialog.getOpenFileName(self, "選擇視頻文件", "./", "視頻文件 (*.mp4 *.avi *.mov *.mkv)")if not file_path:returntry:self.video_path = file_path  # 保存視頻路徑self.video_cap = cv2.VideoCapture(str(Path(file_path)))if not self.video_cap.isOpened():raise ValueError("無法打開視頻文件")QMessageBox.information(self, "視頻加載成功", f"已加載視頻:{Path(file_path).name}\n"f"分辨率:{int(self.video_cap.get(3))}x{int(self.video_cap.get(4))}")# 創建視頻定時器self.video_timer = QtCore.QTimer(self)self.video_timer.timeout.connect(self.update_video_frame)self.video_timer.start(30)  # 每30毫秒更新一次畫面self.is_video_paused = False  # 初始狀態為播放self.btn6_2.setText("暫停播放")  # 更新按鈕文本except Exception as e:QMessageBox.critical(self, "視頻加載失敗", f"無法加載視頻文件:\n{str(e)}")# 更新視頻幀(支持循環播放)def update_video_frame(self):if not hasattr(self, 'video_cap') or not self.video_cap.isOpened() or self.is_video_paused:returnret, frame = self.video_cap.read()if not ret:# 視頻播放完畢,重新開始播放self.video_cap.release()self.video_cap = cv2.VideoCapture(str(Path(self.video_path)))if self.video_cap.isOpened():ret, frame = self.video_cap.read()if ret:# 轉換顏色空間:BGR -> RGBrgb_frame = cv2.cvtColor(frame, cv2.COLOR_BGR2RGB)# 轉換為QImageh, w, ch = rgb_frame.shapebytes_per_line = ch * wq_img = QImage(rgb_frame.data, w, h, bytes_per_line, QImage.Format_RGB888)# 縮放并顯示pixmap = QPixmap.fromImage(q_img)scaled_pixmap = pixmap.scaled(self.original_view.size(),Qt.AspectRatioMode.KeepAspectRatio,Qt.TransformationMode.SmoothTransformation)self.original_view.setPixmap(scaled_pixmap)else:QMessageBox.warning(self, "視頻錯誤", "無法重新打開視頻進行循環播放")self.video_timer.stop()return# 轉換顏色空間:BGR -> RGBrgb_frame = cv2.cvtColor(frame, cv2.COLOR_BGR2RGB)# 轉換為QImageh, w, ch = rgb_frame.shapebytes_per_line = ch * wq_img = QImage(rgb_frame.data, w, h, bytes_per_line, QImage.Format_RGB888)# 縮放并顯示在original_view上pixmap = QPixmap.fromImage(q_img)scaled_pixmap = pixmap.scaled(self.original_view.size(),Qt.AspectRatioMode.KeepAspectRatio,Qt.TransformationMode.SmoothTransformation)self.original_view.setPixmap(scaled_pixmap)self.original_view.setAlignment(Qt.AlignmentFlag.AlignCenter)# 暫停/繼續視頻播放def toggle_video_play(self):if not hasattr(self, 'video_timer'):returnself.is_video_paused = not self.is_video_paused  # 切換播放狀態if self.is_video_paused:self.video_timer.stop()self.btn6_2.setText("繼續播放")else:self.video_timer.start(30)self.btn6_2.setText("暫停播放")# 開始視頻檢測def start_video_detection(self):if not hasattr(self, 'video_cap') or not self.video_cap.isOpened():QMessageBox.warning(self, '視頻', '請先選擇并加載視頻')returnif not self.model_pt:QMessageBox.warning(self, '模型', '請先選擇模型權重')returntry:# 加載模型if not hasattr(self, 'model'):self.model = YOLO(self.model_pt)# 創建視頻檢測定時器if not hasattr(self, 'video_detection_timer'):self.video_detection_timer = QtCore.QTimer(self)self.video_detection_timer.timeout.connect(self.detect_video_frame)if not self.video_detection_timer.isActive():self.is_video_detecting = Trueself.video_detection_timer.start(30)  # 每30ms檢測一次self.btn4_5.setText("停止檢測")self.btn4_5.clicked.disconnect()self.btn4_5.clicked.connect(self.stop_video_detection)except Exception as e:QMessageBox.critical(self, "檢測失敗", f"執行檢測時出錯:\n{str(e)}")# 停止視頻檢測def stop_video_detection(self):if hasattr(self, 'video_detection_timer') and self.video_detection_timer.isActive():self.is_video_detecting = Falseself.video_detection_timer.stop()self.btn4_5.setText("開始檢測")self.btn4_5.clicked.disconnect()self.btn4_5.clicked.connect(self.start_video_detection)# 檢測視頻幀def detect_video_frame(self):if not hasattr(self, 'video_cap') or not self.video_cap.isOpened() or self.is_video_paused:returnret, frame = self.video_cap.read()if not ret:# 視頻播放完畢,重新開始播放self.video_cap.release()self.video_cap = cv2.VideoCapture(str(Path(self.video_path)))if self.video_cap.isOpened():ret, frame = self.video_cap.read()if not ret:returnelse:self.stop_video_detection()return# 執行檢測results = self.model(frame, show=False, conf=0.5)# 渲染檢測結果annotated_frame = results[0].plot()# 轉換為RGB(確保顏色正確)rgb_annotated_frame = cv2.cvtColor(annotated_frame, cv2.COLOR_BGR2RGB)# 轉換為QImageh, w, ch = rgb_annotated_frame.shapebytes_per_line = ch * wq_img = QImage(rgb_annotated_frame.data, w, h, bytes_per_line, QImage.Format_RGB888)# 縮放并顯示在tested_view上pixmap = QPixmap.fromImage(q_img)scaled_pixmap = pixmap.scaled(self.tested_view.size(),Qt.AspectRatioMode.KeepAspectRatio,Qt.TransformationMode.SmoothTransformation)self.tested_view.setPixmap(scaled_pixmap)self.tested_view.setAlignment(Qt.AlignmentFlag.AlignCenter)# 顯示檢測信息self.edit1.setText(f"{results[0].speed['inference']:.2f}ms")  # 檢測用時self.edit2.setText(str(len(results[0].boxes)))  # 檢測到的目標數量if len(results[0].boxes) > 0:# 顯示第一個檢測框的位置box = results[0].boxes[0]xmin, ymin, xmax, ymax = box.xyxy[0].cpu().numpy().astype(int)self.edit3.setText(str(xmin))self.edit4.setText(str(xmax))self.edit5.setText(str(ymin))self.edit6.setText(str(ymax))"""攝像頭實時檢測"""# 打開攝像頭def open_camera(self):self.cap=cv2.VideoCapture(0)if not self.cap.isOpened():QMessageBox.warning(self,'攝像頭','打開攝像頭失敗,請檢查攝像頭')return# 創建定時器,用于定時捕獲畫面self.timer = QtCore.QTimer(self)self.timer.timeout.connect(self.update_camera_frame)self.timer.start(30)  # 每30毫秒更新一次畫面# 啟動火災定時器self.analysis_timer.start()  # 啟動分析定時器# 更新畫面def update_camera_frame(self):if not hasattr(self, 'cap') or not self.cap.isOpened():returnret,frame=self.cap.read()if not ret:QMessageBox.warning(self, '攝像頭', '攝像頭捕獲畫面失敗,請檢查攝像頭')self.cap.release()# 顯示圖像# 正確轉換顏色空間:BGR -> RGBrgb_frame = cv2.cvtColor(frame, cv2.COLOR_BGR2RGB)# 將OpenCV幀轉換為QImageh, w, ch = rgb_frame.shapebytes_per_line = ch * wq_img = QImage(rgb_frame.data, w, h, bytes_per_line, QImage.Format_RGB888)# 縮放并顯示在original_view上pixmap = QPixmap.fromImage(q_img)scaled_pixmap = pixmap.scaled(self.original_view.size(),Qt.AspectRatioMode.KeepAspectRatio,Qt.TransformationMode.SmoothTransformation)self.original_view.setPixmap(scaled_pixmap)self.original_view.setAlignment(Qt.AlignmentFlag.AlignCenter)# 新增關閉攝像頭的方法def close_camera(self):if hasattr(self, 'cap') and self.cap.isOpened():self.cap.release()if hasattr(self, 'timer'):self.timer.stop()# 關閉火災定時器self.analysis_timer.stop()# 實時檢測攝像頭內容 顯示在tested_view()上def test_camara(self):if not hasattr(self, 'cap') or not self.cap.isOpened():QMessageBox.warning(self, '攝像頭', '請先打開攝像頭')returnif not self.model_pt:QMessageBox.warning(self, '模型', '請先選擇模型權重')returntry:# 加載模型if not hasattr(self, 'model'):self.model = YOLO(self.model_pt)# 讀取當前幀ret, frame = self.cap.read()if not ret:QMessageBox.warning(self, '攝像頭', '無法獲取當前幀')return# 執行檢測results = self.model(frame, show=False, conf=0.5)# 渲染檢測結果annotated_frame = results[0].plot()# 轉換為RGB(確保顏色正確)rgb_annotated_frame = cv2.cvtColor(annotated_frame, cv2.COLOR_BGR2RGB)# 轉換為QImageh, w, ch = rgb_annotated_frame.shapebytes_per_line = ch * wq_img = QImage(rgb_annotated_frame.data, w, h, bytes_per_line, QImage.Format_RGB888)# 縮放并顯示在tested_view上pixmap = QPixmap.fromImage(q_img)scaled_pixmap = pixmap.scaled(self.tested_view.size(),Qt.AspectRatioMode.KeepAspectRatio,Qt.TransformationMode.SmoothTransformation)self.tested_view.setPixmap(scaled_pixmap)self.tested_view.setAlignment(Qt.AlignmentFlag.AlignCenter)# 顯示檢測信息self.edit1.setText(f"{results[0].speed['inference']:.2f}ms")  # 檢測用時self.edit2.setText(str(len(results[0].boxes)))  # 檢測到的目標數量if len(results[0].boxes) > 0:# 顯示第一個檢測框的位置box = results[0].boxes[0]xmin, ymin, xmax, ymax = box.xyxy[0].cpu().numpy().astype(int)self.edit3.setText(str(xmin))self.edit4.setText(str(xmax))self.edit5.setText(str(ymin))self.edit6.setText(str(ymax))except Exception as e:QMessageBox.critical(self, "檢測失敗", f"執行檢測時出錯:\n{str(e)}")def start_continuous_detection(self):if not hasattr(self, 'detection_timer'):self.detection_timer = QtCore.QTimer(self)self.detection_timer.timeout.connect(self.test_camara)if not self.detection_timer.isActive():self.detection_timer.start(30)  # 每30ms檢測一次(約30FPS)self.btn4_6.setText("停止檢測")self.btn4_6.clicked.disconnect()self.btn4_6.clicked.connect(self.stop_continuous_detection)def stop_continuous_detection(self):if hasattr(self, 'detection_timer') and self.detection_timer.isActive():self.detection_timer.stop()self.btn4_6.setText("開始檢測")self.btn4_6.clicked.disconnect()self.btn4_6.clicked.connect(self.start_continuous_detection)# 火災分析def analyze_fire_risk(self):if not hasattr(self, 'cap') or not self.cap.isOpened():return# 獲取當前幀ret, frame = self.cap.read()if not ret:returntemp_dir = tempfile.gettempdir()temp_path = os.path.join(temp_dir, f'fire_analysis_{uuid.uuid4().hex}.jpg')cv2.imwrite(temp_path, frame)try:# 調用AI分析函數result = ai_analysis(self,temp_path)# 更新UI(保持QLabel不變)self.textedit.setText(result)# 改進的火情檢測邏輯if result=='發生火情':# 觸發 播放 初始化播放次數self.alarm_triggered = Trueself.play_cont = 0# 啟動語音模塊self.speaker.say(self.textedit.text())except Exception as e:QMessageBox.critical(self, "分析錯誤", f"火災分析失敗:{str(e)}")finally:if os.path.exists(temp_path):os.remove(temp_path)# 語音狀態變化處理def on_speech_state_changed(self, state):print(f"當前語音狀態:{state}")  # 添加調試輸出if state == QTextToSpeech.State.Ready and self.alarm_triggered:self.play_cont += 1if self.play_cont < 3:self.speaker.say(self.textedit.text())else:# 重置觸發狀態self.alarm_triggered = Falseself.play_cont = 0# 查看所有歷史預測結果def view_history(self):file_path,_=QFileDialog.getOpenFileName(self,'選擇文件','./','所有文件(*)')if not file_path:returntry:# 使用pathlib處理路徑image_path = Path(file_path)self.image_pth=image_path# 打開并預處理圖像with Image.open(image_path) as img:# 自動修正EXIF方向信息img = exif_transpose(img)# 轉換為RGB模式if img.mode != 'RGB':img = img.convert('RGB')# 轉換為QImageqt_image = QImage(img.tobytes(),img.width,img.height,img.width * 3,QImage.Format.Format_RGB888)# 創建QPixmap并縮放pixmap = QPixmap.fromImage(qt_image)scaled_pixmap = pixmap.scaled(self.tested_view.size(),Qt.AspectRatioMode.KeepAspectRatio,Qt.TransformationMode.SmoothTransformation)# 顯示圖像self.tested_view.setPixmap(scaled_pixmap)self.tested_view.setAlignment(Qt.AlignmentFlag.AlignCenter)except Exception as e:QMessageBox.critical(self,"圖像加載失敗",f"無法加載圖像文件:\n{str(e)}")if __name__ == '__main__':app=QApplication(sys.argv)fire_win=Fire()fire_win.show()sys.exit(app.exec())
三、系統測試【視頻演示】
簡單火災檢測系統演示
四、部署
一、準備工作
-
確認依賴完整性
你的?requirements.txt?需包含項目所有依賴(如?torch、opencv-python、PyQt5?等),可通過?pip list --format=freeze > requirements.txt?重新生成(確保覆蓋全)。 -
處理資源文件
- 若?
icons.qrc?等 Qt 資源文件未編譯,先確保?icons_rc.py?已正確生成(若用?pyrcc5?編譯過則無需處理)。 - 確認?
models?文件夾、fire_pre.ui?等資源路徑在代碼中是相對路徑或可動態加載,避免打包后路徑失效。
- 若?
二、使用 PyInstaller 打包
1. 安裝 PyInstaller
pip install pyinstaller
2. 編寫.spec 文件(關鍵配置,可選但推薦)
進入項目根目錄(YOLO?文件夾),執行:
pyi-makespec --onefile --windowed --name your_app_name ui.py
--onefile:打包成單個 EXE 文件(簡潔,適合分發)。--windowed:隱藏命令行黑框(若為 GUI 程序,如 PyQt 項目,必選)。--name:指定最終 EXE 名稱(替換?your_app_name)。ui.py:假設?ui.py?是程序入口(若入口是其他文件,替換為實際入口腳本,比如?fire_pre.py?等,需確保入口邏輯完整)。
執行后會生成?your_app_name.spec?文件,打開編輯關鍵配置:
# your_app_name.spec
block_cipher = Nonea = Analysis(['ui.py'],  # 入口腳本,替換為實際入口pathex=['C:\\Users\\dell\\OneDrive\\桌面\\YOLO'],  # 項目根路徑binaries=[],datas=[# 打包額外資源:models 文件夾、ui 文件、圖標等('models', 'models'),  ('fire_pre.ui', '.'),  ('icons_rc.py', '.'),  # 若有其他資源(如 requirements.txt 想一起打包也可加)],hiddenimports=[# 手動補充 PyInstaller 未自動檢測到的依賴'torch', 'torchvision', 'cv2',  # 示例,根據實際依賴補充'PyQt5', 'PyQt5.QtWidgets'  # 若用 PyQt,需確保此類導入被識別],hookspath=[],hooksconfig={},runtime_hooks=[],excludes=[],win_no_prefer_redirects=False,win_private_assemblies=False,cipher=block_cipher,noarchive=False)pyz = PYZ(a.pure, a.zipped_data, cipher=block_cipher)exe = EXE(pyz,a.scripts,a.binaries,a.zipfiles,a.datas,[],name='your_app_name',  # EXE 名稱debug=False,bootloader_ignore_signals=False,strip=False,upx=True,  # 壓縮 EXE,可選upx_exclude=[],runtime_tmpdir=None,console=False,  # 同 --windowed,隱藏命令行disable_windowed_traceback=False,argv_emulation=False,target_arch=None,codesign_identity=None,entitlements_file=None )
關鍵配置說明:
datas:列出需打包的非代碼資源(文件夾、UI 文件等),格式?(原路徑, 打包后路徑)。hiddenimports:補充 PyInstaller 未自動發現的模塊(如 PyTorch、PyQt 的深層依賴),缺啥補啥,否則運行時會報?ModuleNotFoundError。
3. 執行打包
在項目根目錄執行:
pyinstaller your_app_name.spec
PyInstaller 會根據?.spec?配置,收集依賴、打包資源,最終在?dist?文件夾生成?your_app_name.exe。
三、測試與排坑
-
運行測試
把?dist?里的?your_app_name.exe?單獨復制出來,雙擊運行,測試功能是否正常(如 YOLO 檢測、UI 交互等)。 -
常見問題處理
- 依賴缺失:運行報錯?
ModuleNotFoundError,補充到?.spec?的?hiddenimports?或?requirements.txt。 - 資源路徑錯誤:代碼中用?
os.path.join?動態拼接路徑,避免硬編碼(如?os.path.join(os.path.dirname(__file__), 'models'))。 - PyTorch 體積大:若嫌 EXE 太大,可嘗試精簡模型(如用更小的 YOLO 權重),或用?
upx?壓縮(spec?中?upx=True)。
- 依賴缺失:運行報錯?
四、最終分發
將?dist?中的?your_app_name.exe?單獨發給他人,若依賴復雜(如 PyTorch 等大庫),EXE 體積可能較大,屬于正常現象。
五、總結與展望
本文設計并實現了一款基于深度學習的火災智能檢測系統,該系統通過 YOLOv8?模型實現了對火焰的精準檢測,支持多種數據輸入方式,具備實時報警和可視化展示功能。測試結果表明,系統具有較高的檢測準確率和實時性,能夠滿足實際火災檢測的需求。
然而,系統仍存在一些不足之處。例如,在復雜環境下(如強光照、大霧天氣),模型的檢測性能可能會受到一定影響;對于一些與火焰外觀相似的物體(如紅色燈光),可能會出現誤檢的情況;嵌入的大模型進行火情分析受配置限制,響應時間比較長。
未來,可以從以下幾個方面對系統進行改進和優化:
- 進一步擴充數據集,增加復雜環境下的火災樣本和易混淆樣本,提高模型的泛化能力。
- 嘗試使用更先進的深度學習模型,進一步提高系統的檢測精度和速度。
- 增加火災蔓延預測功能,根據火災的發展趨勢,提前預測火災的蔓延路徑和范圍,為火災撲救提供更有力的支持。
- 加強系統的穩定性和可靠性,提高系統在惡劣環境下的工作能力。
總之,基于深度學習的火災智能檢測系統具有廣闊的應用前景。隨著技術的不斷發展和完善,相信該系統能夠在火災預防和撲救工作中發揮更大的作用,為人們的生命財產安全提供更有力的保障。
留存用戶數)


)


:讓靈蛇舞動起來!)

)


