目錄
前言
1.棧
1.1 棧的概念及結構
1.2 棧的底層數據結構選擇
1.2 數據結構設計代碼(棧的實現)
1.3 接口函數實現代碼
(1)初始化棧
(2)銷毀棧
(3)壓棧
(4)出棧
(5)獲取棧頂元素
(6)獲取棧中有效元素的個數
(7)檢測棧是否為空
1.4 測試函數
2. 隊列
2.1 隊列概念及結構
2.2 隊列的底層數據結構的選擇
2.2 數據結構設計代碼(隊列的實現)
2.3 接口函數
(1)初始化隊列
(2)銷毀隊列
(3)隊尾入隊列
(4)隊頭出隊列
(5)獲取隊列頭部元素
(6)獲取隊列尾部元素
(7)獲取隊列中有效元素個數
(8)檢測隊列是否為空
2.4 測試函數
3. 棧和隊列的源代碼
3.1 棧
(1)Stack.h
(2)Stack.c
(3)STtest.c
3.2 隊列
(1)Queue.h
(2)Queue.c
(3)Qtest.c
總結
前言
這篇文章是關于棧和隊列的C語言實現,干貨滿滿,大家可以邊看邊手寫代碼,最后附上棧和隊列的參考代碼。
1.棧
1.1 棧的概念及結構
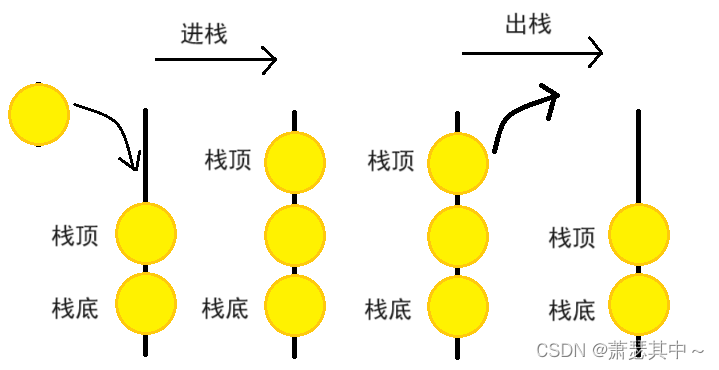
棧:一種特殊的線性表,其只允許在固定的一端進行插入和刪除元素操作。進行數據插入和刪除操作的一端稱為棧頂,另一端稱為棧底。棧中的數據元素遵守后進先出LIFO(Last In First Out)的原則。
壓棧:棧的插入操作叫做進棧/壓棧/入棧,入數據在棧頂。
出棧:棧的刪除操作叫做出棧。出數據也在棧頂。
這個數據結構可以理解為炸串。在最開始,插入丸子時,要插到這根簽的最底部,就是入棧。開始吃的時候,一般從最上面的丸子入手,就是出棧。
1.2 棧的底層數據結構選擇
我們學過順序表和鏈表兩種數據結構,用那種會更好呢?
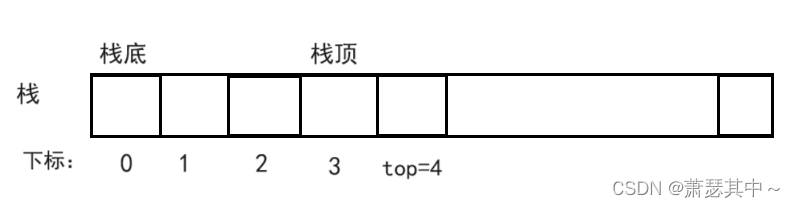
- 相對而言數組的結構實現更優一些。因為數組在尾上插入數據的代價比較小。不用挪動數據,刪除操作也很簡單。
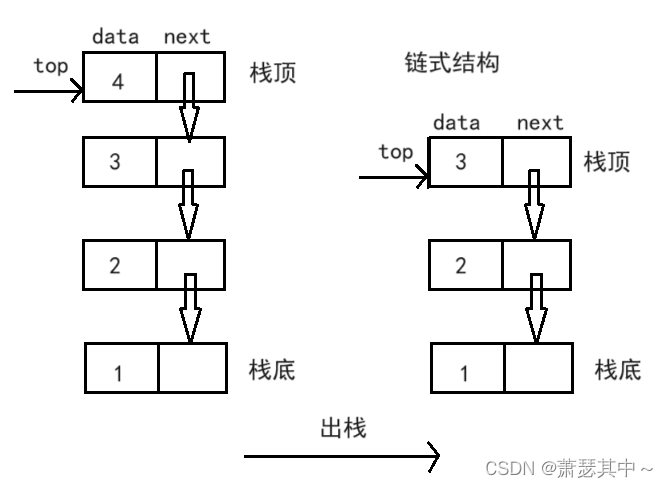
- 而鏈表如果要入棧,就是鏈表的尾插,我們需要找到鏈表的尾結點,效率低。出棧也是一樣。
1.2 數據結構設計代碼(棧的實現)
在用C語言實現棧各種接口函數,需要創建三個文件,分別是STtest.c,Stack.c和Stack.h。
- STtest.c文件用來測試接口函數是否能成功。
- Stack.c文件里面放的是各種接口函數實現的代碼
- Stack.h文件放置各種頭文件的聲明,棧數據結構的設計和接口函數的聲明。下面的代碼就是放在此文件中。
typedef int STDataType;
// 下面是定長的靜態棧的結構,實際中一般不實用,所以我們主要實現下面的支持動態增長的棧
typedef int STDataType;
#define N 10
typedef struct Stack
{STDataType _a[N];int _top; // 棧頂
}Stack;// 支持動態增長的棧
typedef struct Stack
{STDataType* a;int top;      //棧頂int capacity; //容量
}ST;//初始化棧
void StackInit(ST* ps);
//銷毀棧
void StackDestroy(ST* ps);
//壓棧
void StackPush(ST* ps, STDataType x);
//出棧
void StackPop(ST* ps);
//獲取棧頂元素
STDataType StackTop(ST* ps);
//獲取棧中有效元素個數
int StackSize(ST* ps);
//檢測棧是否為空,為空返回true
bool StackEmpty(ST* ps);
1.3 接口函數實現代碼
(1)初始化棧
初始化棧一開始要斷言,斷言來判斷ps指針是否為空,如果為空會直接終止程序并給出提示,方便之后的調試,之后的斷言不再贅述。指針指向空,內部整型數據賦值為0。但是top得注意,top其實也是個下標。看下面的注釋,top可以有兩種賦值方式,只是表示不同意思。
void StackInit(ST* ps)
{assert(ps);ps->a = NULL;ps->top = 0;//表示指向棧頂的下一個元素//ps->top = -1 ///表示指向棧頂元素ps->capacity = 0;
}
(2)銷毀棧
因為我們是以數組為基礎,是動態開辟的連續空間,直接釋放掉ps中的數組指針,并要置為空。
void StackDestroy(ST* ps)
{assert(ps);free(ps->a);ps->a = NULL;//易錯ps->top = ps->capacity = 0;
}
(3)壓棧
棧的壓棧操作跟順序表的尾插類似,先要檢查內部空間容量是否足夠,一開始給四個該數據結構的空間,之后的按兩倍來擴容。最后就是插入數據,棧頂減一。
void StackPush(ST* ps, STDataType x)
{assert(ps);if (ps->top == ps->capacity){int newCapacity = ps->capacity == 0 ? 4 : ps->capacity * 2;STDataType* tmp = realloc(ps->a, sizeof(STDataType) * newCapacity);if (tmp == NULL){printf("realloc fail\n");exit(-1);}ps->a = tmp;ps->capacity = newCapacity;}ps->a[ps->top] = x;ps->top++;
}
(4)出棧
這次不僅要判斷ps是否不為空指針,還要判斷棧內是否有元素,這樣才可以刪除元素,讓棧頂減一即可。
void StackPop(ST* ps)
{assert(ps);assert(!StackEmpty(ps));ps->top--;
}
(5)獲取棧頂元素
這里的判斷跟上個接口函數一樣,只有棧內有元素,才能取棧頂元素。
STDataType StackTop(ST* ps)
{assert(ps);assert(!StackEmpty(ps));return ps->a[ps->top - 1];
}
(6)獲取棧中有效元素的個數
此時的top表示的是棧頂的下一個元素的下標,剛好就是元素個數,直接返回棧頂top
int StackSize(ST* ps)
{assert(ps);return ps->top;
}
(7)檢測棧是否為空
很多人會寫個if語句判斷,其實可以直接像下面一樣寫,ps->top == 0變成一個判斷語句,如果為真返回一個部位0的數,如果為假返回0。
bool StackEmpty(ST* ps)
{assert(ps);return ps->top == 0;
}
1.4 測試函數
我們寫兩個測試函數,第一個測試函數,是出棧和入棧的操作,可以調試查看。第二個測試函數是棧的數據打印,需要使用StackTop獲取棧頂元素,然后將打印的數據出棧。
void TestStack1()
{ST st;StackInit(&st);StackPush(&st, 1);StackPush(&st, 2);StackPush(&st, 3);StackPush(&st, 4);StackPop(&st);StackPop(&st);StackPop(&st);StackPop(&st);StackPop(&st);StackDestroy(&st);
}void TestStack2()
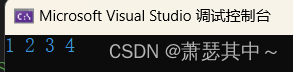
{ST st;StackInit(&st);StackPush(&st, 1);StackPush(&st, 2);StackPush(&st, 3);StackPush(&st, 4);while (!StackEmpty(&st)){printf("%d ", StackTop(&st));StackPop(&st);}StackDestroy(&st);
}int main()
{TestStack1();TestStack2();return 0;
}輸出結果:

2. 隊列
2.1 隊列概念及結構
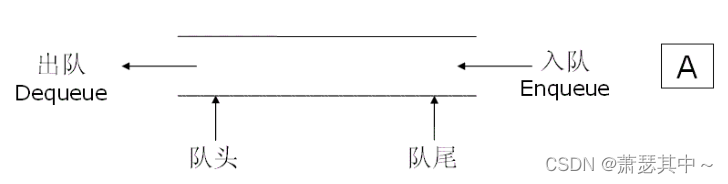
隊列:只允許在一端進行插入數據操作,在另一端進行刪除數據操作的特殊線性表,隊列具有先進先出FIFO(First In First Out)
入隊列:進行插入操作的一端稱為隊尾
出隊列:進行刪除操作的一端稱為隊頭
?這個數據結構可以理解為在銀行取號,先取號的人,就是入隊列。然后先取到號的人,就先去窗口處理業務,這就是出隊列。
2.2 隊列的底層數據結構的選擇
跟棧一樣,隊列也可以用順序表和鏈表來實現,那哪一個更好呢?
- 相較于數組,使用鏈表更優一些。隊列的入隊和出隊,分別是鏈表的尾插和頭刪,不過我們會創建兩個指針指向頭結點和尾結點,所以不會有時間的消耗。
- 而數組在頭部插入和刪除數據,都要挪動數據,效率較低。
鏈表的數據結構存儲的是一個數據變量,和指向下一個結點的指針變量。我們入隊列和出隊列分別在隊尾和隊頭,所以我們在隊列的數據結構定義兩個鏈表的指針變量head和tail,表示隊頭和隊尾

2.2 數據結構設計代碼(隊列的實現)
跟棧的實現一樣,首先要創建三個文件Qtest.c,Queue.c和Queue.h。
- Qtest.c文件用來測試接口函數是否能成功。
- Queue.c文件里面放的是各種接口函數實現的代碼
- Queue.h文件放置各種頭文件的聲明,棧數據結構的設計和接口函數的聲明。下面的代碼就是放在此文件中。
// 鏈式結構:表示隊列
typedef int QDataType;
typedef struct QueueNode
{struct QueueNode* next;QDataType data;
}QueueNode;// 隊列的結構
typedef struct Queue
{QueueNode* head;QueueNode* tail;
}Queue;//初始化隊列
void QueueInit(Queue* pq);
//銷毀隊列
void QueueDestroy(Queue* pq);
//隊尾入隊列
void QueuePush(Queue* pq, QDataType x);
//隊頭出隊列
void QueuePop(Queue* pq);
//獲取隊列頭部元素
QDataType QueueFront(Queue* pq);
//獲取隊列尾部元素
QDataType QueueBack(Queue* pq);
//獲取隊列中有效元素個數
int QueueSize(Queue* pq);
//檢測隊列是否為空,如果為空返回true
bool QueueEmpty(Queue* pq);
2.3 接口函數
(1)初始化隊列
隊列初始化,只需要將隊頭鏈表指針和隊尾鏈表指針置為空指針就好。
void QueueInit(Queue* pq)
{assert(pq);pq->head = NULL;pq->tail = NULL;
}
(2)銷毀隊列
因為是以鏈表為基礎,需要用while循環釋放掉每一個動態開辟的結點。
void QueueDestroy(Queue* pq)
{assert(pq);QueueNode* cur = pq->head;while (cur != NULL){QueueNode* next = cur->next;free(cur);cur = next;}pq->head = pq->tail = NULL;
}
(3)隊尾入隊列
隊尾入隊列就是鏈表的尾插,但是我們有tail指針,直接在tail后面插入就好。不過需要分是否為空隊列兩種情況,如果是空隊列,head和tail指針都指向新結點,如果不是空隊列,在tail之后插入。
void QueuePush(Queue* pq, QDataType x)
{assert(pq);QueueNode* newnode = (QueueNode*)malloc(sizeof(QueueNode));if (newnode == NULL){perror("Queue malloc fail");return;}newnode->data = x;newnode->next = NULL;if (pq->head == NULL){pq->head = pq->tail = newnode;}else{pq->tail->next = newnode;pq->tail = newnode;}
}
(4)隊頭出隊列
在操作之前,我們需要判斷隊列是否有元素。然后在釋放第一個結點,改變指針指向。
void QueuePop(Queue* pq)
{assert(pq);assert(!QueueEmpty(pq));QueueNode* next = pq->head->next;free(pq->head);pq->head = next;
}
(5)獲取隊列頭部元素
QDataType QueueFront(Queue* pq)
{assert(pq);assert(!QueueEmpty(pq));return pq->head->data;
}
(6)獲取隊列尾部元素
QDataType QueueBack(Queue* pq)
{assert(pq);assert(!QueueEmpty(pq));return pq->tail->data;
}
(7)獲取隊列中有效元素個數
這需要一個計數變量。
int QueueSize(Queue* pq)
{assert(pq);int n = 0;QueueNode* cur = pq->head;while (cur){n++;cur = cur->next;}return n;
}
(8)檢測隊列是否為空
跟棧判空相同。
bool QueueEmpty(Queue* pq)
{assert(pq);return pq->head == NULL;
}
2.4 測試函數
寫兩個測試函數,第一是入隊列和出隊列的操作,可以一步一步調試看情況。第二個測試函數,是打印隊列里的數據,現獲取隊頭的數據,然后再出隊。
void TestQueue1()
{Queue q;QueueInit(&q);QueuePush(&q, 1);QueuePush(&q, 2);QueuePush(&q, 3);QueuePush(&q, 4);QueuePop(&q);QueuePop(&q);QueuePop(&q);QueuePop(&q);printf("%d\n", QueueBack(&q));QueueDestroy(&q);
}void TestQueue2()
{Queue q;QueueInit(&q);QueuePush(&q, 1);QueuePush(&q, 2);QueuePush(&q, 3);QueuePush(&q, 4);while (!QueueEmpty(&q)){QDataType front = QueueFront(&q);printf("%d ", front);QueuePop(&q);}printf("\n");
}int main()
{TestQueue1();TestQueue2();return 0;
}
輸出的結果:
3. 棧和隊列的源代碼
3.1 棧
(1)Stack.h
#pragma once
#include <stdio.h>
#include <stdlib.h>
#include <assert.h>
#include <stdbool.h>typedef int STDataType;下面是定長的靜態棧的結構,實際中一般不實用,所以我們主要實現下面的支持動態增長的棧
//typedef int STDataType;
//#define N 10
//typedef struct Stack
//{
//	STDataType _a[N];
//	int _top; // 棧頂
//}Stack;// 支持動態增長的棧
typedef struct Stack
{STDataType* a;int top;      //棧頂int capacity; //容量
}ST;
//初始化棧
void StackInit(ST* ps);
//銷毀棧
void StackDestroy(ST* ps);
//壓棧
void StackPush(ST* ps, STDataType x);
//出棧
void StackPop(ST* ps);
//獲取棧頂元素
STDataType StackTop(ST* ps);
//獲取棧中有效元素個數
int StackSize(ST* ps);
//檢測棧是否為空,為空返回true
bool StackEmpty(ST* ps);
(2)Stack.c
#include "Stack.h"void StackInit(ST* ps)
{assert(ps);ps->a = NULL;ps->top = 0;//ps->top = -1ps->capacity = 0;
}void StackDestroy(ST* ps)
{assert(ps);free(ps->a);ps->a = NULL;ps->top = ps->capacity = 0;
}void StackPush(ST* ps, STDataType x)
{assert(ps);if (ps->top == ps->capacity){int newCapacity = ps->capacity == 0 ? 4 : ps->capacity * 2;STDataType* tmp = realloc(ps->a, sizeof(STDataType) * newCapacity);if (tmp == NULL){printf("realloc fail\n");exit(-1);}ps->a = tmp;ps->capacity = newCapacity;}ps->a[ps->top] = x;ps->top++;
}void StackPop(ST* ps)
{assert(ps);assert(!StackEmpty(ps));ps->top--;
}STDataType StackTop(ST* ps)
{assert(ps);assert(!StackEmpty(ps));return ps->a[ps->top - 1];
}int StackSize(ST* ps)
{assert(ps);return ps->top;
}bool StackEmpty(ST* ps)
{assert(ps);return ps->top == 0;
}
(3)STtest.c
#include "Stack.h"void TestStack1()
{ST st;StackInit(&st);StackPush(&st, 1);StackPush(&st, 2);StackPush(&st, 3);StackPush(&st, 4);StackPop(&st);StackPop(&st);StackPop(&st);StackPop(&st);StackPop(&st);StackDestroy(&st);
}void TestStack2()
{ST st;StackInit(&st);StackPush(&st, 1);StackPush(&st, 2);StackPush(&st, 3);StackPush(&st, 4);//printf("%d ", StackTop(&st));//StackPop(&st);//printf("%d ", StackTop(&st));//StackPop(&st);//StackPush(&st, 5);//StackPush(&st, 6);while (!StackEmpty(&st)){printf("%d ", StackTop(&st));StackPop(&st);}StackDestroy(&st);
}int main()
{TestStack1();//TestStack2();return 0;
}
3.2 隊列
(1)Queue.h
#pragma once
#include <stdio.h>
#include <stdlib.h>
#include <assert.h>
#include <stdbool.h>// 鏈式結構:表示隊列
typedef int QDataType;
typedef struct QueueNode
{struct QueueNode* next;QDataType data;
}QueueNode;// 隊列的結構
typedef struct Queue
{QueueNode* head;QueueNode* tail;
}Queue;//初始化隊列
void QueueInit(Queue* pq);
//銷毀隊列
void QueueDestroy(Queue* pq);
//隊尾入隊列
void QueuePush(Queue* pq, QDataType x);
//隊頭出隊列
void QueuePop(Queue* pq);
//獲取隊列頭部元素
QDataType QueueFront(Queue* pq);
//獲取隊列尾部元素
QDataType QueueBack(Queue* pq);
//獲取隊列中有效元素個數
int QueueSize(Queue* pq);
//檢測隊列是否為空,如果為空返回true
bool QueueEmpty(Queue* pq);
(2)Queue.c
#include "Queue.h"void QueueInit(Queue* pq)
{assert(pq);pq->head = NULL;pq->tail = NULL;
}void QueueDestroy(Queue* pq)
{assert(pq);QueueNode* cur = pq->head;while (cur != NULL){QueueNode* next = cur->next;free(cur);cur = next;}pq->head = pq->tail = NULL;
}void QueuePush(Queue* pq, QDataType x)
{assert(pq);QueueNode* newnode = (QueueNode*)malloc(sizeof(QueueNode));if (newnode == NULL){perror("Queue malloc fail");return;}newnode->data = x;newnode->next = NULL;if (pq->head == NULL){pq->head = pq->tail = newnode;}else{pq->tail->next = newnode;pq->tail = newnode;}
}void QueuePop(Queue* pq)
{assert(pq);assert(!QueueEmpty(pq));QueueNode* next = pq->head->next;free(pq->head);pq->head = next;
}QDataType QueueFront(Queue* pq)
{assert(pq);assert(!QueueEmpty(pq));return pq->head->data;
}QDataType QueueBack(Queue* pq)
{assert(pq);assert(!QueueEmpty(pq));return pq->tail->data;
}int QueueSize(Queue* pq)
{assert(pq);int n = 0;QueueNode* cur = pq->head;while (cur){n++;cur = cur->next;}return n;
}bool QueueEmpty(Queue* pq)
{assert(pq);return pq->head == NULL;
}
(3)Qtest.c
void TestQueue1()
{Queue q;QueueInit(&q);QueuePush(&q, 1);QueuePush(&q, 2);QueuePush(&q, 3);QueuePush(&q, 4);QueuePop(&q);QueuePop(&q);QueuePop(&q);QueuePop(&q);printf("%d\n", QueueBack(&q));QueueDestroy(&q);
}void TestQueue2()
{Queue q;QueueInit(&q);QueuePush(&q, 1);QueuePush(&q, 2);QueuePush(&q, 3);QueuePush(&q, 4);while (!QueueEmpty(&q)){QDataType front = QueueFront(&q);printf("%d ", front);QueuePop(&q);}printf("\n");
}int main()
{//TestQueue1();TestQueue2();return 0;
}
總結
棧和隊列的實現其實相較于鏈表的實現簡單一些,是因為其結構的特殊要求。之后會出一篇關于棧和隊列的OJ題目。多多重復,百煉成鋼!
創作不易,希望這篇文章能給你帶來啟發和幫助,如果喜歡這篇文章,請留下你的三連,你的支持的我最大的動力!!!


)


3月3號)

)
)

修改項目入口頁面布局)


