文章目錄
- 迭代器
- 模擬實現
本篇模擬實現簡單的list和一些其他注意的點
迭代器
如下所示是利用拷貝構造將一個鏈表中的數據挪動到另外一個鏈表中,構造兩個相同的鏈表
list(const list<T>& lt)
{emptyinit();for (auto e : lt){push_back(e);}
}void test_list1()
{list<int> lt;lt.push_back(1);lt.push_back(2);lt.push_back(3);lt.push_back(4);lt.push_back(5);list<int> l2(lt);
}
lt作為形參,傳引用可以提高傳參的效率,同時應該加上const修飾來保證不會因為不小心修改了形參導致外部的實參也被修改,這樣的結果是不應該的,因此就要加const把這個形參變成一個const對象
而問題又來了,const對象要使用的是const迭代器,而前面沒有寫const迭代器,因此這里就引入了const迭代器的實現
從vector的模擬實現中,看似似乎只需要在原來的迭代器的基礎上加上一個const即可,但事實上:
const迭代器和普通迭代器是兩種不同的迭代器,不能直接在普通的迭代器后面加const,原因?
要解決這個問題,先重新回顧一下vector中const迭代器的定義流程:
對比vector的迭代器,vector中的迭代器const版本和非const版本直接在非const版本后面加const使它變成const迭代器即可,這樣在調用的時候就可以直接進行調用

對iterator的定義,const版本就是在指針前面加上const,這樣返回的就是const修飾的指針,因此就可以做到通過該迭代器只讀,不可修改的作用
這里的迭代器本質上就是指針在底層進行訪問,然后我們定義一個const指針,使得const指針就不能對指針指向的內容進行修改了
下面仿照vector修改的原理修改list
要修改的部分其實就是下面的代碼:
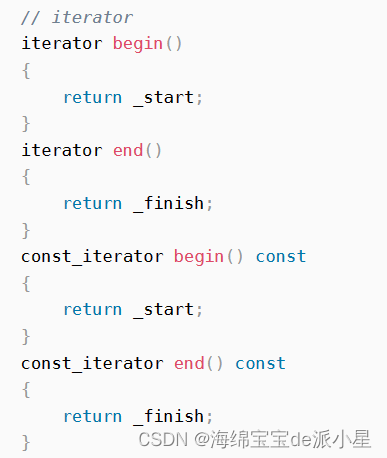
iterator begin()
{return iterator(_head->_next);
}iterator end()
{return iterator(_head);
}
在函數后加const很簡單,但是核心是要把返回值也定義為const指針版本,這個過程要如何實現?
由于這里是把iterator封裝成了一個類進行的實現,因此需要重新封裝一個類進行實現
template <class T>struct __list_iterator{typedef list_node<T> Node;typedef __list_iterator<T> self;// 成員Node* _node;__list_iterator(Node* node):_node(node){}self& operator++(){_node = _node->_next;return *this;}self& operator--(){_node = _node->_prev;return *this;}self operator++(int){self tmp(*this);_node = _node->_next;return tmp;}self operator--(int){self tmp(*this);_node = _node->_prev;return tmp;}T& operator*(){return _node->_data;}T* operator->(){return &_node->_data;}bool operator==(const self& pos){return _node == pos._node;}bool operator!=(const self& pos){return !(*this == pos);}};template <class T>struct __list_const_iterator{typedef list_node<T> Node;typedef __list_const_iterator<T> self;// 成員Node* _node;__list_const_iterator(Node* node):_node(node){}self& operator++(){_node = _node->_next;return *this;}self& operator--(){_node = _node->_prev;return *this;}self operator++(int){self tmp(*this);_node = _node->_next;return tmp;}self operator--(int){self tmp(*this);_node = _node->_prev;return tmp;}const T& operator*(){return _node->_data;}const T* operator->(){return &_node->_data;}bool operator==(const self& pos){return _node == pos._node;}bool operator!=(const self& pos){return !(*this == pos);}};
但事實上,這兩份代碼只有很少的地方有區別,更多的內容都是相同的,這樣是不滿足較好的代碼風格,因此在stl源碼中,使用了模板對這兩個類進行了封裝
改進版本如下:
template <class T, class Ref, class Ptr >struct __list_iterator{typedef list_node<T> Node;typedef __list_iterator<T, Ref, Ptr> self;// 成員Node* _node;__list_iterator(Node* node):_node(node){}self& operator++(){_node = _node->_next;return *this;}self& operator--(){_node = _node->_prev;return *this;}self operator++(int){self tmp(*this);_node = _node->_next;return tmp;}self operator--(int){self tmp(*this);_node = _node->_prev;return tmp;}Ref operator*(){return _node->_data;}Ptr operator->(){return &_node->_data;}bool operator==(const self& pos){return _node == pos._node;}bool operator!=(const self& pos){return !(*this == pos);}};template <class T>class list{void emptyinit(){_head = new Node();_head->_next = _head;_head->_prev = _head;_size = 0;}public:typedef list_node<T> Node;typedef __list_iterator<T, T&, T*> iterator;typedef __list_iterator<T, const T&, const T*> const_iterator;// 構造函數 list(){emptyinit();}// 拷貝構造list(const list<T>& lt){emptyinit();auto it = lt.begin();//*it = 30;}void push_back(const T& x){insert(end(), x);}void push_front(const T& x){insert(begin(), x);}// head tail->prev tailvoid pop_back(){erase(--end());}void pop_front(){erase(begin());}iterator begin(){return iterator(_head->_next);}iterator end(){return iterator(_head);}const_iterator begin() const{return const_iterator(_head->_next);}const_iterator end() const{return const_iterator(_head);}iterator insert(iterator pos, const T& x){Node* cur = pos._node;Node* prev = cur->_prev;Node* newnode = new Node(x);// newnode// prev curprev->_next = newnode;newnode->_prev = prev;newnode->_next = cur;cur->_prev = newnode;return iterator(newnode);}iterator erase(iterator pos){Node* cur = pos._node;Node* prev = cur->_prev;Node* next = cur->_next;// prev cur nextprev->_next = cur->_next;next->_prev = cur->_prev;return iterator(next);}private:Node* _head;size_t _size;};
這里引入了類模板的概念,簡單來說,當需要調用const類型時就會模板實例化出一個const版本的迭代器,再進行相關的操作,這樣的操作可以避免代碼冗余,也是模板的強大之處
模擬實現
#pragma once// 實現的是雙向循環鏈表,鏈表中應該包含節點類和迭代器類,節點類用于從內存中申請節點,迭代器類用于獲取節點指針
namespace mylist
{// 把節點進行封裝,可以動態獲取一個節點template <class T>struct list_node{// 成員list_node<T>* _next;list_node<T>* _prev;T _data;// 成員函數list_node(const T& val = T()):_data(val), _next(nullptr), _prev(nullptr){}};// 對迭代器進行封裝,使得外界看到的是迭代器// 迭代器當中存儲的是某個節點的指針// 可以對迭代器進行各項操作template <class T, class Ref, class Ptr >struct __list_iterator{typedef list_node<T> Node;typedef  __list_iterator<T, Ref, Ptr> self;// 成員Node* _node;__list_iterator(Node* node):_node(node){}self& operator++(){_node = _node->_next;return *this;}self& operator--(){_node = _node->_prev;return *this;}self operator++(int){self tmp(*this);_node = _node->_next;return tmp;}self operator--(int){self tmp(*this);_node = _node->_prev;return tmp;}Ref operator*(){return _node->_data;}Ptr operator->(){return &_node->_data;}bool operator==(const self& pos){return _node == pos._node;}bool operator!=(const self& pos){return !(*this == pos);}};// 適配器 -- 復用template <class T, class Ref, class Ptr >struct __reverse_iterator{typedef list_node<T> Node;typedef  __reverse_iterator<T, Ref, Ptr> self;// 成員Node* _node;__reverse_iterator(Node* node):_node(node){}self& operator++(){_node = _node->_prev;return *this;}self& operator--(){_node = _node->_next;return *this;}self operator++(int){self tmp(*this);_node = _node->_prev;return tmp;}self operator--(int){self tmp(*this);_node = _node->_next;return tmp;}Ref operator*(){return _node->_data;}Ptr operator->(){return &_node->_data;}bool operator==(const self& pos){return _node == pos._node;}bool operator!=(const self& pos){return !(*this == pos);}};template <class T>class list{void emptyinit(){_head = new Node();_head->_next = _head;_head->_prev = _head;_size = 0;}public:typedef list_node<T> Node;typedef __list_iterator<T, T&, T*> iterator;typedef __list_iterator<T, const T&, const T*> const_iterator;typedef __reverse_iterator<T, T&, T*> reverse_iterator;typedef __reverse_iterator<T, const T&, const T*> const_reverse_iterator;// 構造函數 list(){emptyinit();}// 拷貝構造list(const list<T>& lt){emptyinit();auto it = lt.begin();//*it = 30;}void push_back(const T& x){insert(end(), x);}void push_front(const T& x){insert(begin(), x);}// head     tail->prev  tailvoid pop_back(){erase(--end());}void pop_front(){erase(begin());}iterator begin(){return iterator(_head->_next);}iterator end(){return iterator(_head);}const_iterator begin() const{return const_iterator(_head->_next);}const_iterator end() const{return const_iterator(_head);}reverse_iterator rbegin(){return reverse_iterator(_head->_prev);}reverse_iterator rend(){return reverse_iterator(_head);}const_reverse_iterator rbegin() const{return const_reverse_iterator(_head->_prev);}const_reverse_iterator rend() const{return const_reverse_iterator(_head);}iterator insert(iterator pos, const T& x){Node* cur = pos._node;Node* prev = cur->_prev;Node* newnode = new Node(x);//        newnode//   prev         curprev->_next = newnode;newnode->_prev = prev;newnode->_next = cur;cur->_prev = newnode;return iterator(newnode);}iterator erase(iterator pos){Node* cur = pos._node;Node* prev = cur->_prev;Node* next = cur->_next;// prev cur nextprev->_next = cur->_next;next->_prev = cur->_prev;return iterator(next);}private:Node* _head;size_t _size;};void test_list1(){list<int> lt;lt.push_back(1);lt.push_back(2);lt.push_back(3);lt.push_back(4);lt.push_back(5);cout << "正序" << endl;for (auto e : lt){cout << e << " ";}cout << endl;cout << "逆序" << endl;auto rit = lt.rbegin();while (rit != lt.rend()){cout << *rit << " ";rit++;}cout << endl;}
}

】NIO快速入門)


)

![[Openwrt]一步一步搭建MT7981A uboot、atf、openwrt-21.02開發環境操作說明](http://pic.xiahunao.cn/[Openwrt]一步一步搭建MT7981A uboot、atf、openwrt-21.02開發環境操作說明)


