vs azure web
Webscraping as a required skill for many data-science related jobs is becoming increasingly desirable as more companies slowly migrate their processes to the cloud.
隨著越來越多的公司將其流程緩慢遷移到云中,將Web爬網作為許多與數據科學相關的工作所需的技能變得越來越受歡迎。
As someone who started originally getting interested in data science after scraping my University’s course evaluation catalogue, this skill single-handedly allowed me to land two internships during my undergrad program.
作為最初在刮擦我的大學的課程評估目錄后開始對數據科學感興趣的人,這一技能使我能夠在我的本科課程期間獲得兩次實習機會。
Although disputed, many people use a Chrome Webdriver and the Selenium module to scrape data off websites on the internet. While this tool can be very helpful locally, it is difficult to make these recurring tasks that are able to deploy for large scale infrastructure. Within this article, I am going to guide you through porting over your Selenium web-scraper into the Azure Network utilizing a virtual machine as well as show you how to set up the scraping to be a daily reoccurring task.
盡管存在爭議,但許多人還是使用Chrome Webdriver和Selenium模塊從互聯網上的網站上抓取數據。 盡管此工具在本地可能非常有用,但是很難執行這些能夠部署到大型基礎架構的重復任務。 在本文中,我將指導您通過使用虛擬機將Selenium Web爬網程序移植到Azure網絡,并向您展示如何將抓取設置為每天重復發生的任務。
步驟1:設置Azure虛擬機(VM) (Step 1: Setting up the Azure Virtual Machine (VM))
After you have logged into Azure, you’re going to want to make your way over to the Virtual Machines directory. While I won’t walk through every detail behind creating the VM, I will note some specifications that are important to set in order to enable appropriate access between services.
登錄到Azure后,您將需要轉到虛擬機目錄。 盡管我不會遍歷創建VM的每個細節,但我會注意到一些重要的規范,這些規范對于使服務之間能夠進行適當的訪問非常重要。
Since I am familiar most with Windows, I used a Windows 10 Pro Image for my Virtual Machine, however I would imagine that this process could be repeated for other images as well.
由于我對Windows最熟悉,因此我在虛擬機上使用了Windows 10 Pro映像,但是我想也可以對其他映像重復此過程。
For the “Select inbound ports”, make sure to include the HTTPS (443) option to allow the automation task access. We will cover this in more detail in Step 4 of this guide if you miss this step.
對于“選擇入站端口”,請確保包括 HTTPS (443) 選項以允許自動化任務訪問 。 如果您錯過了此步驟,我們將在本指南的第4步中對此進行詳細介紹。
第2步:安裝Python,Chrome,Chromedriver和必需的依賴項 (Step 2: Install Python, Chrome, Chromedriver & Required Dependencies)
Next, we are going to want to load up the VM. If you are using a Windows image, you can use RDP (Remote Desktop Protocol) to get access, or you can use a software like PuTTY to SSH into the desktop as well.
接下來,我們將要加載虛擬機。 如果使用的是Windows映像,則可以使用RDP(遠程桌面協議)進行訪問,也可以使用PuTTY之類的軟件通過SSH進入桌面。
We are going to setup our working environment here in order for Python and Chrome to get up and running. So, make sure to install your required version of Python as well as the latest version of Chrome & Chromedriver. Make note of where these files are saved as you will need them later on.
我們將在這里設置我們的工作環境,以便Python和Chrome啟動并運行。 因此,請確保安裝所需的Python版本以及最新版本的Chrome和Chromedriver。 記下這些文件的保存位置,因為以后將需要它們。
If you want to have less maintenance down the road, make sure to rename the Chrome Update folder so Chrome doesn't automatically update requiring you to download a newer version of Chromedriver. Instructions for doing so can be found here.
如果您想減少日常維護工作,請確保重命名Chrome Update文件夾,以便Chrome不會自動更新 ,而您需要下載更新版本的Chromedriver。 有關說明,請參見此處 。
步驟3:Python腳本 (Step 3: Python Script)
For sake of simplicity, we are going to use just a basic python script that loads up stack overflow. Obviously, this could easily be done using the requests library, however, as many scrapers require JavaScript interactivity with the web page, I’ll assume that your script is longer and more complex.
為了簡單起見,我們將僅使用一個基本的python腳本來加載堆棧溢出。 顯然,這可以使用請求庫輕松完成,但是,由于許多抓取工具需要與網頁進行JavaScript交互,因此我假設您的腳本更長且更復雜。
Lets call the following script scrape.py
讓我們調用以下腳本scrape.py
from selenium import webdriverDRIVER_PATH = "/path/to/chromedriver.exe"def scrape():
    driver = webdriver.Chrome(executable_path=DRIVER_PATH)
    driver.get('https://stackoverflow.com/')if __name__ == "__main__":
    scrape()
    print("Script Executed Correctly.")
You’re going to want to first make sure that the correct output is printed so you know your script works locally within the VM.
您首先要確保打印正確的輸出,以便您知道腳本可以在VM本地運行。
It is also important to note that storage within these Virtual Machines is expensive. So, try and utilize a database or equivalent to store your data outside of the VM if at all possible. For the majority of my uses, utilizing python’s pyodbc module works incredibly well for getting data that I want stored outside of the VM. However, this will likely change on a case to case basis.
還需要注意的是,這些虛擬機中的存儲非常昂貴。 因此,請盡可能利用數據庫或等效數據庫將數據存儲在VM外部。 對于我的大多數用途,利用python的pyodbc模塊非常有效地用于獲取要存儲在VM外部的數據。 但是,這可能會視情況而定。
步驟3:Powershell腳本 (Step 3: Powershell Script)
Next, you’re going to want to setup a Powershell script that runs your python code. This script is how Azure will communicate with any internal scripts you have within your VM. Again, for simplicity, my Powershell script here will utilize some basic functionality just to get the basic structure outlined.
接下來,您將要設置運行Python代碼的Powershell腳本。 該腳本是Azure如何與VM中擁有的任何內部腳本進行通信的方式。 同樣,為簡單起見,我在這里的Powershell腳本將利用一些基本功能,只是為了獲得概述的基本結構。
Lets call this script ps-scrape.ps1
讓我們將此腳本稱為ps-scrape.ps1
Write-Output "Script Started."
\path\to\python.exe \path\to\scrape.py
Write-Output "Script Ending."
Now, give this a test run by running it locally on your VM. It should print out the following results:
現在,通過在您的VM上本地運行來進行測試運行。 它應該打印出以下結果:
Script Started.
Script Executed Correctly.
Script Ending.
步驟4:Azure Powershell Runbook (Step 4: Azure Powershell Runbook)
Now that your Powershell script runs locally on your VM, it is time to do the same thing from outside your VM.
現在,您的Powershell腳本在VM上本地運行,是時候從VM外部執行相同的操作了。
Within Azure, open up the Automation Account Resource. Under Process Automation, click on Runbooks and Create a Runbook. The Runbook type should be PowerShell (not PowerShell workflow or Graphical PowerShell Workflow).
在Azure中,打開自動化帳戶資源。 在“流程自動化”下,單擊“運行手冊”并創建一個“運行手冊”。 Runbook類型應為PowerShell(而不是PowerShell工作流或圖形PowerShell工作流)。
Keep in mind, that you will likely need to import the required modules from Automation Account to allow the following to run correctly. To do this, go over to your Automation Account you created, under Shared Resources, you should see Modules. Make sure to add the AzureRM.Compute module and any other modules you may need.
請記住,您可能需要從Automation Account導入所需的模塊,以使以下內容正確運行。 為此,請轉到您在共享資源下創建的自動化帳戶,您應該看到模塊。 確保添加AzureRM.Compute模塊以及您可能需要的任何其他模塊。
Lets call the following Runbook RunbookScrape
讓我們調用以下Runbook RunbookScrape
$connectionName = "AzureRunAsConnection"
try
{
    # Get the connection "AzureRunAsConnection
    $servicePrincipalConnection=Get-AutomationConnection -Name $connectionName    "Logging in to Azure..."
    Add-AzureRmAccount `
        -ServicePrincipal `
        -TenantId $servicePrincipalConnection.TenantId `
        -ApplicationId $servicePrincipalConnection.ApplicationId `
        -CertificateThumbprint $servicePrincipalConnection.CertificateThumbprint
}
catch {
    if (!$servicePrincipalConnection)
    {
        $ErrorMessage = "Connection $connectionName not found."
        throw $ErrorMessage
    } else{
        Write-Error -Message $_.Exception
        throw $_.Exception
    }
}$rgname ="YourResourceGroupName"
$vmname ="YourVirtualMachineName"
$ScriptToRun = "vm\path\to\script\ps-scrape.ps1"
Out-File -InputObject $ScriptToRun -FilePath ScriptToRun.ps1
$run = Invoke-AzureRmVMRunCommand -ResourceGroupName $rgname -Name $vmname -CommandId 'RunPowerShellScript' -ScriptPath ScriptToRun.ps1
Write-Output $run.Value[0]
Remove-Item -Path ScriptToRun.ps1
Bolded items indicate where you will need to change the code to work for your system.
粗體字表示需要更改代碼才能在系統上工作。
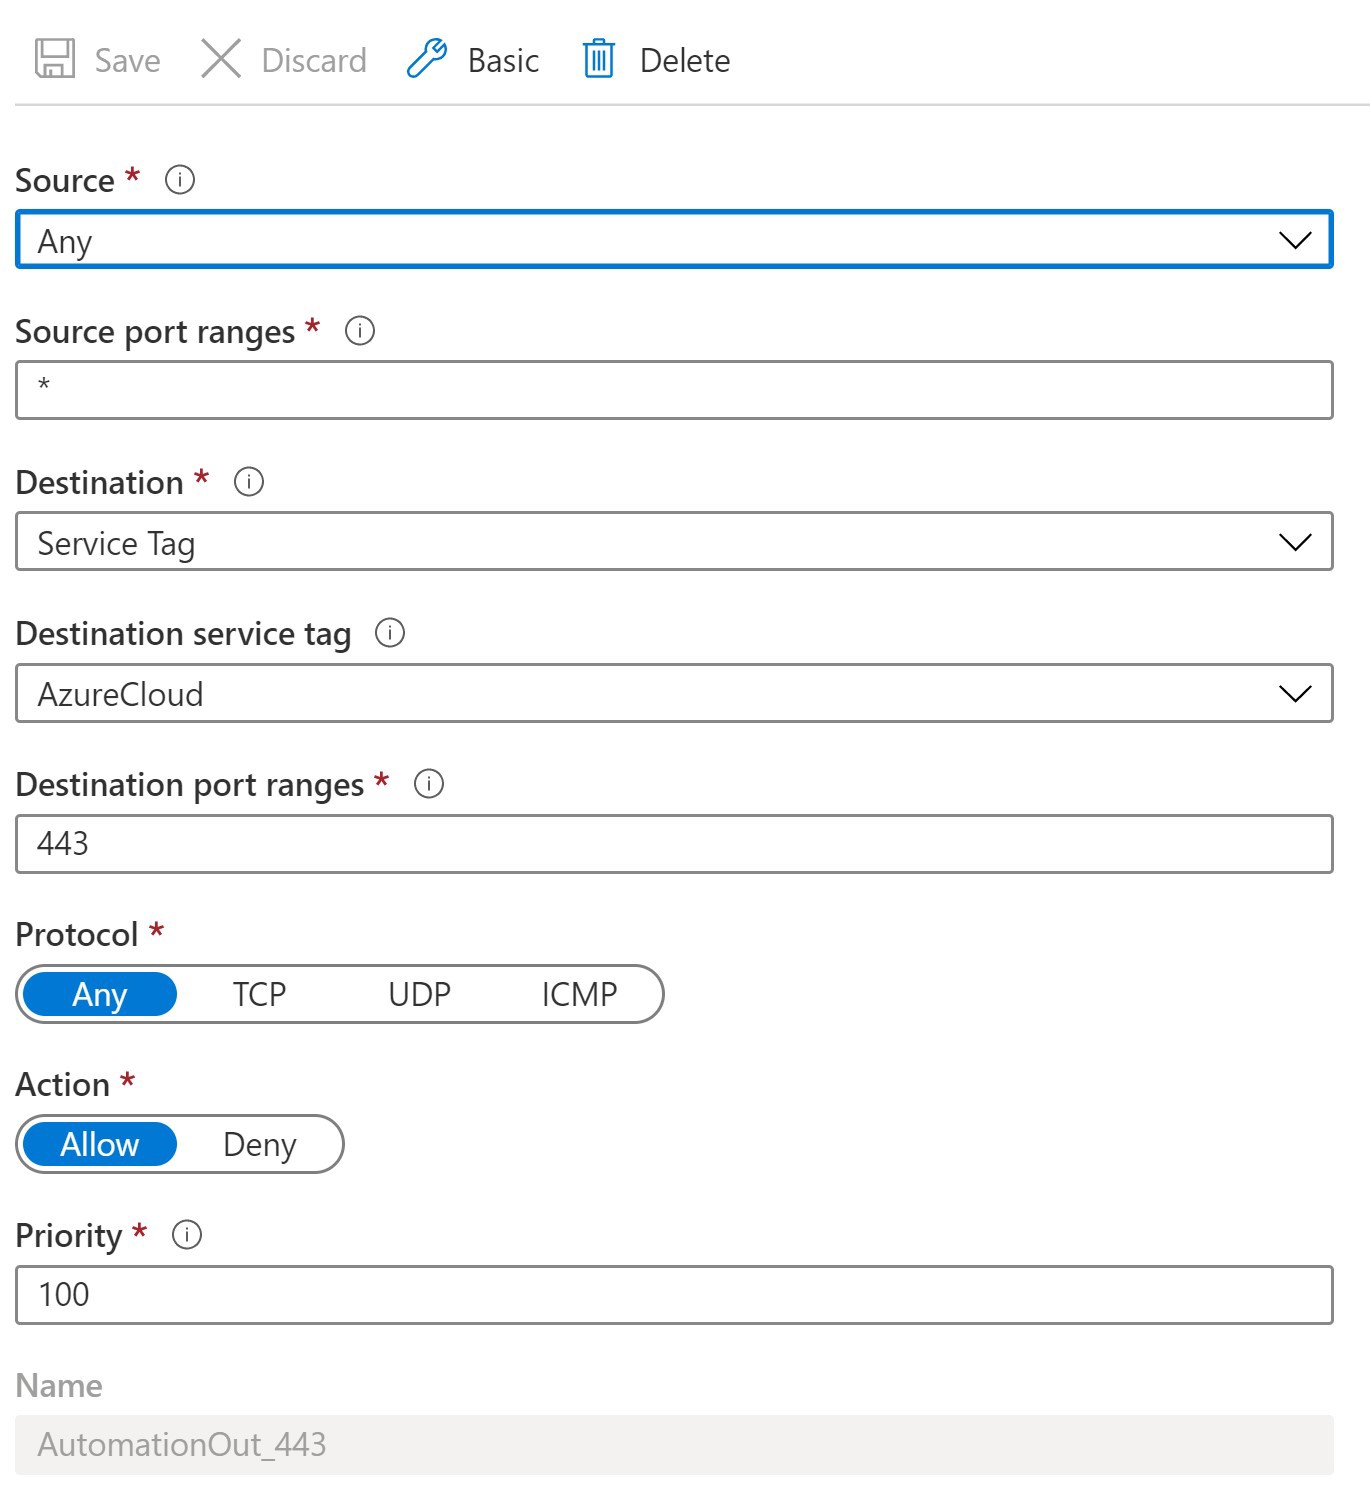
If the script ran correctly but you don’t see an output. DON’T WORRY. It just means you need to update the VM network settings to allow outbound traffic through port 443. This can be done by going to the Virtual Machine where under Settings, you will see the Networking button. Go here and you should see several tabs under the Network Interface. Click on the Outbound port rules and setup a new rule to look like this.
如果腳本正確運行,但看不到輸出。 別擔心 這僅意味著您需要更新VM網絡設置以允許通過端口443的出站流量。這可以通過轉到虛擬機來完成,在虛擬機的“設置”下,您將看到“網絡”按鈕。 轉到此處,您應該在網絡接口下看到幾個選項卡。 單擊出站端口規則,然后設置一個新規則,如下所示。
Try running the Runbook again and you should see the same output as you saw from within the VM!
再次嘗試運行Runbook,您應該會看到與從VM中看到的輸出相同的輸出!
步驟5:Runbook自動化 (Step 5: Runbook Automation)
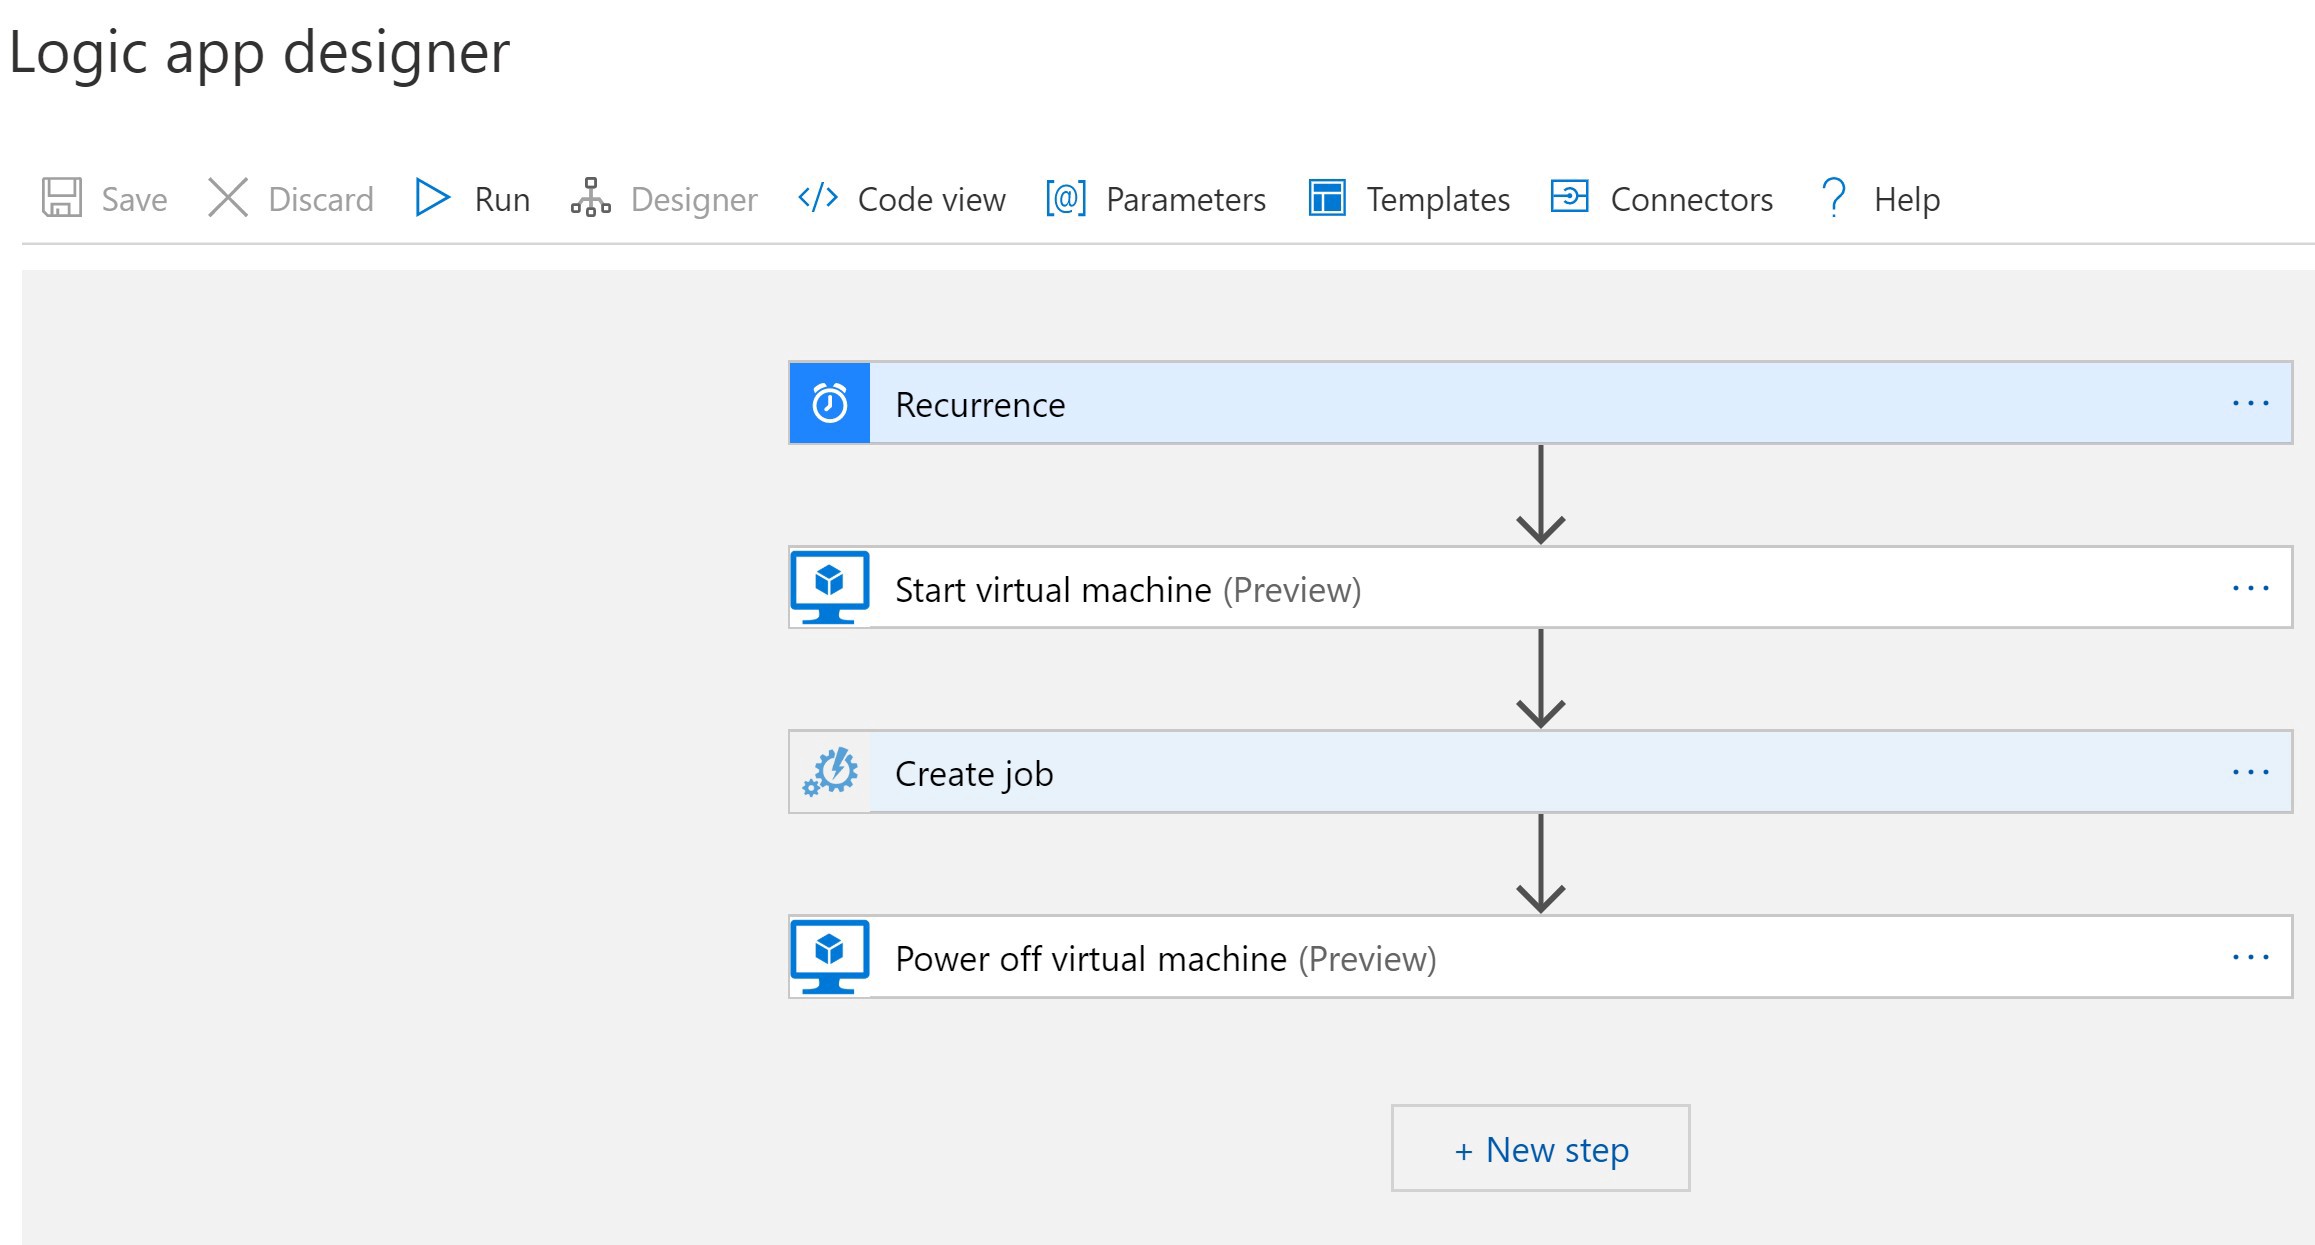
Now comes the task of Automating your Runbook. Within Azure, open up the Logic App resource. Under the Development Tools, you should see the Logic app designer. All that is required is that you link the blocks together to make Azure startup the VM, run the Runbook, and then shut down the VM. You can see what this looks like in the following image.
現在是自動化Runbook的任務。 在Azure中,打開Logic App資源。 在開發工具下,您應該看到Logic應用程序設計器。 所需要做的就是將這些塊鏈接在一起,以使Azure啟動VM,運行Runbook,然后關閉VM。 您可以在下圖中看到它的外觀。
Boom! You’re done. Your Python Selenium Webscraper will now run within the Azure Virtual Machine on a scheduled recurring basis.
繁榮! 你完成了。 您的Python Selenium Webscraper現在將按計劃的定期在Azure虛擬機中運行。
翻譯自: https://medium.com/swlh/guide-to-migrating-automating-chrome-web-scrapers-within-azure-909a4203476a
vs azure web
本文來自互聯網用戶投稿,該文觀點僅代表作者本人,不代表本站立場。本站僅提供信息存儲空間服務,不擁有所有權,不承擔相關法律責任。 如若轉載,請注明出處:http://www.pswp.cn/news/388100.shtml 繁體地址,請注明出處:http://hk.pswp.cn/news/388100.shtml 英文地址,請注明出處:http://en.pswp.cn/news/388100.shtml
如若內容造成侵權/違法違規/事實不符,請聯系多彩編程網進行投訴反饋email:809451989@qq.com,一經查實,立即刪除!相關文章

hadoop eclipse windows


netstat 在windows下和Linux下查看網絡連接和端口占用

selenium 解析網頁_用Selenium進行網頁搜刮

)
代理ARP協議(Proxy ARP)

hive 導入hdfs數據_將數據加載或導入運行在基于HDFS的數據湖之上的Hive表中的另一種方法。

)
對Faster R-CNN的理解(1)

大數據業務學習筆記_學習業務成為一名出色的數據科學家

postman 請求參數為數組及JsonObject
對稱二叉樹 個人題解)
領扣(LeetCode)對稱二叉樹 個人題解

python 開發api_使用FastAPI和Python快速開發高性能API

Purley平臺Linpak測試,從踏坑開始一步步優化
——目錄結構)
基于easyui開發Web版Activiti流程定制器詳解(一)——目錄結構

HDOJ 2037:今年暑假不AC_大二寫
——文件列表)
基于easyui開發Web版Activiti流程定制器詳解(二)——文件列表

杭電oj2047-2049、2051-2053、2056、2058

Power BI:M與DAX以及度量與計算列
