selenium 解析網頁
網頁抓取系列 (WEB SCRAPING SERIES)
總覽 (Overview)
Selenium is a portable framework for testing web applications. It is open-source software released under the Apache License 2.0 that runs on Windows, Linux and macOS. Despite serving its major purpose, Selenium is also used as a web scraping tool. Without delving into the components of Selenium, we shall focus on a single component that is useful for web scraping, WebDriver. Selenium WebDriver provides us with an ability to control a web browser through a programming interface to create and execute test cases.
Selenium是用于測試Web應用程序的可移植框架。 它是在Windows,Linux和macOS上運行的Apache許可2.0下發行的開源軟件。 盡管Selenium具有主要用途,但它也被用作網絡抓取工具。 在不深入研究Selenium的組件的情況下,我們將只關注對Web抓取有用的單個組件WebDriver 。 Selenium WebDriver使我們能夠通過編程界面控制Web瀏覽器以創建和執行測試用例。
In our case, we shall be using it for scraping data from websites. Selenium comes in handy when websites display content dynamically i.e. use JavaScripts to render content. Even though Scrapy is a powerful web scraping framework, it becomes useless with these dynamic websites. My goal for this tutorial is to make you familiarize with Selenium and carry out some basic web scraping using it.
就我們而言,我們將使用它來從網站上抓取數據。 當網站動態顯示內容(即使用JavaScript呈現內容)時,Selenium會派上用場。 盡管Scrapy是強大的Web抓取框架,但對于這些動態網站而言,它就變得毫無用處。 本教程的目的是使您熟悉Selenium并使用它進行一些基本的Web抓取。
Let us start by installing selenium and a webdriver. WebDrivers support 7 Programming Languages: Python, Java, C#, Ruby, PHP, .Net and Perl. The examples in this manual are with Python language. There are tutorials available on the internet with other languages.
讓我們從安裝selenium和一個webdriver開始。 WebDrivers支持7種編程語言:Python,Java,C#,Ruby,PHP,.Net和Perl。 本手冊中的示例均使用Python語言。 互聯網上有其他語言的教程。
This is the third part of a 4 part tutorial series on web scraping using Scrapy and Selenium. The other parts can be found at
這是有關使用Scrapy和Selenium進行Web抓取的4部分教程系列的第三部分。 其他部分可以在找到
Part 1: Web scraping with Scrapy: Theoretical Understanding
第1部分:使用Scrapy進行Web抓取:理論理解
Part 2: Web scraping with Scrapy: Practical Understanding
第2部分:使用Scrapy進行Web爬取:實踐理解
Part 4: Web scraping with Selenium & Scrapy
第4部分:使用Selenium和Scrapy進行Web抓取
安裝Selenium和WebDriver (Installing Selenium and WebDriver)
安裝Selenium (Installing Selenium)
Installing Selenium on any Linux OS is easy. Just execute the following command in a terminal and Selenium would be installed automatically.
在任何Linux操作系統上安裝Selenium都很容易。 只需在終端中執行以下命令,即可自動安裝Selenium。
pip install selenium安裝WebDriver (Installing WebDriver)
Selenium officially has WebDrivers for 5 Web Browsers. Here, we shall see the installation of WebDriver for two of the most widely used browsers: Chrome and Firefox.
Selenium正式具有用于5個Web瀏覽器的 WebDrivers 。 在這里,我們將看到為兩種最廣泛使用的瀏覽器安裝了WebDriver:Chrome和Firefox。
安裝適用于Chrome的Chromedriver (Installing Chromedriver for Chrome)
First, we need to download the latest stable version of chromedriver from Chrome’s official site. It would be a zip file. All we need to do is extract it and put it in the executable path.
首先,我們需要從Chrome的官方網站下載最新的穩定版chromedriver 。 這將是一個zip文件。 我們需要做的就是提取它并將其放在可執行文件路徑中。
wget https://chromedriver.storage.googleapis.com/83.0.4103.39/chromedriver_linux64.zipunzip chromedriver_linux64.zipsudo mv chromedriver /usr/local/bin/為Firefox安裝Geckodriver (Installing Geckodriver for Firefox)
Installing geckodriver for Firefox is even simpler since it is maintained by Firefox itself. All we need to do is execute the following line in a terminal and you are ready to play around with selenium and geckodriver.
為Firefox安裝geckodriver更加簡單,因為它是由Firefox自己維護的。 我們需要做的就是在終端中執行以下行,您可以使用Selenium和geckodriver。
sudo apt install firefox-geckodriver例子 (Examples)
There are two examples with increasing levels of complexity. First one would be a simpler webpage opening and typing into textboxes and pressing key(s). This example is to showcase how a webpage can be controlled through Selenium using a program. The second one would be a more complex web scraping example involving mouse scrolling, mouse button clicks and navigating to other pages. The goal here is to make you feel confident to start web scraping with Selenium.
有兩個示例的復雜性不斷提高。 第一個將是一個更簡單的網頁,打開并在文本框中鍵入內容并按鍵。 這個例子展示了如何使用程序通過Selenium控制網頁。 第二個是更復雜的Web抓取示例,其中涉及鼠標滾動,鼠標按鈕單擊以及導航到其他頁面。 目的是使您有信心開始使用Selenium進行網頁抓取。
示例1 —使用Selenium登錄到Facebook (Example 1 — Logging into Facebook using Selenium)
Let us try out a simple automation task using Selenium and chromedriver as our training wheel exercise. For this, we would try to log into a Facebook account and we are not performing any kind of data scraping. I am assuming that you have some knowledge of identifying HTML tags used in a webpage using the browser’s developer tools. The following is a piece of python code that opens up a new Chrome browser, opens the Facebook main page, enters a username, password and clicks Login button.
讓我們嘗試使用Selenium和chromedriver作為我們的訓練輪練習的簡單自動化任務。 為此,我們將嘗試登錄Facebook帳戶,并且不執行任何類型的數據抓取。 我假設您具有使用瀏覽器的開發人員工具識別網頁中使用HTML標簽的知識。 以下是一段python代碼,用于打開新的Chrome瀏覽器,打開Facebook主頁,輸入用戶名,密碼并單擊“登錄”按鈕。
from selenium import webdriver
from selenium.webdriver.common.keys import Keysuser_name = "Your E-mail"
password = "Your Password"# Creating a chromedriver instance
driver = webdriver.Chrome()  # For Chrome
# driver = webdriver.Firefox() # For Firefox# Opening facebook homepage
driver.get("https://www.facebook.com")# Identifying email and password textboxes
email = driver.find_element_by_id("email")
passwd = driver.find_element_by_id("pass")# Sending user_name and password to corresponding textboxes
email.send_keys(user_name)
passwd.send_keys(password)# Sending a signal that RETURN key has been pressed
passwd.send_keys(Keys.RETURN)# driver.quit()
After executing this python code, your Facebook homepage would open in a new Chrome browser window. Let us examine how this became possible.
執行此python代碼后,您的Facebook主頁將在新的Chrome瀏覽器窗口中打開。 讓我們研究一下這如何成為可能。
It all starts with the creation of a webdriver instance for your browser. As I am using Chrome, I have used
driver = webdriver.Chrome().這一切都始于為瀏覽器創建Webdriver實例。 在使用Chrome時,我已經使用
driver = webdriver.Chrome()。Then we open the Facebook webpage using
driver.get("https://www.facebook.com"). When python encountersdriver.get(URL), it opens a new browser window and opens the webpage specified by theURL.然后,我們使用
driver.get("https://www.facebook.com")打開Facebook網頁。 當python遇到driver.get(URL),它將打開一個新的瀏覽器窗口,并打開由URL指定的網頁。Once the homepage is loaded, we identify the textboxes to type e-mail and password using their HTML tag’s id attribute. This is done using
driver.find_element_by_id().加載首頁后,我們將使用其HTML標簽的id屬性來標識文本框,以鍵入電子郵件和密碼。 這是使用
driver.find_element_by_id()。We send the
usernameandpasswordvalues for logging into Facebook usingsend_keys().我們使用
send_keys()發送用于登錄Facebook的username和password值。We then simulate the user’s action of pressing RETURN/ENTER key by sending its corresponding signal using
send_keys(Keys.RETURN).然后,我們通過使用
send_keys(Keys.RETURN)發送相應的信號來模擬用戶按下RETURN / ENTER鍵的send_keys(Keys.RETURN)。
IMPORTANT NOTE:Any instance created in a program should be closed at the end of the program or after its purpose is served. So, whenever we are creating a webdriver instance, it has to be terminated using driver.quit(). If we do not terminate the opened instances, it starts to use up RAM, which may impact the machine's performance and slow it down. In the above example, this termination process has been commented out to show the output in a browser window. And, if terminated, the browser window would also be closed and the reader would not be able to see the output.
重要說明:在程序中創建的任何實例都應在程序結束時或在達到其目的后關閉。 因此,每當我們創建一個webdriver實例時,都必須使用driver.quit()將其終止。 如果我們不終止打開的實例,它將開始用完RAM,這可能會影響計算機的性能并降低其速度。 在上面的示例中,該終止過程已被注釋掉,以在瀏覽器窗口中顯示輸出。 并且,如果終止,瀏覽器窗口也將關閉,閱讀器將無法看到輸出。
示例2 —從OpenAQ收集污染數據 (Example 2 — Scraping Pollution data from OpenAQ)
This is a more complex example. OpenAQ is a non-profit organization that collects and shares air quality data that are open and can be accessed in many ways. This is evident from the site’s robots.txt.
這是一個更復雜的示例。 OpenAQ是一個非營利性組織,負責收集和共享開放的空氣質量數據,并且可以通過多種方式進行訪問。 從網站的robots.txt中可以明顯看出這一點。
User-agent: *
Disallow:
Our goal here is to collect data on PM2.5 readings from all the countries listed on http://openaq.org. PM2.5 are the particulate matter (PM) that have a diameter lesser than 2.5 micrometres, which is way smaller than the diameter of a human hair. If the reader is interested in knowing more about PM2.5, please follow this link.
我們的目標是從http://openaq.org上列出的所有國家/地區收集有關PM2.5讀數的數據。 PM2.5是直徑小于2.5微米(比人的頭發直徑小得多)的顆粒物(PM)。 如果讀者有興趣了解更多有關PM2.5的信息,請點擊此鏈接。
The reason for choosing Selenium over Scrapy is that http://openaq.org uses React JS to render data. If it were static webpages, Scrapy would scrape the data efficiently. To scrape data, we first need to analyze the website, manually navigate the pages and note down the user interaction steps required to extract data.
選擇Selenium而不是Scrapy的原因是http://openaq.org使用React JS渲染數據。 如果是靜態網頁,Scrapy將有效地抓取數據。 要抓取數據,我們首先需要分析網站,手動瀏覽頁面,并記下提取數據所需的用戶交互步驟。
了解http://openaq.org布局 (Understanding http://openaq.org layout)
It is always better to scrape with as few webpage navigations as possible. The website has a webpage https://openaq.org/#/locations which could be used as a starting point for scraping.
最好抓取盡可能少的網頁導航。 該網站有一個網頁https://openaq.org/#/locations ,可以用作抓取的起點。
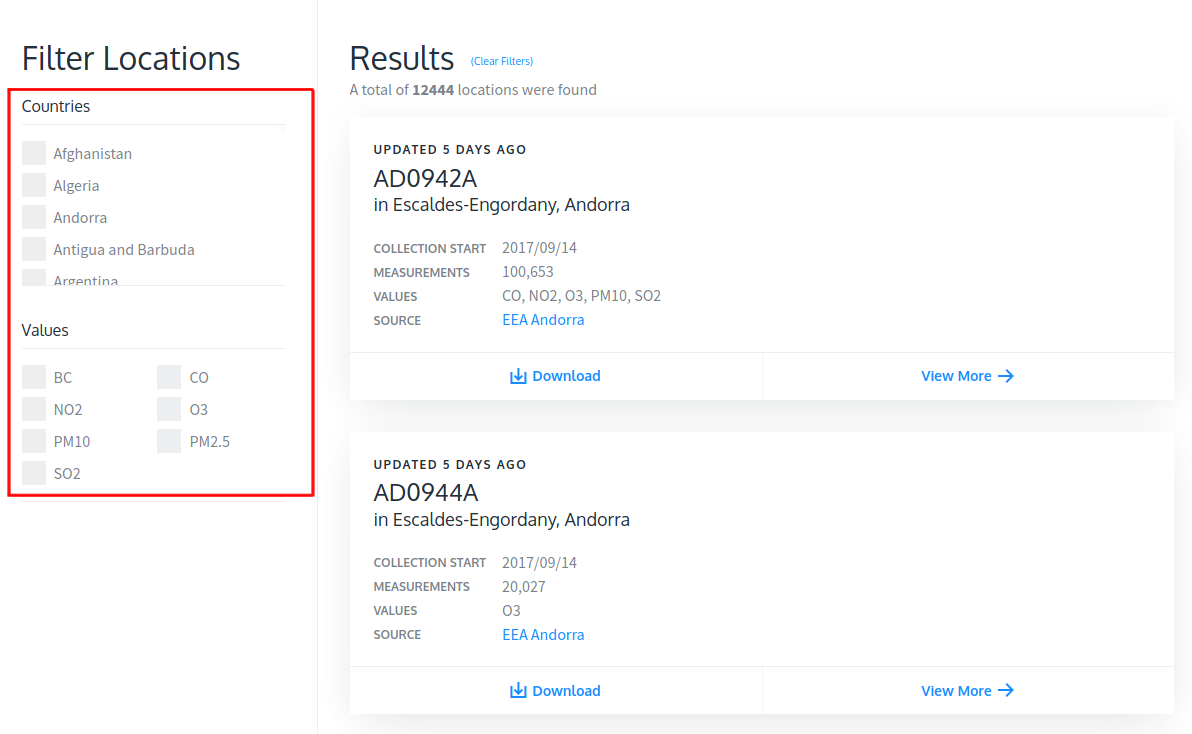
The filter locations option on the left-side panel is used to filter out PM2.5 data for each country. The Results on the right-side panel show cards that open a new page when clicked to display PM2.5 and other data.
左側面板上的過濾器位置選項用于過濾每個國家的PM2.5數據。 右側面板上的結果顯示了單擊顯示PM2.5和其他數據時會打開新頁面的卡片。
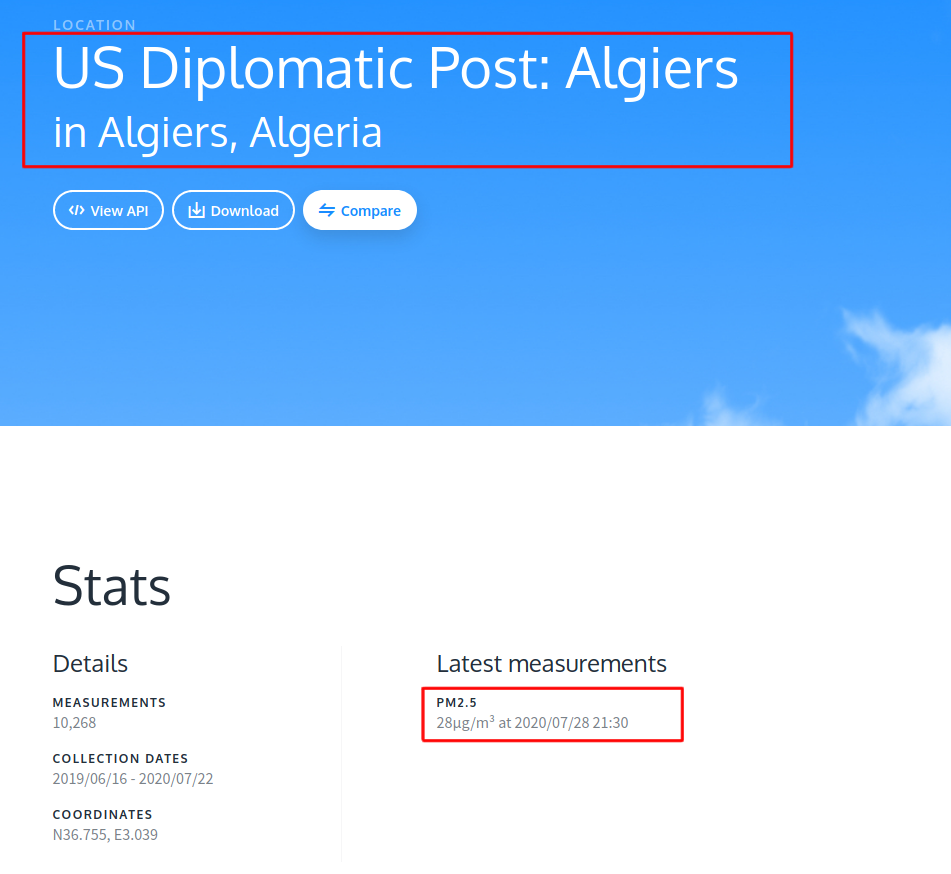
A sample page containing PM2.5 data is shown below. From this page, we can extract PM2.5 values, location, city, country, date and time of recording PM2.5 value using XPATH or CSS.
包含PM2.5數據的示例頁面如下所示。 在此頁面上,我們可以使用XPATH或CSS提取PM2.5值,位置,城市,國家,記錄PM2.5值的日期和時間。
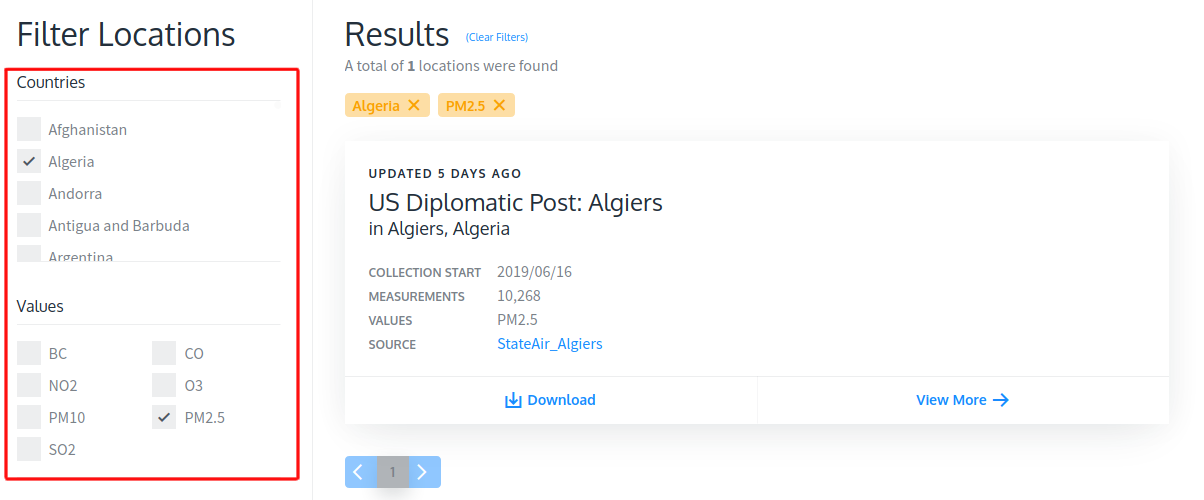
Similarly, the left-side panel can be used to filter out and collect URLs of all the locations that contain PM2.5 data. The following are the actions that we performed manually to collect the data.
同樣,左側面板可用于過濾和收集包含PM2.5數據的所有位置的URL。 以下是我們為收集數據而手動執行的操作。
Open https://openaq.org/#/locations
打開https://openaq.org/#/locations
- From the left-side panel, select/click checkbox of a country. Let us go through the countries alphabetically. 在左側面板中,選擇/單擊國家/地區的復選框。 讓我們按字母順序瀏覽各個國家。
- Also, from the left-side panel, select/click checkbox PM2.5. 另外,從左側面板中,選擇/單擊復選框PM2.5。
- Wait for the cards to load in the right-side panel. Each card would then open a new webpage when clicked to display PM2.5 and other data. 等待卡裝入右側面板。 單擊顯示PM2.5和其他數據后,每張卡都會打開一個新的網頁。
收集PM2.5數據所需的步驟 (Steps needed to collect PM2.5 data)
Based on the manual steps performed, data collection from http://openaq.org is broken down to 3 steps.
根據執行的手動步驟,從http://openaq.org收集數據分為3個步驟。
- Collecting country names as displayed on OpenAQ countries webpage. This would be used in selecting appropriate checkboxes while filtering. 收集OpenAQ國家網頁上顯示的國家名稱。 這將用于在過濾時選擇適當的復選框。
- Collecting URLs that contain PM2.5 data from each country. Some countries contain more than 20 PM2.5 readings collected from various locations. It would require further manipulation of the webpage, which is explained in the code section. 從每個國家/地區收集包含PM2.5數據的URL。 一些國家/地區包含從各個位置收集的20多個PM2.5讀數。 這將需要對網頁進行進一步的操作,這將在代碼部分中進行說明。
- Opening up webpages of the individual URL and extracting PM2.5 data. 打開單個URL的網頁并提取PM2.5數據。
刮取PM2.5數據 (Scraping PM2.5 data)
Now that we have the steps needed, let us start to code. The example is divided into 3 functions, each performing the task corresponding to the aforementioned 3 steps. The python code for this example can be found in my GitHub repository.
現在我們有了所需的步驟,讓我們開始編寫代碼。 該示例分為3個功能,每個功能對應于上述3個步驟。 該示例的python代碼可以在我的GitHub存儲庫中找到。
get_countries() (get_countries())
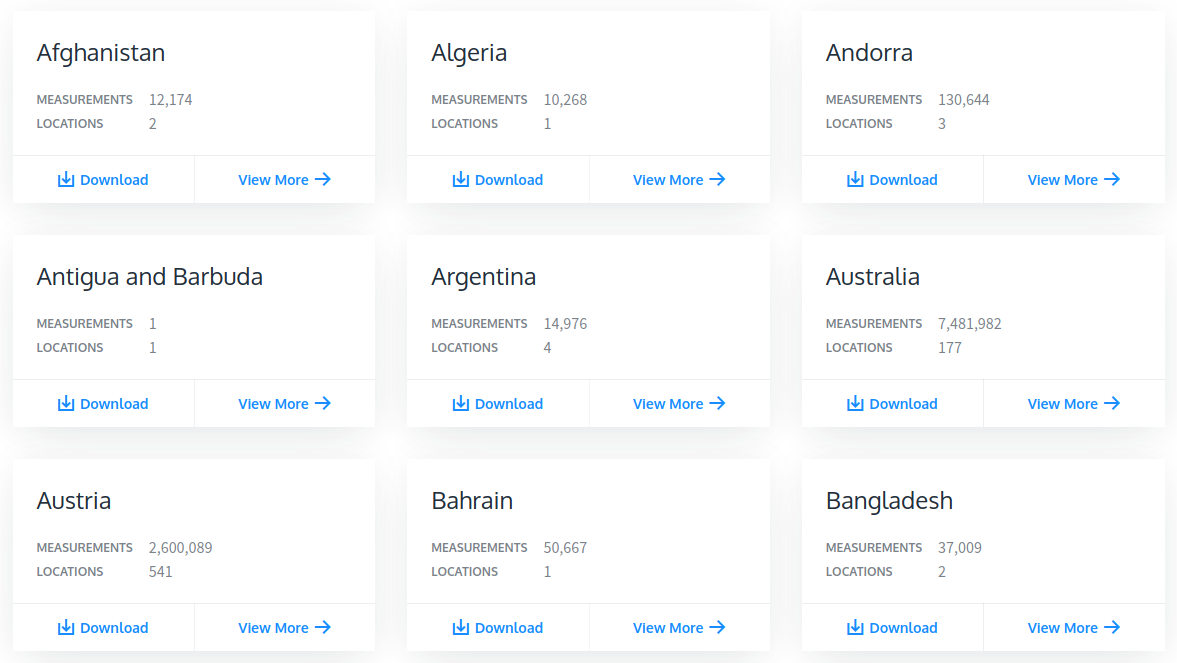
Instead of using OpenAQ locations webpage, there is https://openaq.org/#/countries webpage, which displays all the countries at once. It is easier to extract country names from this page.
https://openaq.org/#/countries網頁不是使用OpenAQ位置網頁,而是一次顯示所有國家/地區。 從此頁面提取國家/地區名稱比較容易。
from selenium import webdriver
from selenium.webdriver.common.by import By
from selenium.webdriver.support.ui import WebDriverWait
from selenium.webdriver.support import expected_conditions as EC
import jsondef get_countries():countries_list = []# driver = webdriver.Chrome() # To open a new browser window and navigate it# Use the headless option to avoid opening a new browser window
    options = webdriver.ChromeOptions()
    options.add_argument("headless")
    desired_capabilities = options.to_capabilities()
    driver = webdriver.Chrome(desired_capabilities=desired_capabilities)# Getting webpage with the list of countriesdriver.get("https://openaq.org/#/countries")# Implicit wait
    driver.implicitly_wait(10)# Explicit wait
    wait = WebDriverWait(driver, 5)
    wait.until(EC.presence_of_element_located((By.CLASS_NAME, "card__title")))

    countries = driver.find_elements_by_class_name("card__title")
    for country in countries:
        countries_list.append(country.text)driver.quit()# Write countries_list to json file
    with open("countries_list.json", "w") as f:
        json.dump(countries_list, f)
Let us understand how the code works. As always, the first step is to instantiate the webdriver. Here, instead of opening a new browser window, the webdriver is instantiated as a headless one. This way, a new browser window will not be opened and the burden on RAM would be reduced. The second step is to open the webpage containing the list of countries. The concept of wait is used in the above code.
讓我們了解代碼的工作原理。 與往常一樣,第一步是實例化webdriver。 在這里,無需打開新的瀏覽器窗口,而是將Webdriver實例化為無頭的窗口。 這樣,將不會打開新的瀏覽器窗口,并且將減輕RAM的負擔。 第二步是打開包含國家列表的網頁。 在上面的代碼中使用了wait概念。
Implicit Wait: When created, is alive until the WebDriver object dies. And is common for all operations. It instructs the webdriver to wait for a certain amount of time before elements load on the webpage.
隱式等待 :創建后,它一直存在,直到WebDriver對象死亡。 并且對于所有操作都是通用的。 它指示Web驅動程序在將元素加載到網頁上之前等待一定的時間。
Explicit Wait: Intelligent waits that are confined to a particular web element, in this case, tag with class name “card__title”. It is generally used along with
ExpectedConditions.顯式等待 :僅限于特定Web元素的智能等待,在這種情況下,標記為類名“ card__title”。 它通常與
ExpectedConditions一起使用。
The third step is to extract the country names using the tag with class name “card__title”. Finally, the country names are written to a JSON file for persistence. Below is a glimpse of the JSON file.
第三步是使用帶有類名“ card__title”的標簽提取國家名稱。 最后,將國家/地區名稱寫入JSON文件以實現持久性。 以下是JSON文件的概覽。
countries_list.json["Afghanistan", "Algeria", "Andorra", "Antigua and Barbuda", ... ]get_urls() (get_urls())
The next step after getting the list of countries is to get the URLs of every location that records PM2.5 data. To do this, we need to open the OpenAQ locations webpage and make use of the left-side panel to filter out countries and PM2.5 data. Once it is filtered, the right-side panel would be populated with cards to individual locations that record PM2.5 data. We extract the URLs corresponding to each of these cards and eventually write them to a file that would be used in the next step of extracting PM2.5 data. Some countries have more than 20 locations that record PM2.5 data. For example, Australia has 162 locations, Belgium has 69 locations, China has 1602 locations. For these countries, the right-side panel on locations webpage is subdivided into pages. It is highly imperative that we navigate through these pages and collect URLs of all the locations. The code below has a while TRUE: loop that performs this exact task of page navigation.
獲取國家列表后的下一步是獲取記錄PM2.5數據的每個位置的URL。 為此,我們需要打開OpenAQ位置網頁,并使用左側面板過濾掉國家和PM2.5數據。 過濾后,右側面板將在卡片上填充到記錄PM2.5數據的各個位置。 我們提取與每個卡相對應的URL,最后將它們寫入一個文件,該文件將在下一步提取PM2.5數據時使用。 一些國家/地區有20多個記錄PM2.5數據的位置。 例如,澳大利亞有162個地點,比利時有69個地點,中國有1602個地點。 對于這些國家/地區,位置網頁右側的面板可細分為頁面。 我們必須瀏覽這些頁面并收集所有位置的URL,這一點非常重要。 下面的代碼有while TRUE:循環,執行此頁面導航的確切任務。
from selenium import webdriver
from selenium.webdriver.common.by import By
from selenium.webdriver.support.ui import WebDriverWait
from selenium.webdriver.support import expected_conditions as EC
from selenium.webdriver.common.action_chains import ActionChains
from logzero import logger
import selenium.common.exceptions as exception
import time
import jsondef get_urls():# Load the countries list written by get_countries()
    with open("countries_list.json", "r") as f:
        countries_list = json.load(f)

    # driver = webdriver.Chrome()

    # Use headless option to not open a new browser window
    options = webdriver.ChromeOptions()
    options.add_argument("headless")
    desired_capabilities = options.to_capabilities()
    driver = webdriver.Chrome(desired_capabilities=desired_capabilities)urls_final = []
    for country in countries_list:# Opening locations webpage
        driver.get("https://openaq.org/#/locations")
        driver.implicitly_wait(5)
        urls = []# Scrolling down the country filter till the country is visible
        action = ActionChains(driver)
        action.move_to_element(driver.find_element_by_xpath("//span[contains(text()," + '"' + country + '"' + ")]"))
        action.perform()# Identifying country and PM2.5 checkboxes
        country_button = driver.find_element_by_xpath("//label[contains(@for," + '"' + country + '"' + ")]")
        values_button = driver.find_element_by_xpath("//span[contains(text(),'PM2.5')]")

        # Clicking the checkboxes
        country_button.click()
        time.sleep(2)
        values_button.click()
        time.sleep(2)while True:
            # Navigating subpages where there are more PM2.5 data. For example, Australia has 162 PM2.5 readings from 162 different locations that are spread across 11 subpages.locations = driver.find_elements_by_xpath("//h1[@class='card__title']/a")for loc in locations:
                link = loc.get_attribute("href")
                urls.append(link)try:
                next_button = driver.find_element_by_xpath("//li[@class='next']")
                next_button.click()
            except exception.NoSuchElementException:
                logger.debug(f"Last page reached for {country}")
                breaklogger.info(f"{country} has {len(urls)} PM2.5 URLs")
        urls_final.extend(urls)logger.info(f"Total PM2.5 URLs: {len(urls_final)}")
    driver.quit()# Write the URLs to a file
    with open("urls.json", "w") as f:
        json.dump(urls_final, f)
It is always a good practice to log the output of programs that tend to run longer than 5 minutes. For this purpose, the above code makes use of logzero. The output JSON file containing the URLs looks like this.
記錄運行時間超過5分鐘的程序的輸出始終是一個好習慣。 為此,上面的代碼使用了logzero 。 包含URL的輸出JSON文件如下所示。
urls.json[
    "https://openaq.org/#/location/US%20Diplomatic%20Post%3A%20Kabul",
    "https://openaq.org/#/location/Kabul",
    "https://openaq.org/#/location/US%20Diplomatic%20Post%3A%20Algiers",
    ...
]
get_pm_data() (get_pm_data())
The process of getting PM2.5 data from the individual location is a straight forward web scraping task of identifying the HTML tag containing the data and extracting it with text processing. The same happens in the code provided below. The code extracts the country, city, location, PM2.5 value, URL of the location, date and time of recording PM2.5 value. Since there are over 5000 URLs to be opened, there would be a problem with RAM usage unless the RAM installed is over 64GB. To make this program to run on machines with minimum 8GB of RAM, the webdriver is terminated and re-instantiated every 200 URLs.
從各個位置獲取PM2.5數據的過程是直接的Web抓取任務,即識別包含數據HTML標簽并通過文本處理將其提取。 在下面提供的代碼中也會發生同樣的情況。 該代碼提取國家,城市,位置,PM2.5值,位置的URL,記錄PM2.5值的日期和時間。 由于要打開的URL超過5000個,因此除非已安裝的RAM超過64GB,否則RAM的使用會出現問題。 為了使該程序在具有至少8GB RAM的計算機上運行,??將終止webdriver,并每200個URL重新實例化一次。
from selenium import webdriver
from selenium.webdriver.common.by import By
from selenium.webdriver.support.ui import WebDriverWait
from selenium.webdriver.support import expected_conditions as EC
from selenium.webdriver.common.action_chains import ActionChains
from logzero import logger
import selenium.common.exceptions as exception
import time
import jsondef get_pm_data():# Load the URLs list written by get_urls()
    with open("urls.json", "r") as f:
        urls = json.load(f)# Use headless option to not open a new browser window
    options = webdriver.ChromeOptions()
    options.add_argument("headless")
    desired_capabilities = options.to_capabilities()
    driver = webdriver.Chrome(desired_capabilities=desired_capabilities)list_data_dict = []
    count = 0for i, url in enumerate(urls):
        data_dict = {}# Open the webpage corresponding to each URL
        driver.get(url)
        driver.implicitly_wait(10)
        time.sleep(2)try:
            # Extract Location and City
            loc = driver.find_element_by_xpath("//h1[@class='inpage__title']").text.split("\n")
            logger.info(f"loc: {loc}")
            location = loc[0]
            city_country = loc[1].replace("in ", "", 1).split(",")
            city = city_country[0]
            country = city_country[1]
            data_dict["country"] = country
            data_dict["city"] = city
            data_dict["location"] = locationpm = driver.find_element_by_xpath("//dt[text()='PM2.5']/following-sibling::dd[1]").textif pm is not None:
                # Extract PM2.5 value, Date and Time of recording
                split = pm.split("μg/m3")
                pm = split[0]
                date_time = split[1].replace("at ", "").split(" ")
                date_pm = date_time[1]
                time_pm = date_time[2]
                data_dict["pm25"] = pm
                data_dict["url"] = url
                data_dict["date"] = date_pm
                data_dict["time"] = time_pmlist_data_dict.append(data_dict)
                count += 1except exception.NoSuchElementException:
            # Logging the info of locations that do not have PM2.5 data for manual checking
            logger.error(f"{location} in {city},{country} does not have PM2.5")# Terminating and re-instantiating webdriver every 200 URL to reduce the load on RAM
        if (i != 0) and (i % 200 == 0):
            driver.quit()
            driver = webdriver.Chrome(desired_capabilities=desired_capabilities)
            logger.info("Chromedriver restarted")# Write the extracted data into a JSON file
    with open("openaq_data.json", "w") as f:
        json.dump(list_data_dict, f)logger.info(f"Scraped {count} PM2.5 readings.")
    driver.quit()
The outcome of the program looks as shown below. The program has extracted PM2.5 values from 4114 individual locations. Imagine opening these individual webpages and manually extracting the data. It is times like this makes us appreciate the use of web scraping programs or bots, in general.
程序的結果如下所示。 該程序已從4114個單獨的位置提取了PM2.5值。 想象一下打開這些單獨的網頁并手動提取數據。 像這樣的時代使我們大體上喜歡使用網絡抓取程序或機器人。
openaq_data.json[
    {
        "country": " Afghanistan",
        "city": "Kabul",
        "location": "US Diplomatic Post: Kabul",
        "pm25": "33",
        "url": "https://openaq.org/#/location/US%20Diplomatic%20Post%3A%20Kabul",
        "date": "2020/07/31",
        "time": "11:00"
    },
    {
        "country": " Algeria",
        "city": "Algiers",
        "location": "US Diplomatic Post: Algiers",
        "pm25": "31",
        "url": "https://openaq.org/#/location/US%20Diplomatic%20Post%3A%20Algiers",
        "date": "2020/07/31",
        "time": "08:30"
    },
    {
        "country": " Australia",
        "city": "Adelaide",
        "location": "CBD",
        "pm25": "9",
        "url": "https://openaq.org/#/location/CBD",
        "date": "2020/07/31",
        "time": "11:00"
    },
    ...
]
結束語 (Closing remarks)
I hope this tutorial has given you the confidence to start web scraping with Selenium. The complete code of the example is available in my GitHub repository. In the next tutorial, I shall show you how to integrate Selenium with Scrapy.
我希望本教程使您有信心開始使用Selenium進行Web抓取。 該示例的完整代碼可在我的GitHub 存儲庫中找到 。 在下一個教程中 ,我將向您展示如何將Selenium與Scrapy集成。
Till then, Good Luck. Stay safe and happy learning.!
到那時,祝你好運。 保持安全愉快的學習!!
翻譯自: https://towardsdatascience.com/web-scraping-with-selenium-d7b6d8d3265a
selenium 解析網頁
本文來自互聯網用戶投稿,該文觀點僅代表作者本人,不代表本站立場。本站僅提供信息存儲空間服務,不擁有所有權,不承擔相關法律責任。 如若轉載,請注明出處:http://www.pswp.cn/news/388096.shtml 繁體地址,請注明出處:http://hk.pswp.cn/news/388096.shtml 英文地址,請注明出處:http://en.pswp.cn/news/388096.shtml
如若內容造成侵權/違法違規/事實不符,請聯系多彩編程網進行投訴反饋email:809451989@qq.com,一經查實,立即刪除!相關文章

)
代理ARP協議(Proxy ARP)

hive 導入hdfs數據_將數據加載或導入運行在基于HDFS的數據湖之上的Hive表中的另一種方法。

)
對Faster R-CNN的理解(1)

大數據業務學習筆記_學習業務成為一名出色的數據科學家

postman 請求參數為數組及JsonObject
對稱二叉樹 個人題解)
領扣(LeetCode)對稱二叉樹 個人題解

python 開發api_使用FastAPI和Python快速開發高性能API

Purley平臺Linpak測試,從踏坑開始一步步優化
——目錄結構)
基于easyui開發Web版Activiti流程定制器詳解(一)——目錄結構

HDOJ 2037:今年暑假不AC_大二寫
——文件列表)
基于easyui開發Web版Activiti流程定制器詳解(二)——文件列表

杭電oj2047-2049、2051-2053、2056、2058

Power BI:M與DAX以及度量與計算列

git 基本命令和操作
——頁面結構(上))
基于easyui開發Web版Activiti流程定制器詳解(三)——頁面結構(上)

bzoj 4300 絕世好題 —— 思路
——頁面結構(下))
基于easyui開發Web版Activiti流程定制器詳解(四)——頁面結構(下)
