自己一直學習計算機視覺方面的東西,現在想學習一下數據挖掘跟搜索引擎,自己基礎也有點薄弱,看朱明的那本數據挖掘,只能片面的了解這個數據挖掘。不過最近有一本書 機器學習實戰,于是乎通過實戰的形式了解一下基本的算法的執行過程。
在算法當中,很多都是相通的,模式識別、機器學習、數據挖掘、自然語言處理等等這些算法歸結起來其實差不了多少,題外話不多說了,好好學習。
k近鄰算法
對于這個算法,我用自己的話來描述一下,就是把一個未知數與所有已有的數據樣本求距離,對距離進行排序,取前k個數,這k這個數中,那個類別多,那這個未知數就屬于哪個類別。
不用說,大家也知道這個k的選取還是很重要的。先用書上最簡單的例子表述一下。
# -*- coding: utf-8 -*
from numpy import *
import operatordef createDataSet():group = array([[1.0,1.1],[1.0,1.0],[0,0],[0,0.1]])labels = ['A','A','B','B']return group, labelsdef classify0(inX, dataSet, labels, k):#行的個數也就是訓練集的個數dataSetSize = dataSet.shape[0]print ('dataSetSize:',dataSetSize)#tile表示將輸入向量inX在行方向上重復dataSetSize次,在列的方向上重復1次,具體就是構建一個跟訓練集對應的數組大小,相減就是為了求距離diffMat = tile(inX,(dataSetSize,1)) - dataSetprint('diffMat:',diffMat)sqDiffMat = diffMat**2print('sqDiffMat:',sqDiffMat)#sum默認axis=0為普通相加,axis=1為矩陣的每一個行向量相加sqDistances = sqDiffMat.sum(axis=1)print('sqDistances:',sqDistances)distances = sqDistances**0.5print('distances:',distances)sortedDistIndicies = distances.argsort()print('sortedDistIndicies:',sortedDistIndicies)#定義一個詞典classCount={}#range(k) 為[0,1,2....k-1]print('labels:',labels)for i in range(k):       voteIlabel = labels[sortedDistIndicies[i]]#獲得最小的k個長度#get 返回鍵值key對應的值;如果key沒有在字典里,則返回default參數的值,這邊default是0,功能計算每個標簽類別的個數classCount[voteIlabel] = classCount.get(voteIlabel,0) + 1#sorted 排序是產生一個新的列表,sort是在原有基礎上排序,key按第一個域進行排序,Ture為逆序print('classCount:',classCount)sortedClassCount = sorted(classCount.iteritems(),key=operator.itemgetter(1),reverse=True)print('sortedClassCount:',sortedClassCount)return sortedClassCount[0][0]
這邊我已經將要解釋的地方標識了。
下面就是運行,運行結果如下:
1: >>> import kNN 2: >>> group,labels = kNN.createDataSet() 3: >>> kNN.classify0([0,0],group,labels,3) 4: ('dataSetSize:', 4L)
5: ('diffMat:', array([[-1. , -1.1],
6: [-1. , -1. ], 7: [ 0. , 0. ], 8: [ 0. , -0.1]])) 9: ('sqDiffMat:', array([[ 1. , 1.21],
10: [ 1. , 1. ], 11: [ 0. , 0. ], 12: [ 0. , 0.01]])) 13: ('sqDistances:', array([ 2.21, 2. , 0. , 0.01]))
14: ('distances:', array([ 1.48660687, 1.41421356, 0. , 0.1 ]))
15: ('sortedDistIndicies:', array([2, 3, 1, 0], dtype=int64))
16: ('labels:', ['A', 'A', 'B', 'B'])
17: ('classCount:', {'A': 1, 'B': 2})
18: ('sortedClassCount:', [('B', 2), ('A', 1)])
19: 'B'
對照這個結果看上面的代碼應該都能夠看懂。
好,跟書上說得一樣,這個例子沒有實際的用處,于是書上給出了兩個實際的例子。一個是使用k-近鄰算法改進約會網站的配對效果。
算法過程,如書中:

這個例子給出了機器學習的一般過程
首先我們要知道我們要做什么,知道要做什么之后,我們要采集數據,數據采集完了之后,我們要將數據進行預處理。
1、因為我們采集過來的數據,可能面臨雜亂、重復、不完整等等原因,常見處理方法有數據集成、數據清洗、數據變換、數據歸約。
對于本例,認為數據是有效的,我們處理是數據變換,將數據變成分類器可以識別的格式。數據歸約將數據同一化,不然數據值大的就相當于權重大了,對處理有影響。
定義一個函數將文本轉換為數組
1: def file2matrix(filename): 2: fr = open(filename) 3: arrayOLines = fr.readlines() 4: numberOfLines = len(arrayOLines) 5: print('numberOfLines:',numberOfLines)
6: returnMat = zeros((numberOfLines,3)) 7: print('returnMat:',returnMat)
8: classLabelVector = [] 9: index = 0 10: for line in arrayOLines:
11: #沒有傳入參數時,是默認去除首尾空格
12: line = line.strip() 13: listFromLine = line.split('\t')
14: returnMat[index,:] = listFromLine[0:3] 15: classLabelVector.append(int(listFromLine[-1])) 16: index += 1 17: print('returnMat:',returnMat)
18: print('classLabelVector:',classLabelVector[0:20])
19: return returnMat,classLabelVector
20: 運行結果如下:
1: >>> reload(kNN) 2: <module 'kNN' from 'E:\Machine Learning\exercise\ch02\kNN.py'>
3: >>> datingDataMat,datingLabels = kNN.file2matrix('datingTestSet.txt')
4: ('numberOfLines:', 1000)
5: ('returnMat:', array([[ 0., 0., 0.],
6: [ 0., 0., 0.], 7: [ 0., 0., 0.], 8: ..., 9: [ 0., 0., 0.], 10: [ 0., 0., 0.], 11: [ 0., 0., 0.]])) 12: ('returnMat:', array([[ 4.09200000e+04, 8.32697600e+00, 9.53952000e-01],
13: [ 1.44880000e+04, 7.15346900e+00, 1.67390400e+00], 14: [ 2.60520000e+04, 1.44187100e+00, 8.05124000e-01], 15: ..., 16: [ 2.65750000e+04, 1.06501020e+01, 8.66627000e-01], 17: [ 4.81110000e+04, 9.13452800e+00, 7.28045000e-01], 18: [ 4.37570000e+04, 7.88260100e+00, 1.33244600e+00]])) 19: ('classLabelVector:', [3, 2, 1, 1, 1, 1, 3, 3, 1, 3, 1, 1, 2, 1, 1, 1, 1, 1, 2, 3])
在我們進行模型選擇的時候,我們可以通過圖形化數據的方式,這樣我們可以根據一定的經驗就知道應該使用什么樣的模型。
我們通過Matplotlib來顯示圖像,這個包的安裝,直接下載這個包就可以了,如果提示你缺少什么包,補齊就好了。
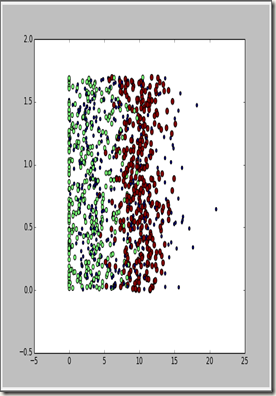
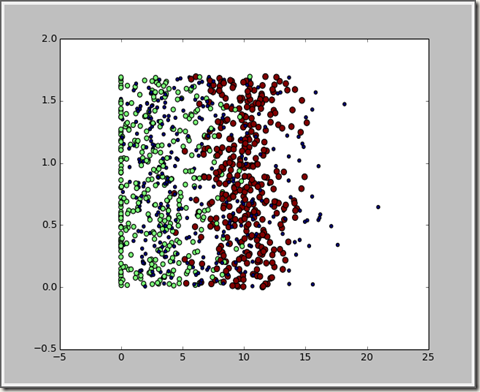
根據作者使用,我們畫出玩視頻游戲所消耗的時間百分比 與每周所消費的冰淇淋公升數
1: >>> import matplotlib 2: >>> import matplotlib.pyplot as plt 3: >>> fig = plt.figure() 4: >>> ax = fig.add_subplot(111)//這邊111表示把繪圖區域分成1行*1列共1個區域,然后在區域1上創建一個軸對象 5: >>> ax.scatter(datingDataMat[:,1],datingDataMat[:,2])//scatter表示散點圖 6: <matplotlib.collections.PathCollection object at 0x00000000064DD128> 7: >>> plt.show() 
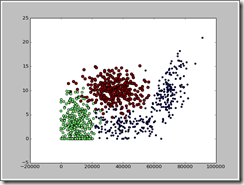
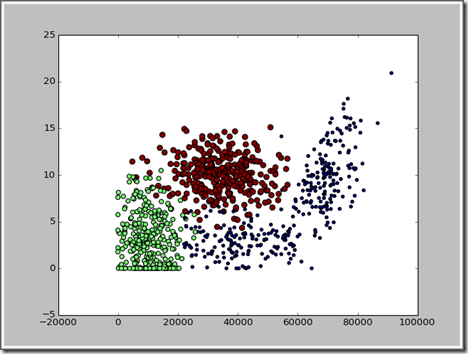
對于這個圖很難看出有用的東西,用顏色進行標識,如下圖:
1: ax.scatter(datingDataMat[:,1],datingDataMat[:,2],15.0*array(datingLabels),15.0*array(datingLabels)) 
換一下屬性,x軸用每年獲取的飛行常客里程數表示,則三類分的就比較明顯了。

下面就是歸一化,不歸一化,值大的相當于權重就大,而權重的大小是應該我們去添加的,不是由值的大小來
對于歸一化,我們一般有三種處理方法。
1、[(原值-最小值)/(最大值-最小值)]*(新的最大值-新的最小值)+新的最小值。
2、(原值-均值)/標準差
3、小數的規范化,就是移動小數點位,歸化到0-1之間
我們就采用的是第一種方式,這邊我們新的最大值是1,最小值是0.我們的歸一化就是:
[(原值-最小值)/(最大值-最小值)]
1: def autoNorm(dataSet): 2: minVals = dataSet.min(0) 3: maxVals = dataSet.max(0) 4: print('minVals:',minVals)
5: print('maxVals:',maxVals)
6: ranges = maxVals - minVals 7: normDataSet = zeros(shape(dataSet)) 8: m = dataSet.shape[0] 9: print('m:',m)
10: normDataSet = dataSet - tile(minVals,(m,1)) 11: normDataSet = normDataSet/tile(ranges,(m,1)) 12: return normDataSet,ranges,minVals
13: 執行結果
1: >>> reload(kNN) 2: <module 'kNN' from 'E:\Machine Learning\exercise\ch02\kNN.py'>
3: >>> normMat,ranges,minVals = kNN.autoNorm(datingDataMat) 4: ('minVals:', array([ 0. , 0. , 0.001156]))
5: ('maxVals:', array([ 9.12730000e+04, 2.09193490e+01, 1.69551700e+00]))
6: ('m:', 1000L)
7: >>> normMat 8: array([[ 0.44832535, 0.39805139, 0.56233353], 9: [ 0.15873259, 0.34195467, 0.98724416], 10: [ 0.28542943, 0.06892523, 0.47449629], 11: ..., 12: [ 0.29115949, 0.50910294, 0.51079493], 13: [ 0.52711097, 0.43665451, 0.4290048 ], 14: [ 0.47940793, 0.3768091 , 0.78571804]]) 15: >>> ranges 16: array([ 9.12730000e+04, 2.09193490e+01, 1.69436100e+00]) 17: >>> minVals 18: array([ 0. , 0. , 0.001156]) 為了評估算法,我們將數據分成訓練集和測試集,通常用70%的數據作為訓練集,用剩下30%的數據作為測試集。很重要的一點是訓練集和測試集均要含有各種類型的數據,通常我們要對數據進行“洗牌”,然后再分成訓練集和測試集。
下面進行測試
1: def datingClassTest(): 2: hoRatio = 0.10 3: datingDataMat,datingLabels = file2matrix('datingTestSet.txt')
4: normMat,ranges,minVals = autoNorm(datingDataMat) 5: m = normMat.shape[0] 6: numTestVecs = int(m*hoRatio) 7: errorCount = 0.0 8: for i in range(numTestVecs):
9: #這邊的意思是拿前10%的數據作為測試,后90%的數據是訓練樣本
10: classifierResult = classify0(normMat[i,:],normMat[numTestVecs:m,:],datingLabels[numTestVecs:m],5) 11: print "the classifier came back with:%d,the real answer is: %d" %(classifierResult,datingLabels[i])
12: if(classifierResult !=datingLabels[i]):
13: errorCount +=1.0 14: print "the total error rate is :%f" %(errorCount/float(numTestVecs))
得到的結果
1: >>> import kNN 2: >>> kNN.datingClassTest() 3: the classifier came back with:3,the real answer is: 3
4: the classifier came back with:2,the real answer is: 2
5: the classifier came back with:1,the real answer is: 1
6: 。。。。。。 7: the classifier came back with:3,the real answer is: 3
8: the classifier came back with:3,the real answer is: 3
9: the classifier came back with:2,the real answer is: 2
10: the classifier came back with:2,the real answer is: 1
11: the classifier came back with:1,the real answer is: 1
12: the total error rate is :0.040000
這個結果還好,我這邊設置的k為5,k的變化結果也會變化,所有怎么選擇這個k也是值得研究的。
最后為了適合系統的使用變得直觀一點,寫下如下函數:
1: def classifyPerson(): 2: resultList = ['not at all','in small doses','in large doses']
3: percentTats = float(raw_input("percentage of time spent playing video games?"))
4: ffMiles = float(raw_input("frequent flier miles earned per year?"))
5: iceCream = float(raw_input("liters of ice cream consumed per year?"))
6: datingDataMat,datingLabels = file2matrix('datingTestSet.txt')
7: normMat,ranges,minVals = autoNorm(datingDataMat) 8: inArr = array([ffMiles,percentTats,iceCream]) 9: classifierResult = classify0((inArr-minVals)/ranges,normMat,datingLabels,3) 10: #這邊減1是由于最后分類的數據是1,2,3對應到數組中是0,1,2
11: print "You will probably like this person: ",resultList[classifierResult -1]
運行結果如下:
1: >>> import kNN 2: >>> kNN.classifyPerson() 3: percentage of time spent playing video games?11 4: frequent flier miles earned per year?11111 5: liters of ice cream consumed per year?0.6 6: You will probably like this person: in large doses
7: >>> kNN.classifyPerson() 8: percentage of time spent playing video games?10 9: frequent flier miles earned per year?10000 10: liters of ice cream consumed per year?0.5 11: You will probably like this person: in small doses
下一個demo是手寫識別系統,書中為了簡化只設別0-9的數字。
作者這邊是將圖像數據轉化成向量
寫下如下函數:
1: #把圖像文本數據存入returnVect
2: def img2vector(filename): 3: #圖像像素是32*32
4: returnVect = zeros((1,1024)) 5: fr = open(filename) 6: for i in range(32):
7: lineStr = fr.readline() 8: for j in range(32):
9: returnVect[0,32*i+j] = int(lineStr[j]) 10: return returnVect
運行查看如下:
1: >>> import kNN 2: >>> kNN.img2vector('testDigits/0_13.txt')
3: array([[ 0., 0., 0., ..., 0., 0., 0.]]) 4: >>> testVector = kNN.img2vector('testDigits/0_13.txt')
5: >>> testVector[0,0:31] 6: array([ 0., 0., 0., 0., 0., 0., 0., 0., 0., 0., 0., 0., 0., 7: 0., 1., 1., 1., 1., 0., 0., 0., 0., 0., 0., 0., 0., 8: 0., 0., 0., 0., 0.]) 分類函數已經有,下面就是測試模型
1: def handwritingClassTest(): 2: hwLabels = [] 3: #獲取文件目錄
4: trainingFileList = listdir('trainingDigits')
5: m = len(trainingFileList) 6: trainingMat = zeros((m,1024)) 7: for i in range(m):
8: fileNameStr = trainingFileList[i] 9: #得到數組如[0_12,txt],[0]是第一個數據0_12
10: fileStr = fileNameStr.split('.')[0]
11: #得到數組如[0,12]獲得第一個數[0],從這邊看出文件名還是有很大作用的。
12: classNumStr = int(fileStr.split('_')[0])
13: hwLabels.append(classNumStr) 14: trainingMat[i,:] = img2vector('trainingDigits/%s' % fileNameStr)
15: testFileList = listdir('testDigits')
16: errorCount = 0.0 17: mTest = len(testFileList) 18: for i in range(mTest):
19: fileNameStr = testFileList[i] 20: fileStr = fileNameStr.split('.')[0]
21: classNumStr = int(fileStr.split('_')[0])
22: vectorUnderTest = img2vector('testDigits/%s' % fileNameStr)
23: classifierResult = classify0(vectorUnderTest, trainingMat, hwLabels, 3) 24: print "the classifier came back with: %d, the real answer is: %d" % (classifierResult, classNumStr)
25: if (classifierResult != classNumStr): errorCount += 1.0
26: print "\nthe total number of errors is: %d" % errorCount
27: print "\nthe total error rate is: %f" % (errorCount/float(mTest))
最后得到的結果
1: >>> import kNN 2: >>> kNN.handwritingClassTest() 3: the classifier came back with: 0, the real answer is: 0
4: the classifier came back with: 0, the real answer is: 0
5: 。。。。。。 6: the classifier came back with: 9, the real answer is: 9
7: the classifier came back with: 9, the real answer is: 9
8: the classifier came back with: 9, the real answer is: 9
9: the classifier came back with: 9, the real answer is: 9
10: ? 11: the total number of errors is: 11
12: ? 13: the total error rate is: 0.011628
錯誤率還是很低的,這個模型是可行的。最后作者給出k近鄰算法的不足。k近鄰算法必須保存全部數據集,訓練集大的話,占用存儲空間大,由于要對每個數據計算距離是浮點型計算,計算量大。
另外相似性的判斷是根據歐式距離來的,這樣如果計算歐式距離的屬性中如果有無關屬性或者噪音數據比較多的話,那這個測量的距離就不是真正的距離,誤差較大。解決辦法有給重要屬性的權重加大。
剛學習Python,主要以看代碼,自己照著敲代碼,思考了一下整個思路,了解了基本的Python語法。
下面繼續學習決策樹。

![[No000003]現代版三十六計,計計教你如何做人](http://pic.xiahunao.cn/[No000003]現代版三十六計,計計教你如何做人)


 安全)


)
:圖中樹的定義amp;各類型樹的特征分析...)

)
)
學習筆記七——多層框架定位與智能等待)
?)


