類風格:
// 父類
function Widget(width, height) {this.width = width || 50;this.height = height || 50;this.$elem = null;
}
Widget.prototype.render = function($where) {if(this.$elem) {this.$elem.css({width: this.width + "px",height: this.height + "px"}).appendTo($where);}
};// 子類
function Button(width, height, label) {// 調用父類(Widget)的構造函數Widget.call(this, width, height);this.label = label || "Default";this.$elem = $("<button>").text(this.label);
}// 讓Button"繼承"Widget(Button可以使用Widget原型上的方法,本例中是render方法)
Button.prototype = Object.create(Widget.prototype);// 重寫render
Button.prototype.render = function($where) {// 調用父類(Widget)的render方法Widget.prototype.render.call(this, $where); this.$elem.click(this.onClick.bind(this)); // 監聽點擊事件
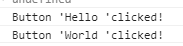
};Button.prototype.onClick = function(evt) {console.log("Button '" + this.label + " 'clicked!" );
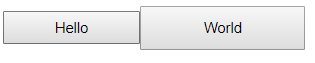
};$(document).ready(function() {var $body = $(document.body);var btn1 = new Button(125, 30, "Hello" );var btn2 = new Button(150, 40, "World");btn1.render($body);btn2.render($body);
});// 注:用到了jquery故需要導入cdn <script src="https://cdn.bootcss.com/jquery/3.4.1/jquery.js"></script>
上述代碼,首先定義了一個Widget的父類,然后使用使用在constructor中使用call方法(作用域綁定到當前)調用父類Widget的初始化…并添加了一個新的$elem(即Butoon標簽).
在Button的原型上,使用Object.create()方法繼承父類的原型方法(render).并新增了一個(按鈕特有的)點擊功能.
說明:上面是一個仿照類實現的方法,其實就是使用Widget.call 和Widget.prototype.render.call在Button函數中調用Widget…
用書上的原話說就是…丑陋的顯示多態
ES6的class語法糖實現:
class Widget{constructor(width, height) {this.width = width || 50;this.heigth = height || 50;this.$elem = null;}// 很巧妙的render...render($where) {if(this.$elem) {this.$elem.css({width: this.width + "px",height: this.height + "px"}).appendTo($where);}}
}
class Button extends Widget{constructor(width, height, label) {super( width, height);this.label = label || "Default";this.$elem = $("<button>").text(this.label);  // 生成一個<button> 內容是label}render($where) {  // $where 是調用時傳入的參數super.render($where);   // 調用父類Widget的renderthis.$elem.click(this.onClick.bind(this));}onClick(evt) {console.log("Button ' " + this.label + " ' clicked!");}
}
$(document).ready(function(){var $body = $(document.body);var btn1 = new Button(125, 30, "Hello" );var btn2 = new Button(150, 40, "World" );btn1.render($body);btn2.render($body);})
//說明: 關鍵是super替代了偽類中的call方法...變得更簡潔(at least看上去是這樣...)
委托控件對象:
var Widget = {init: function(width, height){this.width =width || 50;this.height = height || 50;this.$elem = null;},insert: function($where) {if(this.$elem){this.$elem.css({width: this.width + "px",height: this.heigth + "px"}).appenTo($where);}}
};
// 還是定義一個Widget對象,, 使用委托(Object.create)順著原型鏈[[prototype]]由下而上讀取方法
var Button = Object.create(Widget);Button.setup = function(width, height, label) {this.init(width, height);  // Button無init方法,順著原型鏈找到了Widget中的init.this.label = label || "Default";this.$elem = $('<button>').text(this.label);
};
Button.build = function($where) {this.insert($where);this.$elem.click(this.onClick.bind(this));  // this.onClick實際上是Button.onClick
};
Button.onClick = function(evt) {console.log("Button '" + this.label + "' clicked!" );
};
$(document).ready(function(){var $body = $(document.body);var btn1 = Object.create(Button);btn1.setup(123, 30, 'Hello');var btn2 = Object.create(Button);btn2.setup(150, 40, 'World');btn1.build($body);btn2.build($body);
});
// 很美的方式
參考《你不知道的JavaScript》(上卷) P174 ~P177


![[Usaco2010 Nov]Visiting Cows](http://pic.xiahunao.cn/[Usaco2010 Nov]Visiting Cows)


)


