原理
泛洪填充算法和分水嶺算法是圖像處理中的兩種重要算法,主要用于區域分割,但它們的原理和應用場景有所不同,但是他們的基礎思想都是基于區域迭代實現的區域之間的劃分。
泛洪算法
泛洪填充算法(Flood Fill)是一種經典的圖像處理算法,用于確定和標記與給定點連接的區域,通常在圖像填充、分割、邊界檢測等方面應用廣泛。為了更直觀地理解泛洪填充算法,我們可以通過一系列生動的圖像和步驟來介紹其工作原理。
假設我們有一個二維圖像,每個像素可以有不同的顏色或灰度值。泛洪填充算法的目標是從某個起始像素開始,填充所有與其相連且具有相同顏色的像素。常見的應用包括圖像編輯中的填充工具(如油漆桶工具)和迷宮求解等。
算法流程
以下是泛洪填充算法的基本步驟,配合圖像說明:
-
選擇起始點和目標顏色:
- 選擇圖像中的一個起始像素點(如鼠標點擊的位置),記作 (x, y)。
- 確定要填充的目標顏色。
-
初始化隊列:
- 將起始點 (x, y) 加入隊列。
-
處理隊列:
當隊列不為空時,重復以下步驟:- 從隊列中取出一個像素點 (cx, cy)。
- 如果 (cx, cy) 的顏色等于目標顏色,則進行填充。
- 將 (cx, cy) 的四個鄰居(上、下、左、右)加入隊列(如果這些鄰居還沒有被處理過且顏色等于目標顏色)。

分水嶺算法
分水嶺算法是一種基于形態學和拓撲學的圖像分割技術。它將圖像視為一個拓撲地形,通過標記圖像的不同區域(例如山脈和盆地)進行分割。分水嶺算法的基本思想是通過模擬雨水從山頂流向盆地的過程,確定圖像中不同區域的邊界。
分水嶺迭代過程:
- 把梯度圖像中的所有像素按照灰度值進行分類,并設定一個測地距離閾值。
- 找到灰度值最小的像素點(默認標記為灰度值最低點),讓threshold從最小值開始增長,這些點為起始點。
- 水平面在增長的過程中,會碰到周圍的鄰域像素,測量這些像素到起始點(灰度值最低點)的測地距離,如果小于設定閾值,則將這些像素淹沒,否則在這些像素上設置大壩,這樣就對這些鄰域像素進行了分類。
- 隨著水平面越來越高,會設置更多更高的大壩,直到灰度值的最大值,所有區域都在分水嶺線上相遇,這些大壩就對整個圖像像素的進行了分區。
實際應用時常結合其他預處理,來實現前后景的分割:
算法流程
-
梯度計算: 首先計算圖像的梯度,梯度可以使用 Sobel 算子或其他方法計算。梯度圖像反映了圖像中像素值變化的幅度。
其中,𝐼?是原始圖像,𝐺是梯度圖像。
-
標記區域: 對圖像進行標記,將前景對象和背景標記出來。可以使用形態學操作來獲取這些標記。
-
確定前景:使用距離變換和閾值化來確定前景區域。
-
確定背景:通過膨脹操作擴展前景區域,從而確定背景區域。
-
-
確定未知區域: 未知區域是背景和前景的差集。
-
連接組件標記: 對前景區域進行連通組件標記,每個連通組件代表一個獨立的前景對象。
-
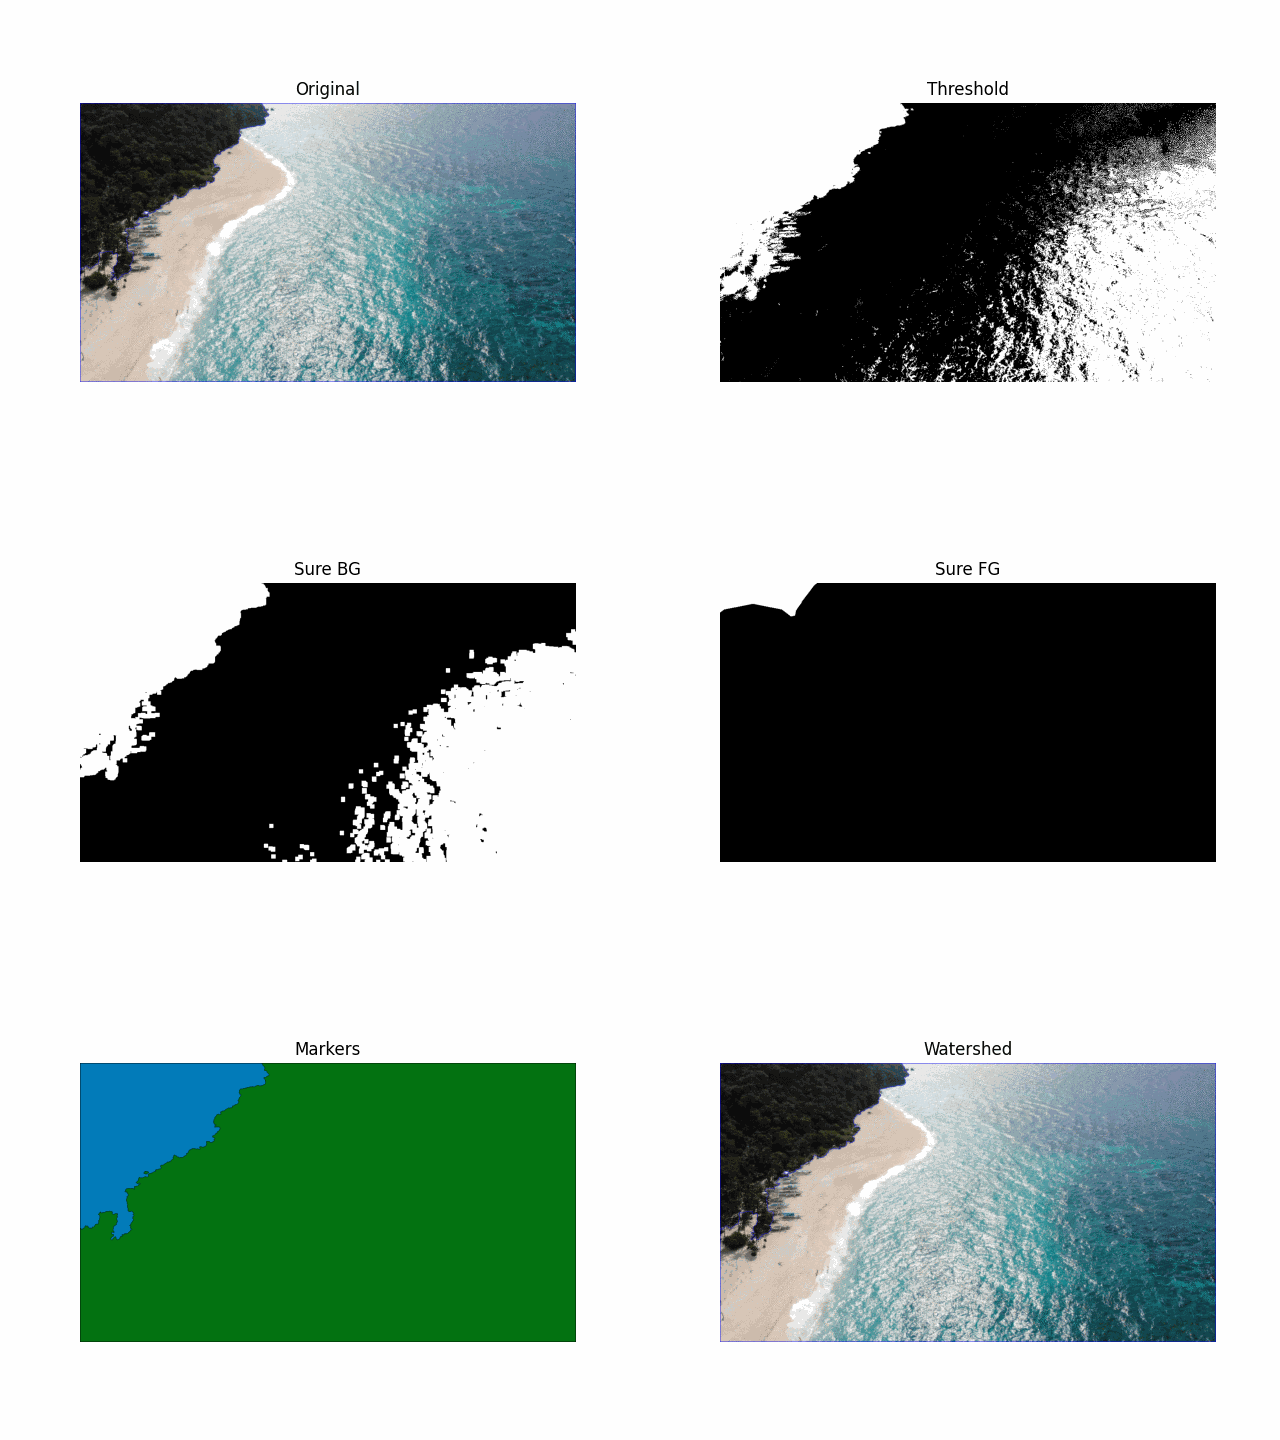
分水嶺變換: 使用分水嶺變換對梯度圖像進行處理,分割圖像中的不同區域。
分水嶺變換后,標記圖像的邊界區域將被標記為 -1。
API介紹
floodfill
int cv::floodFill	(	InputOutputArray 	image,   //輸入圖像InputOutputArray 	mask,                        //輸入輸出的maksPoint 	seedPoint,                               //種子點Scalar 	newVal,                                  //信的Rect * 	r    ect = , 0                           // 存儲填充區域的邊界Scalar 	loDiff = , Scalar()                      // 允許填充的像素值差的下屆Scalar 	upDiff = , Scalar()                      // 允許填充的像素值差的上屆int 	flags = 4                                // 4聯通或8聯通
)
import cv2
import numpy as np
import matplotlib.pyplot as plt
def main():# 加載圖像image_path = 'D:\code\src\code\lena.jpg' # 替換為你的圖像路徑image = cv2.imread(image_path)if image is None:print("Error: Unable to load image.")return# 定義種子點和新顏色seed_point = (30, 30) # 替換為你希望的種子點 (x, y)new_color = (0, 0, 255) # 新顏色為綠色 (B, G, R)# 創建掩碼,比原圖多出兩行兩列mask = np.zeros((image.shape[0] + 2, image.shape[1] + 2), np.uint8)# 設置差值范圍lo_diff = (10, 10, 10)up_diff = (10, 10, 10)image_src = image.copy()# 執行泛洪填充flags = 4 # 4-連通num, im, mask, rect = cv2.floodFill(image, mask, seed_point, new_color, lo_diff, up_diff, flags)# 顯示填充后的圖像plt.subplot(131),plt.imshow(image_src[...,::-1]),plt.title('Source Image'), plt.xticks([]), plt.yticks([])plt.subplot(132),plt.imshow(mask[...,::-1]),plt.title('Mask Image'), plt.xticks([]), plt.yticks([])plt.subplot(133),plt.imshow(image[...,::-1]),plt.title('Filled Image'), plt.xticks([]), plt.yticks([])plt.show()if __name__ == '__main__':main()
watermeshed
cv::watershed	(	InputArray 	image,  //輸入圖像
InputOutputArray 	markers             //輸入出的標記
)
//即根據傳入的確信區域以及原圖,經過分水嶺迭代后,得到的確信區域
import cv2
import numpy as np
import matplotlib.pyplot as plt
import imageiodef plot_image(image, title, save_path):plt.imshow(cv2.cvtColor(image, cv2.COLOR_BGR2RGB))plt.title(title)plt.axis('off')plt.savefig(save_path)plt.close()def save_gif(frames, filename, duration=0.5):imageio.mimsave(filename, frames, duration=duration)def watershed_segmentation(image_path):# Read the imageimage = cv2.imread(image_path)gray = cv2.cvtColor(image, cv2.COLOR_BGR2GRAY)# Apply thresholdingret, thresh = cv2.threshold(gray, 0, 255, cv2.THRESH_BINARY_INV + cv2.THRESH_OTSU)# Noise removal with morphological operationskernel = np.ones((3, 3), np.uint8)opening = cv2.morphologyEx(thresh, cv2.MORPH_OPEN, kernel, iterations=2)# Sure background areasure_bg = cv2.dilate(opening, kernel, iterations=3)# Finding sure foreground areadist_transform = cv2.distanceTransform(opening, cv2.DIST_L2, 5)ret, sure_fg = cv2.threshold(dist_transform, 0.7 * dist_transform.max(), 255, 0)# Finding unknown regionsure_fg = np.uint8(sure_fg)unknown = cv2.subtract(sure_bg, sure_fg)# Marker labellingret, markers = cv2.connectedComponents(sure_fg)# Add one to all labels so that sure background is not 0, but 1markers = markers + 1# Now, mark the region of unknown with zeromarkers[unknown == 255] = 0# Apply watershedmarkers = cv2.watershed(image, markers)image[markers == -1] = [255, 0, 0] # Mark boundaries with red color# Collect frames for GIFframes = []for step in ['Original', 'Threshold', 'Morph Open', 'Sure BG', 'Sure FG', 'Unknown', 'Markers', 'Watershed']:if step == 'Original':frame = image.copy()elif step == 'Threshold':frame = cv2.cvtColor(thresh, cv2.COLOR_GRAY2BGR)elif step == 'Morph Open':frame = cv2.cvtColor(opening, cv2.COLOR_GRAY2BGR)elif step == 'Sure BG':frame = cv2.cvtColor(sure_bg, cv2.COLOR_GRAY2BGR)elif step == 'Sure FG':frame = cv2.cvtColor(sure_fg, cv2.COLOR_GRAY2BGR)elif step == 'Unknown':frame = cv2.cvtColor(unknown, cv2.COLOR_GRAY2BGR)elif step == 'Markers':frame = np.zeros_like(image)for i in range(1, ret + 1):frame[markers == i] = np.random.randint(0, 255, size=3)elif step == 'Watershed':frame = image.copy()frame_path = f"{step.lower().replace(' ', '_')}.png"plot_image(frame, step, frame_path)frames.append(imageio.imread(frame_path))return frames# Main execution
image_path = 'D:\code\src\code\R-C.png' # Replace with your image path
frames = watershed_segmentation(image_path)
save_gif(frames, 'watershed.gif', duration=1000)

參考鏈接
OpenCV(26)圖像分割 -- 距離變換與分水嶺算法(硬幣檢測、撲克牌檢測、車道檢測)_分水嶺算法分割咖啡豆-CSDN博客
圖像處理之漫水填充算法(flood fill algorithm)-騰訊云開發者社區-騰訊云 (tencent.com)
【OpenCV(C++)】分水嶺算法_opencv分水嶺c++-CSDN博客


)
![vue-el-steps 使用2[代碼示例]](http://pic.xiahunao.cn/vue-el-steps 使用2[代碼示例])


)
+ labelimg的使用(數據標準))

![[數據集][目標檢測]獼猴桃檢測數據集VOC+YOLO格式1838張1類別](http://pic.xiahunao.cn/[數據集][目標檢測]獼猴桃檢測數據集VOC+YOLO格式1838張1類別)